
Image Credit: All photos: Brian Post and Kyra Salancy
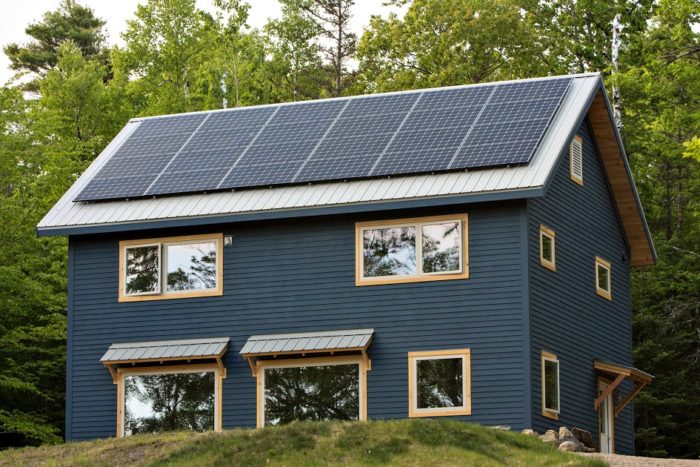
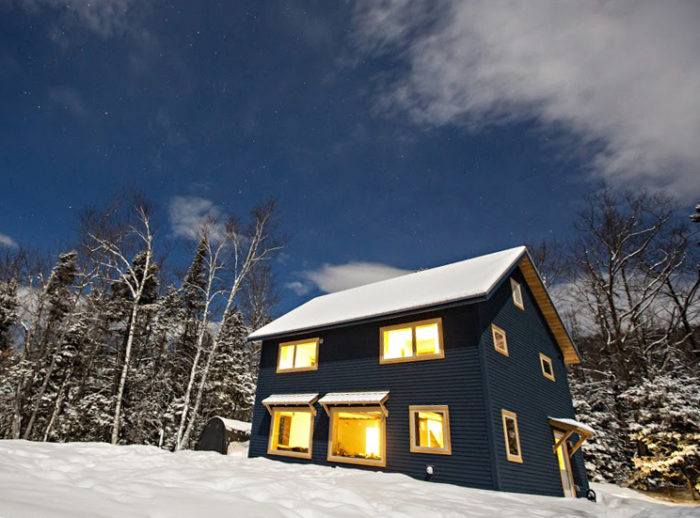
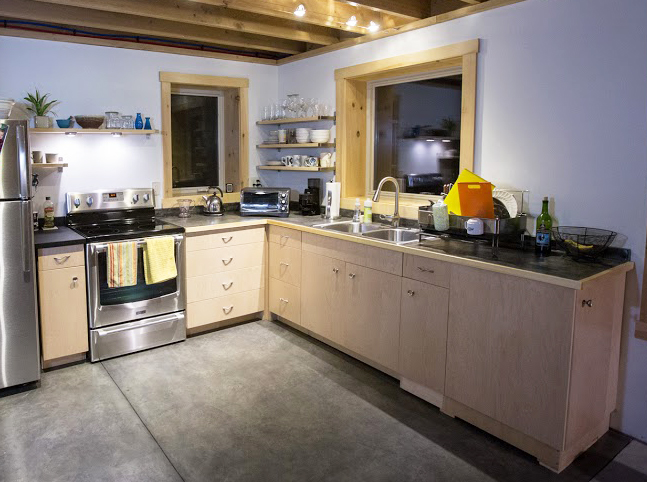
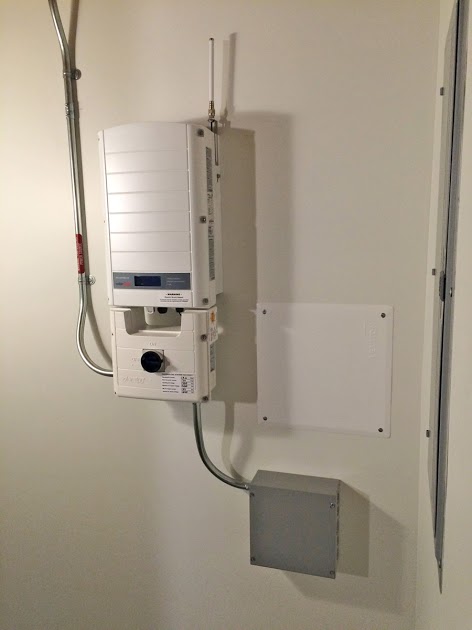
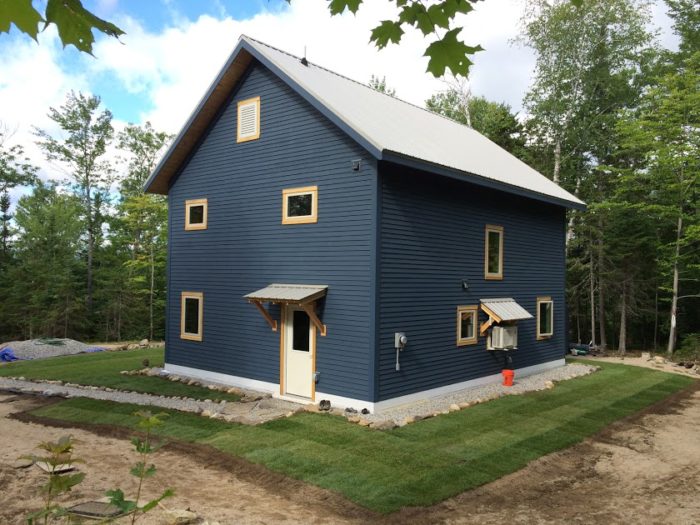
Image Credit: All photos: Brian Post and Kyra Salancy The exterior of the house in early winter 2015, after fresh snow. The blower door results: 0.38 ach50. Our radon level was higher than we expected, but did drop closer to 6 pCi/L when we started running our ventilation system 24/7. The guard rail is made of Eastern white pine and stainless-steel cables. When this photo was taken, we still needed to complete some minor finish work on the 6x6 pine posts. This is a LG combination washer/dryer. It’s a condensing dryer, so there is no need for an exhaust duct. Kyra applying and smoothing out the last coat of Deco-Poz. The Deco-Poz countertop after staining but before sealing. Our kitchen appliance setup: no dishwasher, no range hood, standard electric range, and basic/efficient top freezer fridge. We are wired for a range hood, but decided it wouldn’t be necessary with our light cooking habits. The countertops are done and have many coats of sealer. The SolarEdge inverter was installed in an entry area. We didn’t plan ahead by installing conduit for the solar array, but the installation was easy: the electricians used the open hemlock joists and went through a closet into the attic. We installed a zone of sod around the house. The rest of the lot will be more wild, with a mix of grass and wildflowers. Is this a glimpse into a future? A snowless December 25, 2015, in the White Mountains of New Hampshire.
More Guest Blogs


Editor’s note: This is the fifth in a series of blogs chronicling the design and construction of a house owned by Brian Post and Kyra Salancy. The first blog in the series was titled Building a Small House in the White Mountains.
Living in a house with no functioning kitchen involved many microwave meals, using a sheet of plywood over sawhorses as a table, and washing dishes in the bathroom sink. We got used to it and will look back fondly at the early days living in our house. Many people warned us not to move in while the house was still under construction, but we stayed pretty disciplined on completing tasks.
On the exterior, the house was looking really cool in the snow, especially on moonlit nights (see Image #2, below).
Energy Star Homes certification
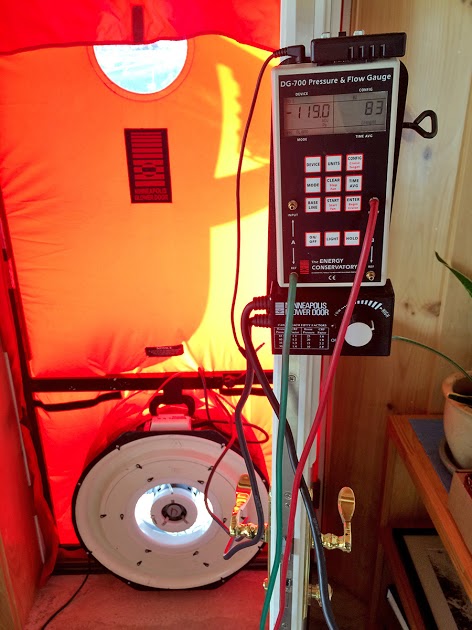
In early February 2015 we had our final Energy Star inspection, which included the final blower door test (see Image #3, below). The air leakage rate was 83 cfm at 50 Pascals (0.38 ACH at 50 Pascals). This means the house is very well air sealed. According to the HERS rater (who has tested over 600 homes), our house was “possibly the tightest house I’ve ever measured.”
Building science geeks and homeowners can get really obsessed with blower door results. It’s a fun number to pay attention to… but in the end is just one of many measurements that can help energy efficiency.
According to the final Energy Star report, the house received a HERS Index of 38 and a “5 Stars Plus” rating under Energy Star Version 3 — although there was a mistake in the report stating that we had a heat-pump water heater. (In fact, we just have a standard electric-resistance model.)
I mentioned this to the HERS rater and he said that would impact our HERS Index by 3 to 5 points, so our realistic Index is in the low 40s. Regardless, we had a positive experience with the Energy Star program and received almost $4,000 in rebates.
In other good testing news, we received a water report back from the lab and all numbers were well within EPA limits. After all the well drilling stress and large expense of the water system, at least we weren’t getting poisoned.
Radon levels are high
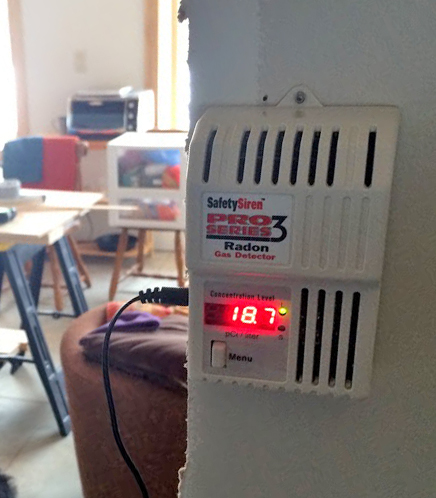
Of course, when it comes to building a house, all the testing news can’t be good. I plugged in the Safety Siren Pro radon monitor on the first floor in early March and the first readings (after two days of collecting data) were well above the EPA’s action guideline of 4 pCi/L (see Image #4, below). In fact, the first reading was 24.6 pCi/L.
I think this was partially because the monitor was located in a back room with no ventilation and we weren’t running our ventilation 24/7 because we didn’t think it was necessary. We immediately started running one of our bath fans at 30 cfm around the clock, and the number dropped to close to 6 pCi/L after a couple of weeks. I had to move the monitor around because of continued finish work, but as of January 2016, we’re finding that:
- Spring through fall levels are under 4 pCi/L and less than 2 pCi/L during periods of nice weather when windows are open a lot.
- In winter, when the house is usually closed up, radon levels range from 4 to 6 pCi/L.
I’m currently (January 2016) monitoring radon levels on both floors with Corentium radon monitors. We’ll make a decision about whether we want to do radon mitigation after this winter.
It doesn’t look like our radon levels are that bad, but I’d feel more comfortable taking some action because I work from home and spend a lot of time in the house. We now have an exhaust-only ventilation system. We may decide to retrofit the house with an HRV; that change could help lower radon levels. Or it’s possible that we’ll have to resort to sub-slab depressurization to significantly reduce the radon levels.
Looking back, I’m kicking myself for not insisting that our foundation/shell contractor and plumber include underslab radon venting that could be used for passive venting or turned into an active system. During my initial building research, I learned that this was a good idea and brought it up with our foundation/shell contractor (and our original builder), but was told that “radon shouldn’t be a problem with a slab.” This was bad advice, especially because Carroll County in New Hampshire is “Zone 1” on the EPA Radon Zones map. Looking back at proposals and quotes, the other foundation/shell contractor we considered did include radon venting plans.
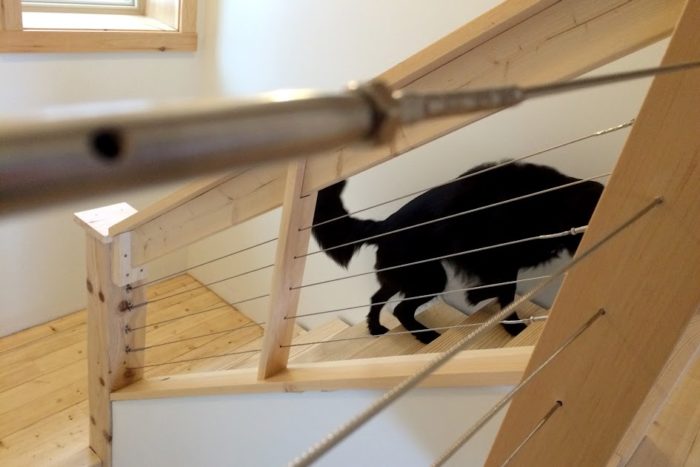
Pine posts and stainless-steel cable for the stair guard
Kyra and I continued on more interior work. I worked on the stairs, installing a guardrail and handrail. I used stainless-steel cable railing material to finish things off.
We installed 6×6 pine posts during the framing stage to support the guardrail. These posts twisted as they dried, and they weren’t installed at an ideal height to meet stair codes, but I made it all work and we like the look (see Image #5, below).
Most of the lighting is LEDs
I don’t think I mentioned anything about lighting in previous posts, but we had all the light fixtures installed before we moved in. We mostly followed the guidance of our electrician for interior lights; we just have wall sconces plus three strands of cable lights downstairs. For wall sconces, we bought a couple of fixtures that were close to $50 each, but outfitted most areas with $10 jar lights. We like the simple look of them and it kept the lighting budget down.
All light fixture bulbs in the house are LED, except for three CFL chain light fixtures in closets and under the stairs.
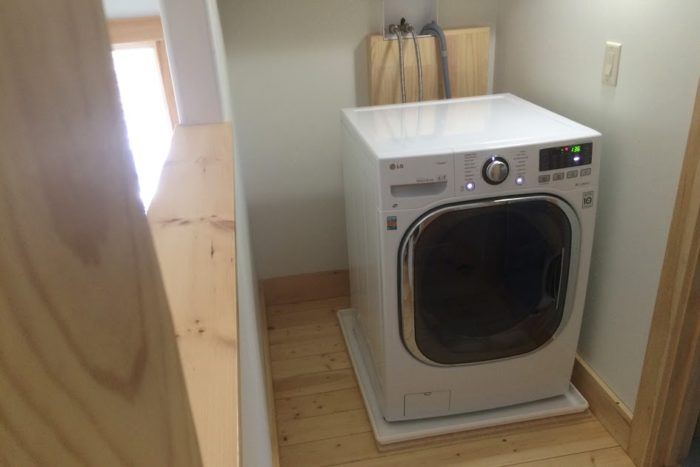
A combination laundry appliance
In early March, we installed our combination washer/dryer (see Image #6, below). It’s an LG model WM3997HWA, and we’re happy with it. It’s nice to have a single laundry appliance, and since it’s a condensing dryer, there was no need to install any exhaust ducting.
In more than nine months of use, I think we’ve used the dryer function less than five times. We either hang our clothes outside or inside, depending on the weather.
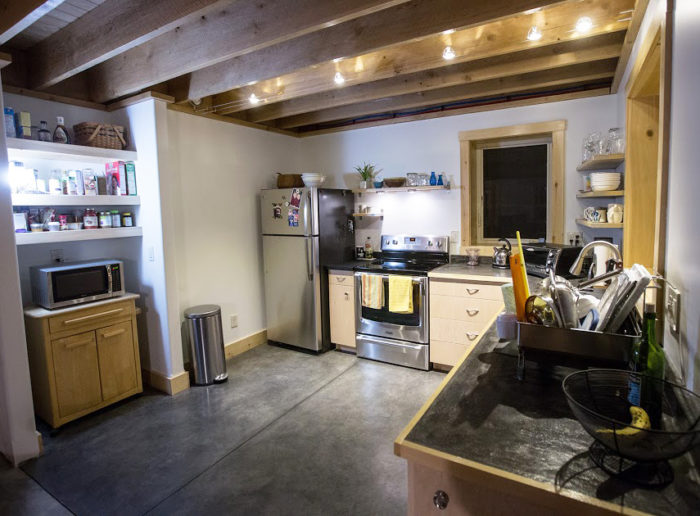
The kitchen
Living without a functioning kitchen wasn’t too bad, but Kyra and I made a big push (starting in March) to do the countertops, install the sink, and get a stove running.
We considered several types of countertops, but wanted to keep the expense down. Laminate was a contender because it’s the least expensive. I knew laminate countertops had a come a long way and could look good, but I wasn’t sold on it.
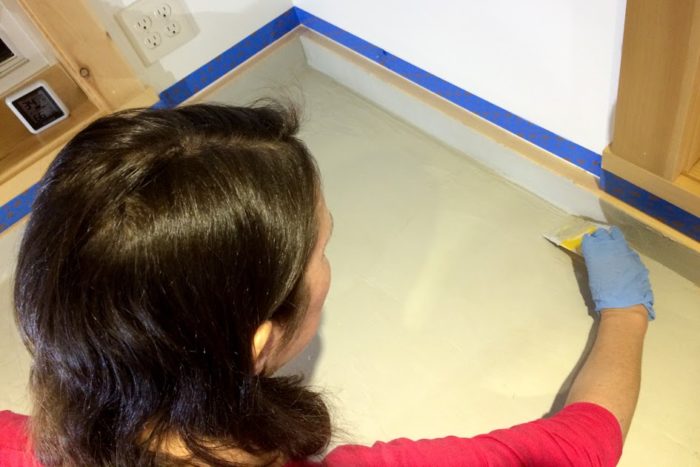
I looked into a concrete resurfacing product called Deco-Poz, from the company that made the stain and sealer for our concrete floors. It can also be used to refinish countertops or make new ones. We weren’t sure how it would work out, but had seen examples of other people using it and decided to give it a try.
We didn’t mix or install any concrete to make our countertops — just Deco-Poz. It comes as a powder that is mixed with a proprietary polymer to produce a slurry that looks like pancake batter.
Here are the steps we took:
- We leveled and installed the base cabinets.
- We screwed down 1-inch-thick pine “project boards” from the local box store as a substrate.
- We cut out the sink opening.
- We screwed 5/4” pine trim boards to the studs at the back for a backsplash substrate.
- We glued and nailed (with finish nails) pine strips to the front side of the project boards to contain a thin application of Deco-Poz.
- We performed various steps related to mixing, spreading, and troweling on two thin applications of Deco-Poz (see Image #7, below).
- We performed sanding and cleanup tasks.
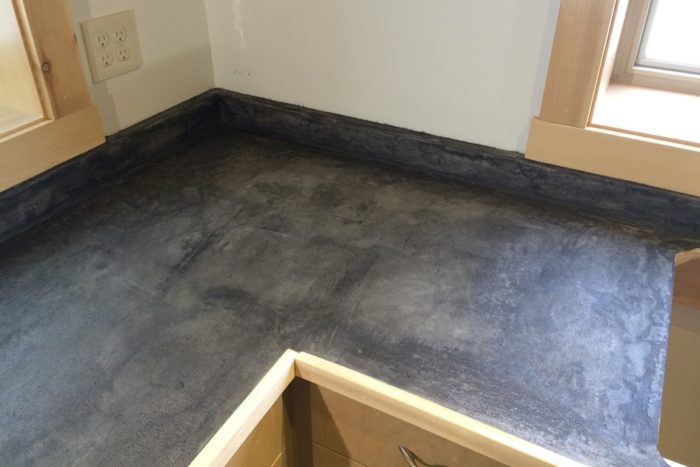
- We applied Black Granite stain (see Image #8) and many coats of sealer (Eco-Tuff Countertop clearcoat).
We hope that our homemade countertop doesn’t self-destruct. The overall consensus is that it worked out, didn’t cost much, and actually looks pretty cool in an artsy DIY sense (see Image #9). There are a couple of hairline cracks in the countertop, but these got filled in with more coats of sealer. There is a larger fracture on the backsplash in the back corner, but it’s hidden by a toaster oven and not super-noticeable.
I think using plywood or another non-solid-wood substrate would have reduced the chance of cracks from the expansion and contraction of the boards. Would we use Deco-Poz again? Probably not. When faced with finishing a separate 12-inch-wide section of countertop between the fridge and stove, we used a remnant piece of PaperStone, which was much easier.
Committing to solar
As we progressed from spring into summer of 2015, we continued on interior work, including finishing more of the concrete floor and hanging downstairs doors.
The biggest news was that the installation of our photovoltaic (PV) system was scheduled for early June. We had planned for solar from the start: the house is oriented due south, the roof is an ideal pitch (9/12 or 37 degrees), and all of our mechanical equipment and appliances are electric. We had kept in touch with a regional solar installation company and finally signed a contract in March 2015.
During the research, design, and construction phases of our house project, we were inspired by passive house and net-zero concepts, but didn’t have any specific energy efficiency goals. As the build progressed, we realized it might be possible to make the house net-zero, and that became a goal we wanted to reach.
When we signed the solar installation contract in March, we had to commit to a system size because of rebate and net-metering application deadlines. The problem was that we only had two months (January and February) of electrical use data while living in the house, so we didn’t know how big of a system we needed to hit net zero.
It wasn’t a very scientific approach, but I looked at data from other PV-equipped houses in the Northeast (well, mostly the Uphill House — thanks for the in-depth data!) to see what their electrical use was in other months compared to peak winter months. So, for example, if the July electric use was usually 40% of the peak winter month, I figured that our house might use approximately 400 kWh in the summer months compared to our highest winter months (1,000+ kWh).
Based on these projections, we decided to max out our roof space and install twenty-four 280-watt panels. This would be a 6.72-kW grid-tied solar electric system. We really weren’t sure whether this size system would get us to net zero, but I didn’t want to get a smaller system and miss out on the opportunity to hit our goal.
The original plan was to install an SMA string inverter that has the ability (through a feature called the “Secure Power Supply”) to supply up to 1,500 watts from the panels if the grid goes down. Due to new electrical codes adopted by the state of New Hampshire, we had to switch to a SolarEdge inverter that had rapid shutdown capability (see Image #11).
We were disappointed to lose the Secure Power Supply feature of the SMA inverter, but the SolarEdge system uses “Power Optimizers” connected to each panel. I don’t know the full technical details, but I believe the overall benefit is that these allow each panel to supply power at a lower starting wattage and will help when individual panels are getting varying amounts of sun due to shading or snow. The Secure Power Supply of the SMA inverter may not have been that helpful anyway, because the most critical time for backup power would be at night in the winter.
The installation happened over June 3-4 and went smoothly. A crew from the electric utility visited on June 11 to complete the meter swap and turn the system on.
Landscaping
With the solar equipment installed, it was now time for some landscaping so that our yard wouldn’t be a big sand and dirt pit. We ordered a significant amount of loam and rented a tracked skid-steer to move and spread it, making sure that the finished grade sloped away from the house. We used leftover round rock (from the driveway fill project) and ordered crushed rock to make a drip edge around the house.
The plan was to use “no mow” grass seed from the Vermont Wildflower Farm in a zone directly around the house. We didn’t want much manicured lawn, so around that we planned to use a mix of grass and wildflower seed. Before we seeded, a strong summer thunderstorm came through; it didn’t impact the loam much, but caused some erosion in other unstabilized areas of the lot. We decided that another summer thunderstorm could ruin a newly seeded lawn, so we ordered “tall fescue” sod for the zone around the house. It took a very tiring full day to install, but was well worth the added cost (see Image #12).
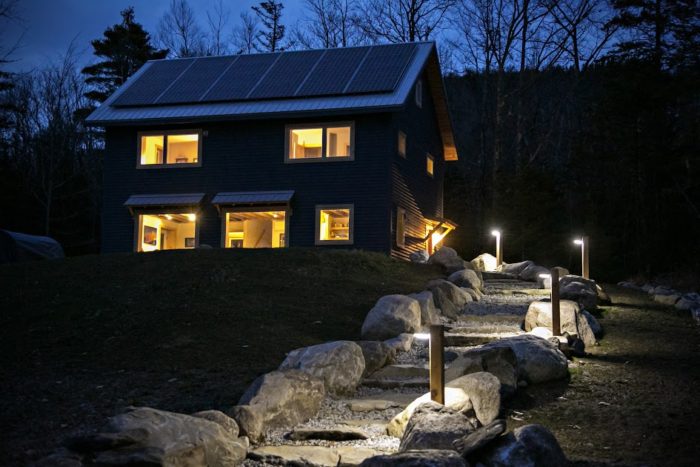
In the fall of 2015, we hired our site work contractors to come back and complete various landscaping tasks, including some final lot grading and drainage work, driveway and parking refinements, and a rough rock pathway. Kyra and I completed the pathway with smaller rocks found on site, crushed rock, and posts with solar-powered motion-sensor lights (see Image #13).
We also put down grass and wildflower seed in the non-lawn parts of the property just before the first snowfall in late December 2015. We’ll need to do some touch-up work and more seeding in the spring of 2016, but hopefully will have some nice grass and wildflowers coming up in 2016.
One full year of occupancy
As I’m writing this post, we’ve lived in the house for just over a year. Overall, it’s working out well. The house is comfortable in both the summer heat and winter cold. We’ve never used the AC, just the dehumidify mode with low fan on the minisplit during stretches of hot and humid weather. In the winter, the whole house stays comfortable with the single minisplit; some outlying and upstairs rooms are 2 to 5+ degrees cooler, though, depending on the severity of the cold. We only turn on the backup electric wall heaters when temperatures are expected to reach -15°F or colder at night.
In November 2015, we added an external wall thermostat (Mitsubishi MHK1) for the minisplit heat pump. We added this because it seemed that the temperature we set on the included remote (which operates in conjunction with a temperature sensor on the indoor unit) wasn’t in line with actual room temperatures. I think it’s possible that warm air pools around the indoor unit and doesn’t give the sensor a good portrayal of general room temperature. With the MHK1 now installed, we set it at 68°F and the main downstairs stays very close to that set point. While we haven’t seen extended severe cold yet this winter, my gut feeling is that the MHK1 is a better control method.
Besides some relatively minor interior and exterior finish work, we consider the house to be “done.” The only decisions we seem to be facing are: (a) what to do about our elevated radon levels, and (b) whether our ventilation system (an exhaust-only system consisting of a bathroom fan with passive air inlets) is a good long-term fit. The radon situation could affect ventilation system changes, or ventilation changes could affect the radon situation.
We recently received our December electric bill, so we have a full year of usage data along with (almost) 6 months of PV production data:
Electrical usage, 01/05/2015 to 01/05/2016: 6,255 kWh;
Electricity produced by the PV system, 06/11/2015 to 01/05/2016: 4,840 kWh.
Theoretically, looking back, if we had a solar array for all of 2015, we would have needed to generate 1,415 kWh from 01/15/2015 to 06/11/2015 to hit net zero for the year. I would imagine that would have been easy to attain, and it’s possible that the array would have generated more than 1,400 kWh in April through early June alone.
Looking at usage in future years, I would project that we’ll generally be using about 6,500 kWh annually. This is partially based on the fact that December 2015 was very warm. Other factors: we didn’t have a working stove or laundry early in 2015.
The solar installation company projected our annual solar generation at 8,070 kWh. Based on all this, the house should be net-positive on an annual basis, with an excess of at least 1,000 kWh and possibly 1,500 kWh or more. Yes, we could have gone with a smaller PV setup, but we’re happy that we’ll reach and exceed our net-zero goal.
I’m currently very happy with my all-wheel drive Subaru Impreza (averaging 34 mpg), but I may give electric cars a closer look as we could install a charging station and take advantage of the excess power.
Only $145 a square foot
I have kept track of expenses during the project, although I wasn’t able to keep up with the task of breaking down expenses into detailed categories during the busiest periods.
The cost per square foot is in the range of $140 to $145. This range takes into account possible errors in my expense categories. This is based on a gross square footage (1,536 square feet) and includes the building expenses from the foundation through the solar panels, including appliances and finish work.
This cost does not include the land and what I would collectively call “site work.” Site work would include expenses like lot clearing, the driveway, grading, septic system design and installation, well drilling and pump installation, hardscaping, and landscaping. Our site work costs were high because it was an undeveloped lot with some challenges, including ledge close to the surface.
Editor’s note: This is Part 5 of a multi-part blog series on the construction of Brian and Kyra’s home in New Hampshire. Brian hopes to write at least one more blog in this series — one on “lessons learned.”
Brian Post is a photographer and website builder. He lives in Jackson, New Hampshire with his wife, Kyra Salancy, and a fluffy black dog. When not working on their house, Brian and Kyra enjoy climbing and skiing in the White Mountains.
Weekly Newsletter
Get building science and energy efficiency advice, plus special offers, in your inbox.


10 Comments
gutters
I noticed no gutters on the roof. Can I assume the stone around the base of the house is an indication of "ground gutters"?
gutters
The term "ground gutters" wasn't in our vocabulary until we started landscaping around the house. When that time came, I did think about using some type of membrane (epdm, pond liner) above the horizontal wing insulation (XPS). I decided not to do this. What we do have:
the slab is above original grade (more so in the front than back) on top of crushed rock and gravel, so I believe well drained below and around the slab
poly below the slab and wrapped up the sides
we did our best to slope the XPS wing insulation away from the house
Grace Ice & Water at intersection of wing and slab edge XPS...at least on the eave sides
high clay content loam around house to shed water, all sides sloped at least 6" for the first 10'
stone perimeter with no vegetation to minimize splash back
No question there can be a lot of water coming off the roof, but I think the drainage situation around the house is under control based on what we did.
Radon
The decision not to include the plumbing for possible sub-slab ventilation is unfortunate. However, I suspect you are okay. The EPA goal of 4pCi/l is a pretty conservative one. Also, keep in mind that this doesn’t mean that no place in the house can never get above that at any time of the year. Instead, the average concentration of the air you breathe in your house over the entire year should be below that level. What the level is in your bedroom is much more important than what it is in a utility room, for example. I believe a HRV in a tight home like yours is an excellent idea for reasons unrelated to radon. I’d certainly do that long before putting holes in the slab. At least with the HRV, your air quality will be improved and you’ll recover some otherwise lost heat. The HRV is not likely to be as effective at radon mitigation as the sub-slab ventilation, but it really doesn’t sound to me that you have a significant radon issue to begin with.
Glad that you covered the entire roof.
I hate seeing these roofs that only have like 1/2 or 2/3 of the perfectly angled roof space covered because "that was all we needed to be net zero." The cost of the extra is comparatively small when you realize you've already payed for the manpower and trucks coming out to install it.
Blower Door results
A few questions.
1. I am curious if the picture of the blower door is the actual picture from when you tested this house. It appears the BD has a B ring and the DG700 is configured to B2. I don't think you can achieve those results in that configuration.
2. How are you managing make up air? A house this tight would need very good ventilation. An HRV could run a balanced system, but a bath fan moving 30cfm would throw the house off (close to -50Pa if you truely are 38cfm@50)
3. Did you act a the GC? How much labor did you provide? Does you number of $145/sf include your labor? Overhead/Profit?
per square foot cost
One of my pet peeves is the use of cost per square foot, when we don't have a consensus of what goes into the number. Brian didn't include site costs, for good reason. His site costs were high.
But when we throw out these numbers, people think they can buy a house as nice as Brian's for $145 per square foot when they generally can't, because every house has some site costs and most people don't GC their own homes.
My recent article in Energy Smart Homes gives a per square foot cost for my new house of $242. But that included site costs, well, septic, a big insulated garage, stone retaining wall, etc. But the cost per square foot was based on the gross square footage of the conditioned space only. I also have two sided, roofed, insulated, windowed, foundationed, drywalled and painted unheated rooms outside the conditioned space. If we included them, we'd add about 350 square feet, reducing the per square foot price by about $40. I don't know what we spent on the garage, but it wasn't nothing.
I don't have an answer, other than that maybe a detailed list of what was spent on what would allow someone to derive some numbers that would be more useful. If I had it to do over again, I'd have tried to keep track of how much we spent on each aspect of the building, so I could pull out what was spent on the garage, for example. That would have required a record-keeping system by the GC more typical on commercial jobs.
Anyway, thanks to Brian for sharing so much about his great new house. I really like it and love the color!
blower door and more
1. Yes, but I don't know enough about the equipment and test procedure to clarify. I have a vague memory that maybe the HERS rater started this test with the B ring and then moved to the C, would that make sense? You wrote 38cfm@50 in question 2, are you mixing up the measurements (83 cfm at 50 Pascals and 0.38 ACH at 50 Pascals)?
2. We initially installed two Panasonic passive air inlets that state up to 18 CFM each. Based on experience and reading another online comment, I think they actually only provide around 10 CFM each. With the initial two inlets, the house was de-pressurizing with one of the fans running at 30 CFM, exterior doors would pop and woosh open. The effect was quite dramatic with a fan running at 80 CFM.
We now have 3 passive air inlets installed and it seems relatively "balanced" with one fan running 30 CFM.
3. Yes, we acted as the GC. We had a lot of help from contractors and especially from our foundation/shell contractor during that stage, but we were the only people to see the project through from start to finish. I only tracked our expenses, I did not consider or factor in our labor.
We provided a variable amount of labor depending on the building stages. Some days we just visited the site and did some cleanup...and other days we were on our hands/knees for hours on end finishing the floors. If you read through the previous posts, that might give you a better idea.
per sq ft costs
I agree, that measurement is misleading and somewhat meaningless without context. I did try to be clear about what our sq ft cost did and didn't include, at least on a large scale.
I'm sure people have varying financial experiences when building a house, but I think it's safe to say that houses cost a lot to build and they often cost more than expected. And then, they cost even more than that.
exhaust-only ventilation
This can be a costly approach in a cold climate. You are paying not only for the wattage to run the fan (which can be quite minimal for an efficient unit), but also the heat loss of that exhausted air that must be replaced by the HRV. I suspect that if you run the numbers on the embodied energy of the exhaust air, you will find investment in an HRV to be worth the cost over a number of years. Thanks for sharing your experience.
Response to Christopher Vlcek
Christopher,
Many researchers have looked at the question of how cold a climate needs to be before the investment in an HRV makes sense, and GBA has published many articles on the topic. Here is a link to one of those articles: Are HRVs Cost-Effective?
The short version: “Based on this analysis, the ERV and HRV systems are not cost-effective (compared to the reference points) in terms of energy savings in the milder climates, and are only moderately cost-effective as the house ‘migrates’ to a cold climate (Burlington). ... Based on the poor cost-effectiveness of ERV/HRV systems in the milder climates, it seems irrational that these mechanical systems should be a ‘de facto’ requirement for meeting the annual heat demand requirement for [Passivhaus] certification.”
Log in or create an account to post a comment.
Sign up Log in