Cut & cobble polyiso with fiberglass batts – good or bad idea?
Hello,
I am a homeowner in the construction management industry and a plumber by trade.
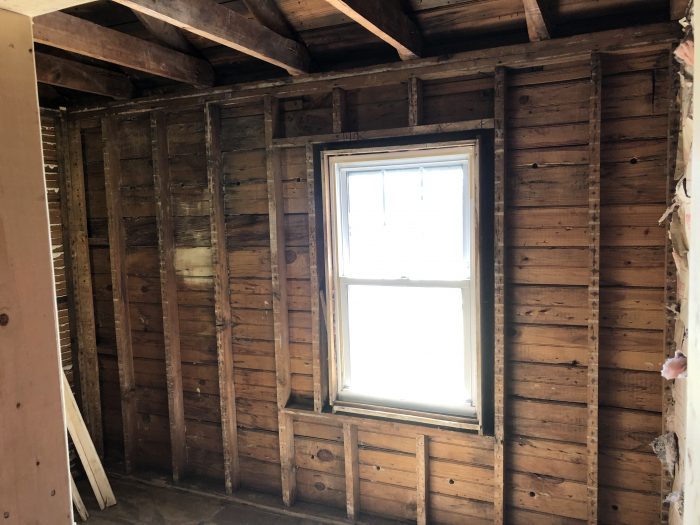
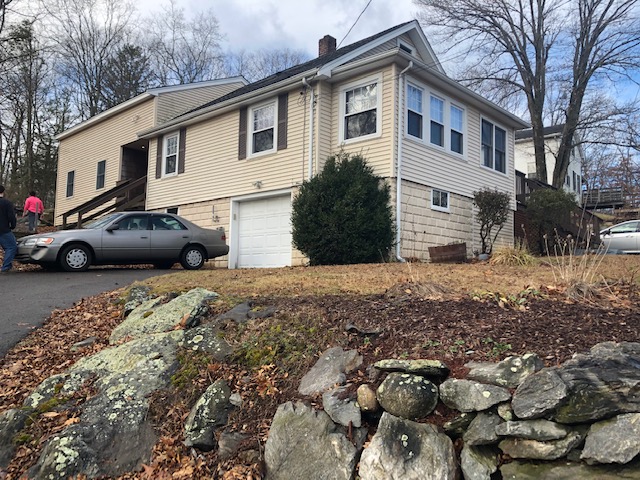
I recently purchased a home in Worcester County Massachusetts (Climate Zone 5A). The “Original” Part of the home (which will be the focus for the purpose of this question) is a bungalow/cape style built in 1890 with a full unfinished basement and attic. I am currently re-locating the bathroom in the old part of the house by doing a complete gut of that area. Here is some info on the existing construction:
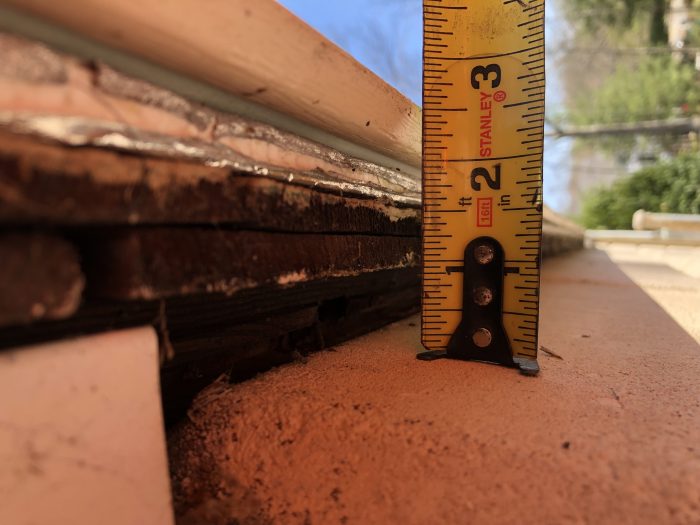
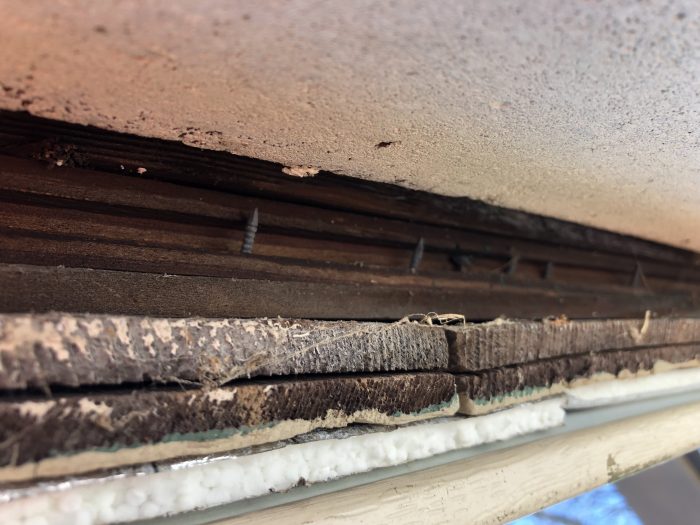
-2×4 exterior walls. Typical construction from outside to in (See attached photos for reference): Vinyl siding>1/2″ rigid insulation (seams do not appear sealed)>(2?) layers of cedar shingles>1x8x3 shiplap sheathing>2×4 stud wall with blown-in cellulose (I had to remove the cellulose within the extent of the bathroom because the lathe had to come off).
Final finish on the interior side of the wall will be 1/2″ durorock with tile to 42″ & 1/2″ drywall to the ceiling
.
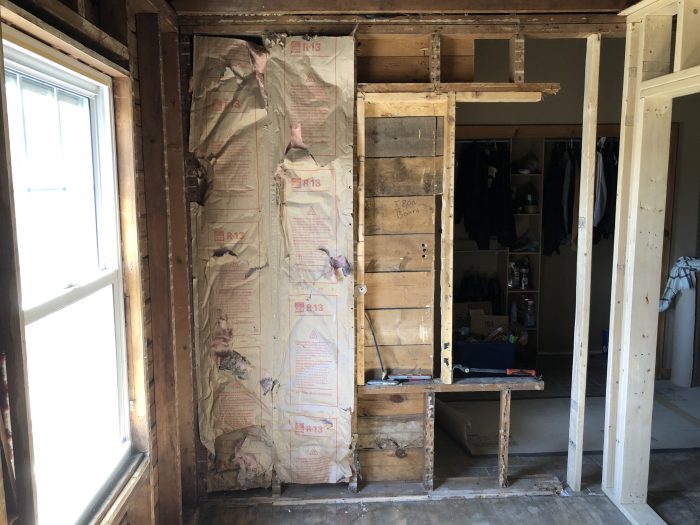
The previous homeowner added an addition to the rear gable end of the home as seen in the attached exterior photo. There is a small portion of (old) exterior wall that creates a covered entryway/porch. The rest of the “Old” gable end of the house can be considered an interior wall with the exception of the attic potion (I’ll save that for another project/post…) The small section of the exterior gable wall was insulated with R-13 FFB by the previous owner. as seen in the attached photo.
There is various to-be-expected signs of moisture infiltration over 130 years, which appears to have been reasonably mitigated relatively recently, as you can see in the photos.
Our goal is to do a slow, phased gut remodel of the old portion of the home, including tightening the entire envelope. The previous owner was a roofing/siding contractor so I’m hoping that added layer of 1/2″ exterior insulation will help in my efforts.
As I mentioned, the first phase is re-locating the current “galley” bathroom. The new bathroom/laundry room will be 7’x11′ with 15 Linear feet (120SF) of exterior wall. I am replacing the existing window seen in the attached photo with a 48″ wide x 24″ tall vinyl awning window with u=.26.
The new tub will be located so the “long” wall will be the exterior wall, and the two “short” walls will be interior walls. This posed my original problem. The tub location is necessary for the layout, however we want to install a 20″x 12″ Hydroban Pre-formed Niche (By Laticrete) in the long exterior wall. The niche is a full 3-1/2″ deep so I did not want to lose the full R-rating at that small location.
My original solution was to pad the exterior wall only at the extent of the tub with 2×3’s, cut & cobble a piece of 2-1/2″ polyiso behind the niche, insulate the rest of the 2×4 wall with R-15 FB & 6-mil Poly, and call it a day.
However, after reading up on this website and realizing how many gaps there were in the shiplap/holes from the blown-in cellulose contractor, I think it would be wise for me to further tighten the envelope, beyond the 1/2″ rigid on the exterior, which probably isn’t even sealed (I will know more when we tear siding off to re-frame the window that arrives in 2 weeks.) I think I have devised a method that will effectively tighten the entire wall assembly, provide ~R-21.5 rating while only adding 1″ of wall construction, and can be installed incrementally from the interior as the phased renovation progresses over time. I would like to avoid disturbing as little as possible of the exterior portion of the envelope, because I fear I would be opening a can of worms.
I would achieve this by padding the entire wall by 1″. Preferably by nailing 2×4’s directly to the existing/new framing (for the niche,) like you would to plumb an existing interior wall or sister studs. This seems easier but will add a lot more lumber to the assembly i.e less insulation. Alternatively, I could rip 1″ off of 2×6’s and replace all the exterior studs with the new 2×5’s, then run 1″ polyiso over the T&B plates. to make it even tighter. After writing it out, the second idea seems much better, but also seems like more work for my cousin and I.
To achieve the new rating, I would cut & cobble 1″ Polyiso directly to the exterior sheathing in each stud bay with Door&window great stuff, then simply add R-15 FB in each bay. I would omit 6-mil Poly or any other type of vapor retarder/barrier on the interior to allow the wall to dry in.
I will also apply one of these methods to the entire “short” exterior wall, as I will be re-purposing a 3-1/2″ deep built-in ironing board that will be 1/2 interior, 1/2 exterior (not sure if you can see my mark in the attached photo), so I would like 1″ Polyiso behind that as well. But the entire wall needs to be padded so it is flat for tile.
I am fortunate enough to have other family members in the trades and therefore have been inundated with various new owens corning FB (a new 7-pack of 15″x93″ R-15 FFB, two lengths of 15″x93″ FB, and a new 11-pack of 15″x47″ R-13 FB) I will likely rip all the facing off the R-15 and use all that up, hopefully I don’t run short but worst case I can just use some of the R-13 for the remaining short wall. But I wanted to at least ask the question/get some feedback here before proceeding/buying rigid insulation and great stuff.
I apologize if this post is longer than most, but I wanted to give as much detail as possible as I realize how important that is on this site, especially for initial questions. Thank you in advance for any input! I look forward to hearing from the community! I have a couple more insulating projects coming up including insulating my entire rim joist, joist bays, and basement walls that I may end up posting about as well.
TL/DR; I have a pretty good knowledge of building envelopes, and a good idea for how to proceed given my situation, and based on info from GBA; but I would greatly appreciate any advice on how to proceed given my situation/constraints from this very helpful community! Thank you in advance!
GBA Detail Library
A collection of one thousand construction details organized by climate and house part


Replies
Hi Anthony,
I'll give this a bump to take it back to the top of the Q&A.
If you want to make the exterior wall cavity deeper (and reduce thermal bridging), you could try the Bonfiglioli method. Here is a how-to for reference: https://www.finehomebuilding.com/2014/11/26/breaking-the-thermal-bridge
Hi Anthony,
Remodeling questions like this are challenging becuase we really can't assume how that wall, with its various exterior layers, is actually performing. If you were remodeling the exterior too, this would be much easier.
If you goal is an air-sealed and well insulated wall, I like Steve's idea of the insulated furring strips on the studs' interior. Perhaps then filling the deepened bays with a vapor-open fibrous insulation and using a variable-perm (smart) vapor retarder detailed as an interior air barrier. That will give you pretty good r-value, air sealing, and some vapor control in the heating season and inward drying potential in the summer.
I'll be curious to hear what others think.
I’ve actually done what Brian suggested, using mineral wool in the stud cavities with membrain detailed as an air barrier on the interior. I have a wall with T1-11 exterior siding over 1/2” polyiso, and its not well sealed. Eventually I’ll be replacing the siding and adding 3” polyiso, but that’s a ways off so I needed the membrain layer on the interior of this one room I’m renovating.
If you go this route, you need to be very careful not to puncture the membrain as you install everything (corners of sheets of drywall need to be watched closely), and you need to seal the edges of each wall section (I used a urethane caulk). I sealed the electrical boxes using a 3M flashing tape to seal to the membrain, and canned foam to seal the wire entries to the box. I use the fiberglass “hard boxes” which are one piece with no gaps, so the only holes needing to be sealed are the knockouts I actually opened to bring in wiring.
Bill
Thank you all for the replies, feedback and giving the post a bump!
I gave the article about the Bonfiglioli method a read. I was actually thinking about implementing some version of this method anyway, but after reading the article, that is definitely a better way to fur the wall then conventional methods or simply adding foam to the studs. I will definitely implement the Bonfiglioli method.
Luckily I just came into a pile of 1" and 2" XPS foam on the side of the road, so now I will only need about 1 more sheet of 1" to finish off the wall and furring strips.
As for Brian/Bill's comments regarding the vapor barrier on the interior, I did come across the membrain product on other posts here, and found that one of the local big box stores has it in stock, so I will definitely use this product in lieu of 6 mil poly.
Also, Brian - you refer to filling the stud cavities with "a vapor-open fibrous insulation". Will the R-15 unfaced Fiberglass Batts I have on hand suffice? Or should I purchase some of the more expensive mineral wool batts that Bill used in his wall assembly? I would like to use what I have on hand as it is obviously free, but I do understand the advantage of the mineral wool product. Regardless, I will likely have to purchase more batts anyway for the interior walls (sound).
Bill- I will definitely be sealing every gap, penetration, electrical Box with canned spray foam, and likely caulk all the framing seams. Good to know I should use the 3M flashing tape product. I talked with my Electrician and he will be installing similar fiberglass "Draft Boxes" which are solid and have foam gaskets at the cable entries. I will probably still seal around them though.
I did find a Great stuff product called "Drywall Gasket." It is the opposite of traditional great stuff in the sense that it compresses when cured. You apply it to the face of the T&B plates and around openings in between the interior vapor retarder and sheetrock, creating a "gasket" behind the sheetrock for added air sealing. Has anyone ever had any luck with this product/is it really worth it? Otherwise I will likely end up sealing the edges of each wall section with caulking like Bill suggested.
Thanks again all.
Fiberglass and mineral wool will both work. “Vapor open” just means moisture (water vapor) can pass through the material. Fiberglass, mineral wool, cellulose, all are vapor open insulating materials. Vapor “closed” (impermeable) materials are things like thicker XPS and foil faced polyiso.
I prefer mineral wool over fiberglass because it’s easier to work with (carve it with a bread knife and stuff it in, it self supports and holds its shape), and its a bit more R per inch. Mineral wool is also a little better for sound control, and since I live ~3/4 mile from a rail line that’s important here. There is no reason not to use the fiberglass you already have, just be careful to fluff and fit it properly when you install it.
Seal the gasketed holes in those draft boxes your electrician will be using. “Gasket” is a strong term for the seal used in those boxes — they’re still pretty leaky. Canned foam works, but red silicone fire caulk (NOT intumescent fire stop caulk!) is often easier to work with.
Bill
Anthony,
I agree with Bill. The fiberglass you have on hand is fine, if you install it really well. Many people like mineral wool because (among other reasons) like Bill said, it is easier to get a good installation than other types of batts.