Air Sealing/insulating with fiberboard sheathing
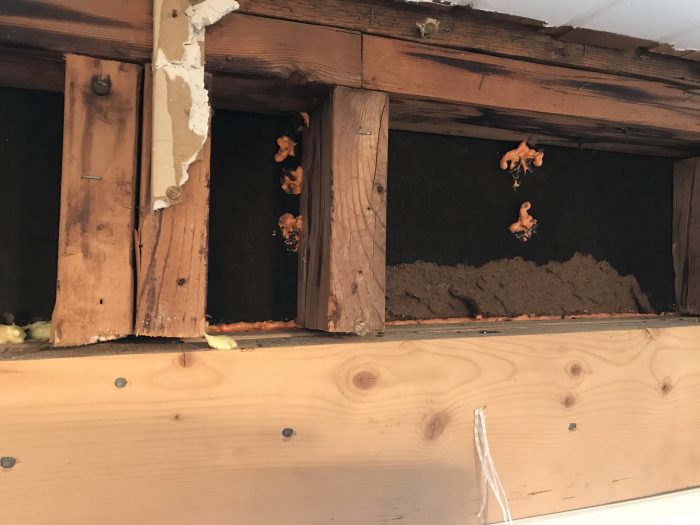
I have an interior renovation project located in central Pennsylvania (Climate Zone 5). The home was built in the 1960s. New vinyl siding, cheap woven house wrap, and new windows we’re installed 4-5 years ago. On the interior, we have removed the existing plaster and insulation. The exterior sheathing is fiberboard, which is in poor condition. It appears the fiberboard sheathing took a beating when the new vinyl siding was installed. Also it does not appear the housewrap was not installed correctly as I cannot find any laps or slices that I’ve been taped. Air sealing seems like it will be a challenge.
Removing the vinyl siding, woven housewrap, and fiberboard sheathing is not an option. Air sealing has to be performed from the inside. Due to the flow of the project, structural modifications, MEP rough-in, and various code inspections…we are roughly 4 to 6 weeks from being able to insulate. Currently temperatures are in the 40s and low 60s, however in 4-6 weeks temperatures will be in the 30s and 40s.
With this in mind, what is the best way to air seal (from interior) and insulate the wall assembly? Close cell spray foam probably won’t be an option due to crew availability, temperatures, and cost. Is the cut and cobble method an acceptable approach? Or is another approach best? Code requires a vapor retarder on the warm side of the wall assembly.
Any insight would be appreciated. Thank you. Jared.
GBA Detail Library
A collection of one thousand construction details organized by climate and house part


Replies
Hi Jared,
I'm sharing this article by Martin Holladay because it lays out some of the pros and cons of the cut-and-cobble approach, and also to give your question a boost in hopes that a seasoned builder can speak from experience.
Cut and cobble is very labor intensive and doesn't get you a very high performance assembly. Lot of work for not much R value.
If you want to air seal this assembly, your simplest is air tight drywall. Hard to get it perfect because of the floor joist and ceiling intersections but better than what you had. Installing vapor tight electrical boxes plus a well detailed vapor barrier/retarder underneath as the secondary air barrier also helps.
If you want more R value than standard batts, you can install rigid foam on the interior over the studs. If you use foil faced polyiso for this, it can be taped and also function as your vapor barrier. You can install drywall directly over this with long drywall screws. Just have to watch your electrical boxes as they need to be moved to match the new drywall spacing.
You can definitely spray foam in cold weather. They use different chemical mix that is designed to work over cold sheathing. You can also look at open cell SPF as it is significantly cheaper and gets you about the same assembly R value as closed cell once you take into account the thermal bridging of the studs.
Thank you for the responses.
Great points. I’m guessing there won’t be much of a performance improvement between cut and cobble vs air tight drywall method with the blower door...or if there is, it’s Probably not worth the effort.
What are your thoughts on this approach?
- seal all wall cavity intersections with one part spray foam (stud/plates to fiberboard, plates to studs)
- seal any damage in the fiberboard with one part spray foam
- seal penetrations in plates/studs with one part spray foam
- seal behind all elec boxes with spray foam or air tight elec boxes
- caulk all framing joints on interior side ( between dbl top plates, bottom plate to floor sheathing, etc)
- install r-15 Rockwool
- apply continuous sealant to face of all plates and studs then apply CertainTeed MemBrain
- install 1/2 drywall ceiling using airtight drywall methods
- seal drywall ceiling edges to MemBrain installed on walls
- install sill sealer or drywall gasket at top plates, windows/ doors openings (not sure if this is necessary if I do a good job sealing the drywall ceiling to the MemBrain on the walls?)
- hang 1/2 drywall on walls using airtight drywall methods
- tape/finish all drywall joints
Thanks again for your insight. Jared
Sounds like a reasonable plan.
One part foam is hard to use to seal surfaces, mostly works for filling gaps. In your case, one of the smaller two part spray kits would work well. Make sure to do it on a warm day and heat both tanks in a tub of hot water before starting. If available for the kit, fan tips work better for this.
Hard to seal electrical boxes from the inside, air tight (could be called vapor tight in your area) boxes are much better. They don't cost all that much and simple to swap out.
You only need to seal the vapor barrier and drywall around the wall perimeter and any window/door openings. Some guides show caulking between studs, but I can't see what it does and I've never done it myself. If there are seams in your vapor barrier make sure to tape it (up here we have Tuck tape specifically for this purpose).
Typical draft seal caulking used for VB is great for sealing and flexibility but not very pleasant to work with as it gets on everything. I prefer to use greenglue sealant (not the compound, this comes in black tube) as it can be used for this and also for sealing the drywall.
Another option would be 2x cross strapping @ 24" OC over an air barrier/smart vapor retarder membrane sealed and run along the interior of the studs. This minimizes electrical penetrations through the air barrier and gives the option of more insulaton. Cavities could be insulated with batts or blown cellulose or whatever you like.
Jared,
I was wondering what you ended up doing in this situation? I’m in almost the same spot: trying to insulate a house with asphalt/felt impregnated fiberboard. The outside siding is wooden board and batten, they put some type of exterior house wrap, and the sheathing is obviously the fiber board. I’m perplexed how to move forward with insulating and sealing the inside cavity.
Really interesting in how you resolved this issue.