Basement retrofit insulation detail and sill moisture safety
Hello all, I am looking to move forward insulating my basement walls. I have a two story 1914 balloon framed home in Zone 6. I’m clarifying an overly wordy previous post and seek advice. My plan and questions follow.
Above grade stud framing 3’-5’ portion of wall:
Remove lathe and plaster and UFFI insulation, fire block balloon framing. Move the insulation/air sealing to the interior of the studs. Cap nail and air seal 2in of rigid foam with 3.5” mineral wool to the interior (held in place by the back side of the interior finish wall studs). ~R25 with no thermal bridging at the studs and ~40% R value from rigid foam to avoid condensation in zone 6. I’d be happy to increase this insulation amount if it would make sense to do so.
Poured concrete wall (exposed between 6” and 2’ above grade):
Continue with 2” rigid foam properly air sealed to the poured concrete foundation wall, 3.5” mineral wool in the finished interior stud bays.
Questions:
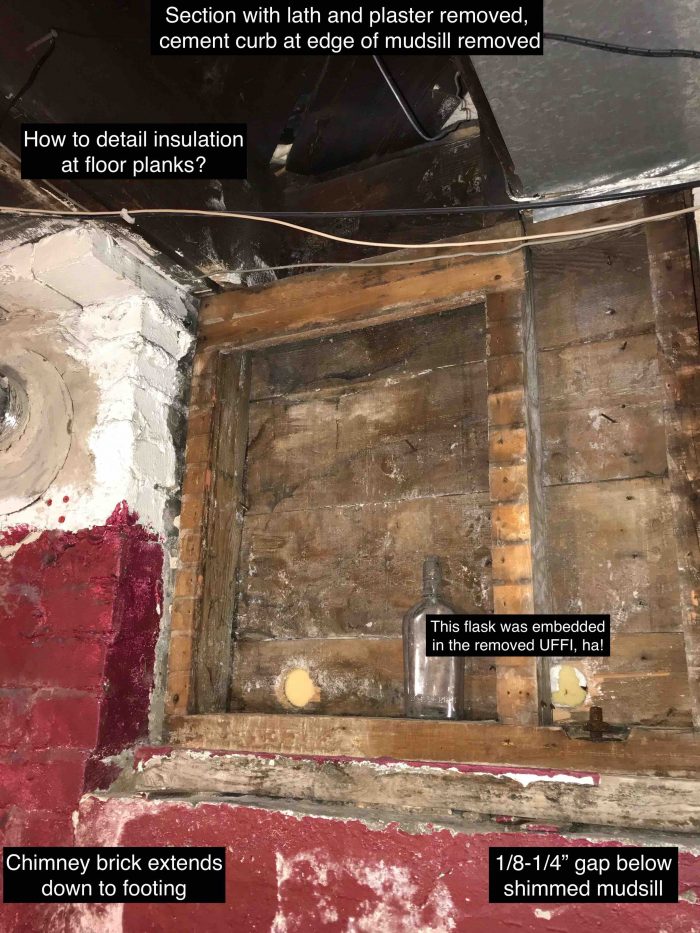
1. How should I terminate insulation where it meets the above subfloor?
I plan to horizontally extend the rigid foam out to the sheathing, and notch and seal the vertical rigid foam to fit between the joists (see diagram). I am thinking that this will help air seal the gaps in the diagonal subfloor planking and provide a bit of insulation for that last 4 inches. I’m stumped as far as removing the fiddly nature of these details. I’m also unsure how any voids behind the wall will effect the insulation that I do install.
2. By leaving the stud bays open, am I allowing for enough of an evaporation path to keep the sill plate safe?
The poured concrete walls display efflorescence on the interior. The foundation is exposed 6”-2’ above grade. The exterior stud cavities will be empty and extend 3’-5’ to the subfloor above. No observable rot in the sill or studs, no capillary break. Wood leveling shims at the sill plate leave a 1/8”-1/4” gap that extends out roughly 2/3 of the depth of the true 2×6 after probing (once vacuumed out). This gap might help act as a partial capillary break and might aid moisture evaporation into and then out of the stud cavity. I would have no problem jacking the house to install a capillary break but am unsure how to proceed given the balloon framing, and if it is even necessary.
I’ve included a diagram and photo.
GBA Detail Library
A collection of one thousand construction details organized by climate and house part


Replies
Hi Tyler,
Am I understanding correctly that you are not insulating the exterior wall above the mudsill to allow for an "evaporative path" for the sill to dry because there is no capillary break beneath it?
Thanks for responding Brian.
I needed an air barrier and rigid foam seemed the easiest (given my tongue and groove sheathing). Mounting that foam to the interior of the stud bay is both easier to install and will reduce thermal bridging. Since I'm already adding an interior finished wall partition, I have room to spare to install to the interior of the studs.
Given that detail, I assume that leaving the area open will conveniently be safer. My 100yr old building envelope might have leaks (unknown to me currently). Also, I will certainly be increasing the moisture at the top of the foundation wall once I use insulation to seal the evaporative path towards the interior of the foundation wall.
Hi Tyler.
I agree with Dana's comments below. Particularly because you may want to do some more work from the outside down the road, take care of the sill now. Then you can insulate the exterior wall too.
It would be cheaper and greener to slip a sheet of EPDM under the mudsills and add window flashing, then install cellulose in those walls, reducing the amount of environmentally & financially expensive foam insulation needed to hit the same performance point, if insulating the above grade walls. A full dimension 2x4 balloon frame 16" o.c. is "whole-layer" equivalent to ~1.5-2" of polyiso or 1.5- 3" of EPS after factoring in the thermal bridging. The full dimension 1x sheathing + clapboard adds another ~R2, the plaster & lath another ~ R0.75-R1.
The fact that the mudsill is currently shimmed enough in most places to actually execute on the EPDM without jacking up the house makes it pretty easy to do using 9" EPDM flashing tape. If it needs to be jacked up, 1/8" is enough, a section at a time. Using a short section of stout beam wide enough to span 3-4 joists and a couple of hydraulic jacks makes it possible to jack it up a section at a time. It may even be possible to use steel shims to wedge up the house a section at a time to slip in the EPDM, re-installing the leveling shims as you go.
The painted plaster & lath is already a vapor barrier if it has even one layer of leaded alkyd paint, and could be left in place if the cavities are insulated, since the cavity insulation is behaving as the exterior-R needed for dew point control at that level. At 4" cellulose would deliver R14-R15 at center cavity, and most cellulose products have been tested as an alternative to traditional fire blocking in studwall assemblies, eliminating another step. eg:
https://www.greenfiber.com/uploads/documents/Fire_Resistance_White_Paper_148_209.pdf
http://www.applegateinsulation.com/Product-Info/Technical-Pages/249502.aspx
For the foundation foam it would need to be at least R8.5 for dew point control on R15 rock wool in a zone 6 climate. That's do-able with a minimum of 1.5" of polyiso, or 2" of EPS (uprated for it's improved performance at colder temps. Note that reclaimed roofing polyiso is cheaper per R than rock wool batts, and higher R/inch too.
I can jack up the sill via the floor joists, even though my home is balloon framed?
If so, this definitely seems the way to go. I was under the impression that something more complicated would be necessary since the joists are simply side nailed to the studs. However, if this connection can lift a two stories a small bit enough to slip in EPDM, I’ll definitely take care of the problem rather than hope for drying. The idea of hammering in metal shims is much less attractive than jacking, so please correct me.
Also can anyone clarify how critical it is to completely remove any contact between the sill plate and the foundation. If I don’t lift the sill and instead were to slip in EPDM only 2/3 of the way, is that of any use? It’s my understanding that I need a complete capillary break or the moisture would just move from the point of contact and then wick throughout the wood.
After attempting, I've found it is not feasible to lift a balloon framed house to install a capillary break when it is constructed like mine. Jacking below the floor joists will not work to lift balloon frame (as expected, but you never know until you try), nor have I found anyone else that thinks that attempting metal shims will be viable or worth the effort. I simply have a troublesome balloon framed retrofit that doesn't fit the usual methods recommended on this board.
Thanks for the responses. However, without the ability to reasonably add a capillary break, these solutions don't seem like they will work for my balloon framed house.
If anyone has any other ideas, I'm open to suggestions.
Tyler, what did you end up doing? Why didn't the balloon framing allow you to jack up the house?