Cathedral roof with external XPS and embedded 2×4 nailers
Hi folks, I’m back with another question on a topic I’ve tried to research but have so far been unsuccessful in finding this exact situation.
I’m building a small cabin with a cathedral ceiling and 5″ exterior XPS insulation (one layer 3″ and second layer 2″). I’ve been thinking about the likelihood of success in hitting the rafters with long screws and the cost of the screws themselves. I’m not overly concerned with energy performance, but longevity and avoiding rot.
From interior to exterior the roof assembly will be as follows:
1. 3/4″ shiplap maple
2. Solotex Mento 3000
3. Layer of 3″ xps then layer of 2″ xps
4. Grace Ice and Water Shield
5. 2×4 purlins parallel to rafters for ventilation gap
6. 5/8″ plywood
7. another layer of Mento 3000
8. Metal roof
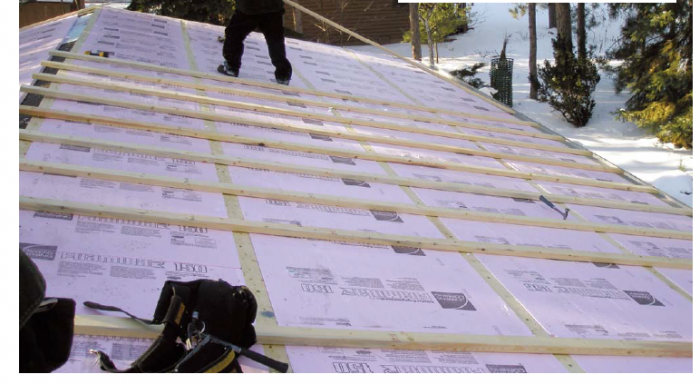
I’m thinking a way to reduce both cost and frustration would be to implement a 2×4 nailer system similar to the one in the attached photo (pink xps photo). What I’ve been trying to determine is whether this opens up the possibility of condensation on the underside of the 2×4’s “embedded” between the 2″ and 3″ insulation layers. It’s quite possible the underside of the 2×4 against the xps would be warm and the exterior (Grace side) very cold.
I’d hate to have water collect and be trapped within the insulation. The photo is an example of installation over top an insulated attic, rather than cathedral ceiling.
Swapping the layers of insulation and installing the 2″ layer first would also reduce screw length by an inch and make it easier to simply stack two 2×4’s to achieve correct embedment dimension.
I feel like the two air barriers should prevent any real risk of moisture but would like to hear people’s thoughts. Perhaps the grace isn’t necessary and simply taping the seams would be enough as well?
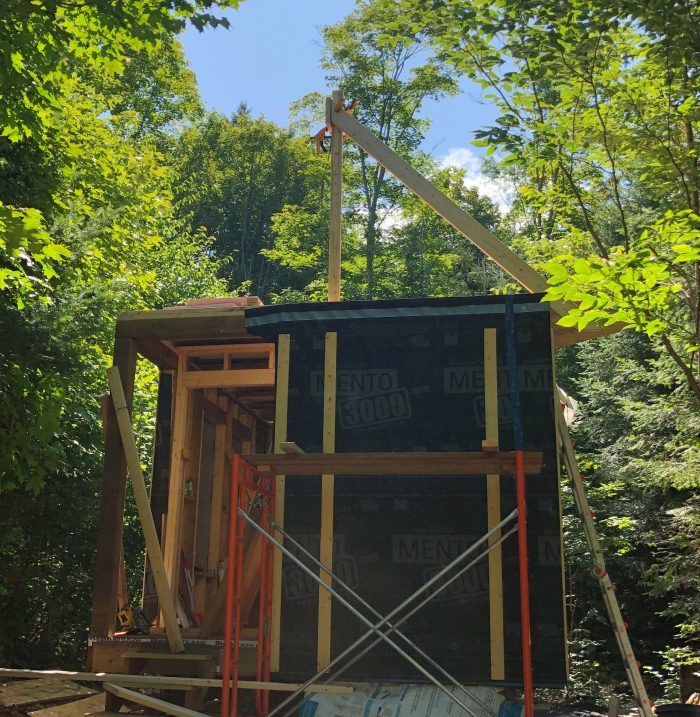
I’ve also attached a picture of the build so far to give some more context – test fitting my rafter templates.
Appreciate any input you guys might have!
-Andrew
GBA Detail Library
A collection of one thousand construction details organized by climate and house part


Replies
I don't get how swapping the thickness of two adjacent layers changes the required screw length. You still need the screws to penetrate from the 2x4 purlins all the way into the structural roof deck. (NOT the rafters).
A dado-cut in the foam to install 2x4 furring under a second layer of foam, with the exterior purlins attached only to the furring doesn't really cut it. The fasteners and spacings would probably have to be specified & signed off on by a professional engineer to get code officials to approve it. The spacing patterns & fasteners specified by nailbase panel insulation vendors will usually get a pass.
Putting the Grace layer on the structural roof deck, and a 5/8" nailer deck through-screwed to the structural deck, with #30 felt on top of the foam and purlins screwed only to the nailer deck will probably fly. With 5" foam that's do-able with a 6.5-7" pancake head timber screws using standard nailbase panel spacings. That way there is no buried wood- the structural deck dries toward the interior, the nailer & purlins all dry into the vent space.
XPS is arguably the least-green way of insulating this roof, due to both the climate damaging HFC blowing agents and the polymer type. While labeled R25 @ 5" it's warranteed for just R22.5, but in reality at full-depletion it will be only R21. EPS of similar density is also R21 @ 5", and while it's the same amount & type of polymer it's blown with a variant of pentane, with only about 1/200th the global warming potential of R134A (the predominant component of XPS blowing agent mixes), and most of the pentane escapes the foam at the factory and is recaptured before the foam leaves the plant.
Polyisocyanurate is a less impactful polymer to manufacture, and is also blown primarily with low-impact iso-pentane, no HFCs.
Hi Dana, thanks for your quick response.
In your first paragraph I'm confused as to why you would not penetrate into the rafters - is this a spacing concern? they are 16"oc. I can’t have screws penetrating the structural roof deck – they’ll pop out into the living space unless they hit a rafter. I feel like I’m not understanding what you mean here.
I understand what you're saying about letting the nailer and purlins dry toward the vent space. Taping the seams of the insulation and using Mento rather than Grace at that layer would allow the buried wood to breath at least. I like the order you're proposing through as it eliminates a layer of underlayment and I could put the purlins at the spacing needed for the metal roof. I'll give this some more consideration.
I also get what you’re saying about the xps and its impacts. From my friend’s demo I was able to recycle most of the 2” foam but the 3” is admittedly new. I didn’t want to mix insulation types and was worried about polyiso’s cold weather performance. I’ll be looking at alternatives for the walls at least to help offset the overall project impacts. Between that and the recycled wall studs I’m finding places to mitigate impacts where I can.
>" I can’t have screws penetrating the structural roof deck – they’ll pop out into the living space unless they hit a rafter. I feel like I’m not understanding what you mean here."
Installation instructions for nailbase insulating panels specifically avoid rafters , apparently to allow more independent movement/expansion/contraction of nailbase panel without stressing or splitting the rafter. It is supposed to be anchored to the roof deck instead.
Installing a 5/8" plywood layer using structural fastener spacing & length on top of the structural maple T & G would make a sufficient screw bed for the nailer-deck-foam sandwich. Put depth stops on the drill to keep it from going through the finish side of the maple. Put the Ice & Water on top of the plywood layer.
>"Taping the seams of the insulation and using Mento rather than Grace at that layer would allow the buried wood to breath at least."
Not really. What do you mean "breathe"? XPS doesn't "breathe", even if the Mento can- it's fairly low-permeance. With 2-3" of unfaced Type II or Type VIII roofing EPS it might have a shot at drying at reasonable rates, not so much with XPS.
Most Type-II XPS is about 0.5 - 0.7 perms @ 2", less than 0.5 perms @ 3". A maple roof deck isn't very vapor permeable either. (If installing a 5/8" plywood over the maple that too would be less than 1 perm.) It's probably on the order of 0.3 perms for the stackup. Yes, at 0.3 perms it would be able to dry EXTREMELY slowly to the interior, but we're talking years, not months, since the temperature of the embedded 2x4 is substantially cooler than the conditioned space during the winter, and cooler than the exterior side roofing in summer. Any moisture that finds it's way to the embedded 2x4 (or any moisture it had when installed) would be there for a long time.
>"I didn’t want to mix insulation types and was worried about polyiso’s cold weather performance."
Are you building in Antarctica or something? Even with 2lb roofing polyiso (labeled R5.3-R5.7 /inch) the mean temperature through the polyiso layer has to be less than 45F for performance to edge slightly below that of fresh new XPS, under 40F to drop below that of EPS (or fully depleted XPS). See the curve in figure 2:
http://msdssearch.dow.com/PublishedLiteratureDOWCOM/dh_09b4/0901b803809b49c0.pdf?filepath=styrofoam/pdfs/noreg/179-00263.pdf&fromPage=GetDoc
So if it were ALL polyiso, with a 70F interior polyiso performance won't drop below fresh XPS until it's 20F outside, and won't drop below depleted XPS until it's +10F outside. Is the average wintertime temperature below +20F (it might be in the middle of US climate zone 6), or below 10F (It might be on the cold edge of climate zone 7.).
If the polyiso is on the conditioned space side of the stackup with the surplus XPS on top, the mean temp through the polyiso would be much warmer, beating the performance of fresh XPS, for a somewhat higher year-round performance.
Hi Dana,
I understand what you're saying now - I was misunderstanding the order of the assembly you'd described. I realize now that you intent the 5/8 directly atop the maple. Makes a lot more sense now.
Before I abandon my original idea though, I've attached a picture of what I'm talking about when I refer to being able to breathe. One of 6 sides of the 2x4 would be in direct contact with the Mento which performs at 38 perms giving at least some drying potential. Do you still feel this is a high risk scenario for condensation or trapped moisture? Directly above the top layer of mento would be the ventilation gap.
I'm basing my concerns of polyiso off other articles recommending it for warm climates only. Unfortunately, the xps is on site so its a moot point on this project but hopefully good information for others on future jobs. I appreciate the direction to other resources on this.
Roof uplift forces are low - I wonder if glue (similar to a DIY SIP) is an option. Speaking of which, people using SIPs discovered that air sealing the warm side (somewhere before condensation) is important. With your plan, I would achieve this with a fully adhered (but non-asphalt) membrane. Or possibly with taped lower layer foam.
There must be some code requirements on roof attachment.
Hi Jon, thanks for your input. I'm looking into butyl peel and stick like Grace Ultra given the feedback here. It's hard to come by in Canada it seems. I don't really like the idea of asphalt based peel and sticks within the living space (due to odor) - it's why I'd focused on a high performance product like the Mento 3000 originally. I'm considering a few things though, like a plywood sheet directly above the ship lap and applying peel and stick to that instead. Thanks again for your feedback!
I have a few comments on the above:
1. If you are considering plywood on top of the T&G, simply taping the seams in the plywood can give you a perfectly serviceable air barrier and a smart vapor retarder without any additional membranes. Taping the seams on each foam layer will also help further reduce air movement.
2. Mento (or a cheaper underlayment) would be a nice addition on top of the stack for better water protection, but only on the top of the stack. Other layers are unnecessary.
3. Maple is very hard. You aren't going to be able to get self-tapping screws to go into/through it easily. You will probably have to predrill pilot holes, and the holes have to be the right size. That will be a serious PIA if you're trying to reach through 5" of insulation + other layers. I would definitely try to install a nail deck on top of the T&G, fastened to the rafters and then get the right size screws to fasten into the nail deck.
Hi Peter, I'm really starting to come around to your advice and others' on a nail deck on top of the T&G. I'm already having to pre-drill the holes to install the maple itself but hadn't thought about the issues involved in punching through it to the rafters as well... Thanks for thinking of that for me.
In terms of the right screw length - 5/8" nail deck on the T&G, then 5" foam, then 5/8" nail deck puts me at total assembly depth of 6 1/4" above the T&G . Is 5/8" embedment really enough depth for a screwing these two nail decks together? I realize there is some structure from the foam itself but it seems like a long span with relatively little for the screw to bite into.
The 5" of insulation is between R25 to R30.
You can get similar performance with 2x8 purlins and R30 batts (R25 whole assembly with 16"oc.) If your roof panel is rated for spanning, you can skip the sheathing and install the panel directly over it (bit hard to walk on though).
If you want slightly better performance, using 9.5" I joists, you get close to R30 with the same batts. If you install the I joists parallel to your rafters, the gap above the insulation gives you a nice vent channel. With a peel and stick over the T&G and a synthetic underlayment over the plywood, this is a very robust assembly.
Either option is less work than trying to hit rafters through maple with 8" screws.
My plans have evolved a fair bit based on what I could and could not recycle from another demo project. I'd originally planned on interior insulation but was able to get some 2" xps. After that I bought and sealed all this maple to give a nice roof with extra head space. I'm too far down the rabbit hole on this one I'm afraid haha. At least I am going into it knowing the PIA of these decisions is all my own doing...
Just as an update for those who helped me out - I've finished the maple ship lap installation and am working now to put a 3/4" nail deck directly atop it. Photos are from when the weather was nice on the first half of the roof.
The PIA factor is 8/10 but the results are looking good.