Change in slope transition flashing
Zone 4c and the attic is vented. Soffit to both gables.
I’ve got a standard style standing seam metal roof the previous owners installed. I have since learned that they went against recommended minimum roof pitch requirements (3:12) and decided to install it on 2:12, and on another part of the roof – .75:12.
what prompted my question is this: last night water dripping from my drywall, coming through a recessed light hole. This is happening right where there is a transition in my roof pitch from 4:12 to… let’s just call it 1:12. The low pitch isn’t really the problem probably, although it isn’t helping. It’s the transition flashing, which slopes slightly back towards the ridge, rather than the gutter. So water will pool there, and normally will be able to drain out because the leg of the flashing that runs up the 4:12 isn’t too short, somewhere around 3”-4”. The problem last night was a little bit of snow, then heavy rain in freezing temperatures. The snow created a dam so the water climbed. Sure enough I went into the attic and water was dripping where the roof deck of the 1:12 and 4:12 meet.
can anyone direct me to the proper way to flash this. Do I just need an even longer leg that runs up the 4:12? Caulking that leg to the underside of the 4:12 roofing won’t do, because of the seams, but I have seen…I think they’re called closure strips that are custom cut to fit the shape of the standing seam, and flat on the other to fit the flashing and you caulk all of that, creating the dam. If that’s the way, where do I get those?
any drawings? Details? Pictures videos etc?
my other idea and let me know if this is at all possible – without buying brand new trusses, could I just re frame the north trusses – connecting the ridge to the gutter, eliminating the transition, which would probably give me somewhere in the neighborhood of one continuous slope of 3:12 at that point… does that make sense?
secondly I should ask while you’re reading this – given that my roof is 2:12 on the one side, and 4:12 that transitions to 1:12, should I start saving $ for a new mechanically seamed roof? (My 2:12 side has given me problems as well, which were cause by hydrostatic movement(?) where the roof isn’t quite steep enough to allow for optimal run off. what happens is that water is able to wick up the one rib, and under the top rib and down again going straight to the roof deck (which I only have tar paper layed down – installed 1994). Atleast thats what some roofer told me. SO, save for a mechanically seamed roof. Keeping in mind no ridge vent… this would be the time if two gable exhausts just don’t cut it?
Long term versus short term goal? Is there a way to bandaid for now, or is there even a way long term to bandaid? I do need to address the leak asap obviously but also asking for some advice on the bigger picture as well.
thanks in advance.
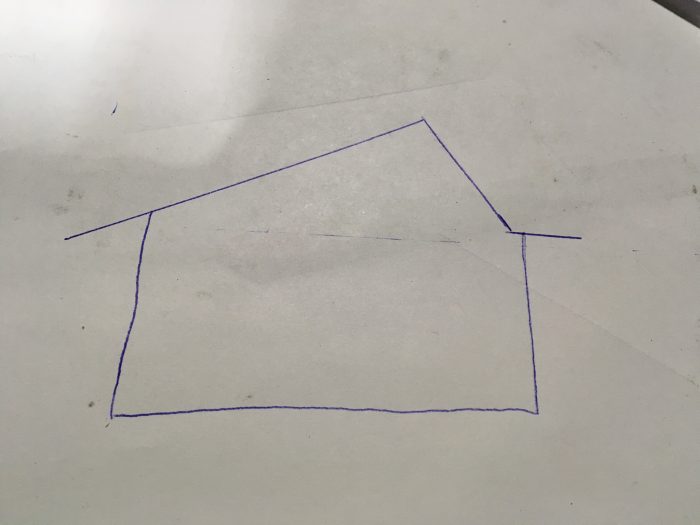
also, see in the picture attached the transition occurs over the dwelling, not the porch unfortunately, hence the leak into the house.
GBA Detail Library
A collection of one thousand construction details organized by climate and house part


Replies
Kevin,
Unfortunately the flashing details for most metal roofs rely on lapping and gravity to work properly, so below 3/12 they all become potential sources of leaks.
Let me describe how the transition should be flashed, and you can see whether it's possible to retrofit the necessary details.
- The lower roofing panels are installed, the ends of the panels cut and bent up 3/4" to form a dam, and the corners between the dam and the standing ribs caulked. Against this dam foam closure-strips are installed (Available from the roof panel manufacturer to fit the profile).
- The transition flashing should be sized so that the upper leg extends at least 12" under the upper roof panels. The lower leg should extend 2" over the closure-strips, and have a hemmed 1" bent edge that is notched at each panel rib so it closes off the end of the lower roof.
- It is important that the lower leg of the transition flashing be installed so that it follows the slope of the lower panel ribs, maintaining the positive slope.
- The flashing is secured with the same roofing screws as the panels into the top slope, and with gasketted screws through the flashing into the top of the ribs on the lower panel.
- The upper panels are installed so that their bottom edge falls on the bend of the transition flashing, so only the lower slope of the flashing is visible.