Comment on job specifications for unvented cathedral ceiling.
severaltypesofnerd
| Posted in GBA Pro Help on
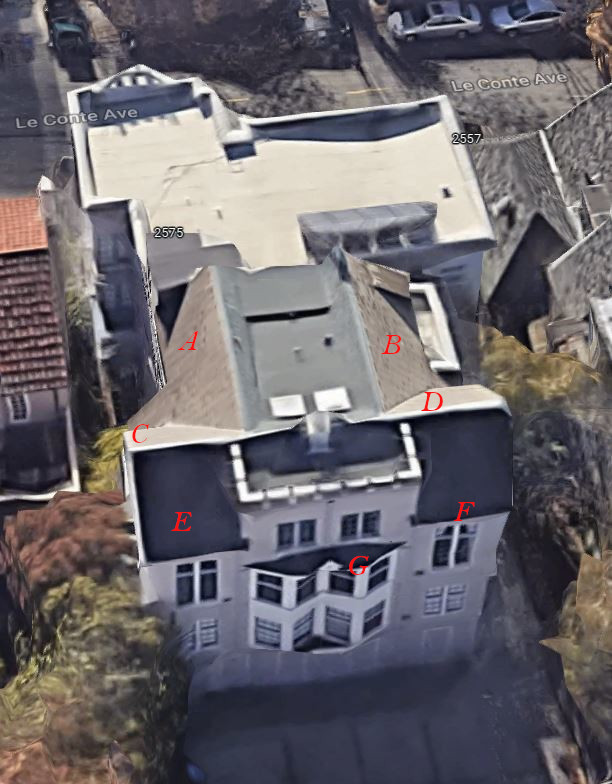
I’m specifying a roof for a San Francisco area Zone 3 roof, on a 12:12 pitch roof of a 1920’s building.
I’m looking for comments on the narrative, particularly regarding the foam and energy details.
This is a Class A requirement area, high fire danger zone.
DRAFT
- Tear the roof down to the T&G layer, removing the asbestos cement shingles and cedar shakes.
Watch out, as potentially harmful dust will enter the occupied units through the gaps in the T&G.
It may be best to set up fans first to vent the unit even with other precautions. - Vacuum all dust a that will be dislodged in later roofing steps.
- Tear out all historic flashings.
- Cut back or remove all wooden gutters, so they no longer extend into the stucco.
Consult with project team on historically appropriate gutter replacements. - Cover the roof in a peel & stick membrane, as a vapor barrier. This vapor barrier must be nearly complete.
- Rip 2×4’s and screw them to the roof perimeter with long screws into the rafters. The 2×4’s are meant to seal completely to the peel & stick.
- Install two layers of 1.5″ rigid Foamular foam sheets, with junctions taped and staggered using vendor specified tape.
- Install 1/2 CDX plywood over the roof, nailed at the edges.
- Fire caulk the edges of each sheet, on the entire roof perimeter.
- Use 5″ minimum screws in the field, through the ply and into the supporting rafters (warning this is hard).
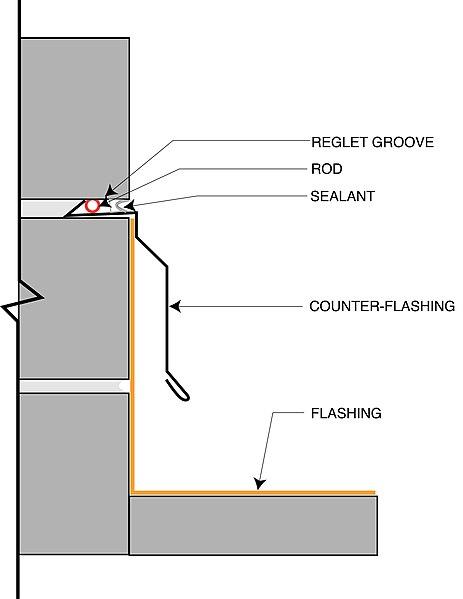
- Install new flashings using a reglet cut into the stucco.
- Add conventional synthetic underlay, and architectural/dimensional shingles per contractor.
Use a lighter gray color for heat rejection, as opposed to a coal black. - Install fascia trim as needed, to hide the 3″ of new roof thickness.
- Finish downspouts.
More photos are at
GBA Detail Library
A collection of one thousand construction details organized by climate and house part
Search and download construction details


Replies
A few things jump out at me here:
1 - If you have to do asbestos abatement, that's really best left to a professional contractor that specializes in such work. This is a hazardous process, so you need some special equipment. Large scale asbestos abatement is not something I would recommend attempting to do as a DIY project. If you have no choice, at least do two things: 1- make the asbestos WET, saturate it. This will help keep dust down. 2- run positive pressure in the room underneath. This will help keep dust from entering that room by making air leak "out" of the cracks towards the outdors instead of "in" towards the interior. I'd still strongly advise you hire an asbestos abatement contractor if you expect issues with dust though.
2 - Use polyiso instead of Foamular (XPS). Two reasons for that. The big one here is you mention fire resistance is a concern, and polyiso is much less of a fire risk than XPS since XPS will actively burn, while polyiso will char but doesn't really support flame. The other reason is that polyiso is greener. A third reason is that polyiso will get you more R per inch, so you get more R value in the same space. Roofing polyiso is specifically made for this type of application, so that's what I'd recommend using here.
Bill
Check. The asbestos scope is a pro remediation contractor.
The roofing and insulation scope is going to a pro roofer with NO top of deck foam insulation experience.
severaltypesofnerd,
I would try and nail down specifics to avoid later confusion.
- Type of: peel & stick membrane, screws to hold down 2"x4"s (and how long), synthetic underlayment, shingles, fascia material (and profile if necessary).
- Pin down what you expect in terms of remediation of dust and debris inside the units. That's the part that which might scare me off as a contractor.
Check. The asbestos scope is a pro remediation contractor.
I have double reminded them that T&G is not a dust control layer. Thanks for the note.
I have work on planning large commercial projects but I don’t know if my comments will be helpful. Just the same here goes.
Suggestion: clarify what you mean when you say « This vapor barrier must be nearly complete. »
2. You mention
Rip 2×4’s and screw them to the roof perimeter with long screws into the rafters. The 2×4’s are meant to seal completely to the peel & stick.
Comment: Rip to what size? Why is it necessary to rip them? If they go along the roof perimeter, how does that integrate with the rest of the assembly? Is the plywood placed over these 2x4 and nailed into the 2x4?
Of course, maybe this clearer when paired with the drawings.
You mention
Add conventional synthetic underlay, and architectural/dimensional shingles per contractor
Comment
Do you want to have the seams taped with any particular type of tape?
You mention
Consult with project team on historically appropriate gutter replacements.
Comment
It is not specified that the contractor will be required to install new gutters, the capacity of the gutters (volume of water), the fasteners to be used . Also, is there a reason why the gutter type is not specified up front to avoid change orders?
You mention
Fire caulk the edges of each sheet, on the entire roof perimeter.
Comment:
Do you mean that you want the trades to seal the seam where the plywood meets the other material to which it is connected? If they apply a bead of sealant on a flat vertical surface, will that bead of sealant stay in place and actually seal the seam as intended? There are many types of fire rated sealant; it it necessary to specify one, for example, that will be water resistant? Is this specified elsewhere?
If the perimeter requires fire sealant, would the same not apply to all the other seams between the sheets?
You mention
Use 5″ minimum screws in the field, through the ply and into the supporting rafters (warning this is hard).
Comment:
Is the spacing of the screws determined by building code or is it something specified elsewhere in the documentation? Is it appropriate to specify whether to use #6 #8 or #10 size screws? Is it self evident that they need to counter sink the screws? If they miss the rafter and notice it, do they remove the screw and se as l the screw hole? Do they leave it in place and add a new one?
If “this is hard” maybe explain briefly. Is it hard to locate and hit the rafters? If the roof deck is wood, will they know or care whether they actually hit the rafters? Is there a way to check from inside the vented roof? Is there value to specify that a 100% must hit the rafters? (This was an issue in our residential project just last year and I had nothing in writing to deal with screws that missed the check from under the roof deck and missed rafters.)
You mention
Install 1/2 CDX plywood over the roof, nailed at the edges.
Comment: is important to specify the length of nails? How deep they must penetrate the wood on the roof? The spacing?
Is this all covered by the building code?
Does the plywood get installed with H clips or is there an expansion gap required? Do they need to tape the plywood seams? Which tape is to be used?
You mention
Install fascia trim as needed, to hide the 3″ of new roof thickness.
Comment:
is the gauge of metal important? Is the colour important? Is this all specified elsewhere?
You mention
You mention
Tear out all historic flashings.
Comment
In my job, there is lots of energy that goes into choosing the right words so forgive me here. Why not just say « remove » rather than « tear out » .
You mention
Add conventional synthetic underlay, and architectural/dimensional shingles per contractor.
Use a lighter gray color for heat rejection, as opposed to a coal black.
Comment
Do you need to specify the fire rating that these shingles must have, since they are replacing asbestos shingles?
Does the underlay need a particular fire rating? Any other characteristics?The tapes used (if any) need a fire rating?
Does the underlay need to be peal and stick? Something that is nailed? Any nailing specifications?
***other notes
Who is responsible for the removal of the waste? Is it the roofers? Does this need to be specified?
If the T&G roof deck is your finished interior ceiling you have to be careful with the peel and stick you choose. You don't want any of the bitumen based ones, you want something with either butyl or acrylic adhesive. Acrylic tends to smell the least, so whatever you pick, I would get a roll of it and give it a sniff test.
If the T&G is continuous to your soffit area, you can have a lot of leaks along the T&G joint between the boards. The peel and stick on top won't stop it leaking along the length of the board, a couple dozen joints and they add up to a big air leak. Less of an issue in your warmer climate, but I would still try to seal it up. What I've done is drill a hole between the T&G a the wall top plates and inject spray foam or flex caulk to seal it up.
If you are in an actual fire zone, I'm not sure I would trust any asphalt shingles. Rating or not, you are better off with something non combustible.
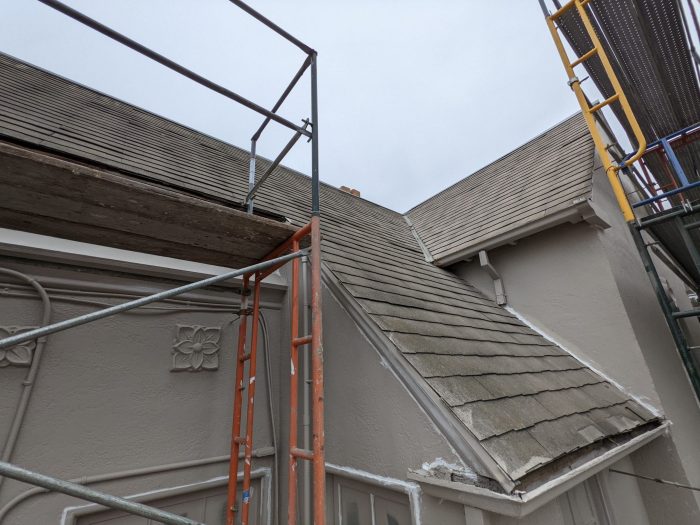
There looks like there are a ton of ugly existing water management details. Cleaning these up will be your biggest challenge.
Thanks!
I got access to the interior for the first time. It turns out it's not T&G on the interior.
The cathedral ceilings each span two floors, going from about 8 feet up to over 20 feet. The interior rafters are exposed hewn beams, the sheathing is 1" true rough cut square boards. In fact, you can touch the cedar shingles above through shrinkage gaps between the boards.
This makes me concerned about fire from the INSIDE also. And considering if the better approach might be:
* Interior 6 mill poly
* Perimeter frame of conventional pine (but redwood would be better).
* Layer of 1/2" or 5/8" type X drywall, then two layers of polyiso.
* Finally conventional ply and roofing.
The building is in a locally declared high fire hazard urban area on a hillside "Fire zone 2". I have no control over the budget: if it were my building I'd go for metal shingle or standing seam in this application.
A Type A roof is required, and shingles (quite stupidly in my view) count.