Detailing Air-sealable Flush Baseboard w/ Reveal
I’m kind of a sucker for certain details that are easier to draw than build, and that are less forgiving than traditional solutions.
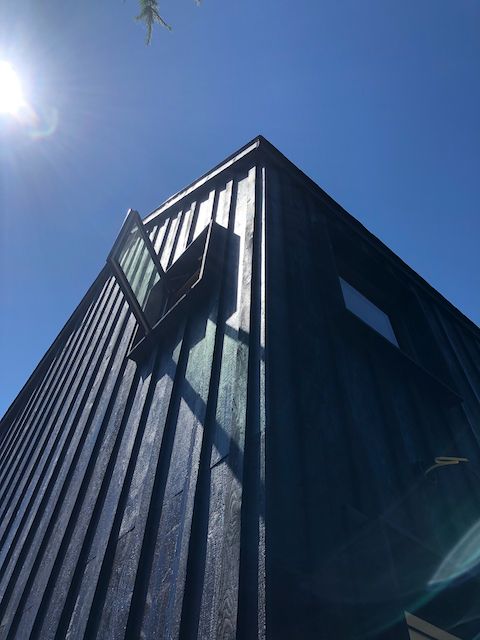
One of these is minimal roof overhangs (see first picture), which I’m using on my current project; this coming winter may prove if I got that right or not. The building is mine; I wouldn’t take the chance designing that for someone else (yet).
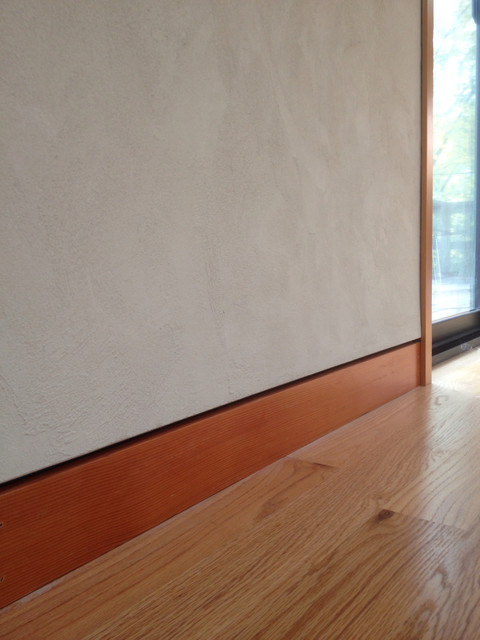
The other detail I’ve wanted to pull off for a while is flush baseboard, similar to the example below (not mine). Various one-piece drywall trims are available to do this, but unfortunately, not affordable or easy to come by in the semi-rural area where I live—e.g., over $600 for a box of 50 vinyl trim pieces, with several weeks lead time.
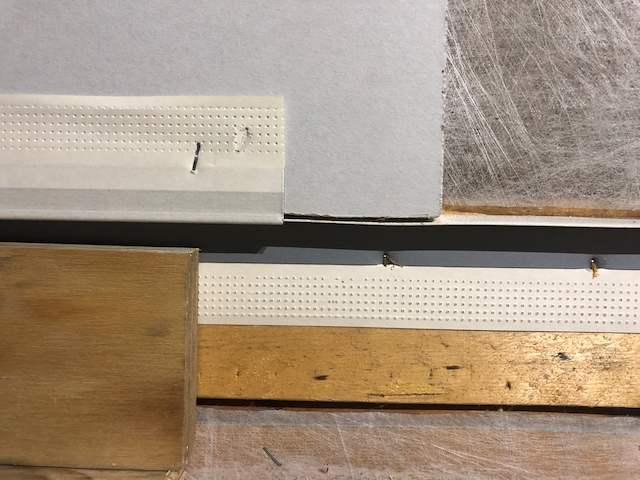
What I’m after is a solution using available and inexpensive L beads. The last few pictures show what I came up yesterday on an 8′ test section. I ran 2×4 blocking on edge at the base of the 2×6 stud bays, and stapled the bottom piece of L beam in place with 1/4″ narrow crown staples. I cut back the edge of the sheet of 5/8″ drywall to remove the taper, rasped the cut edge straight and square, set the sheet in place on top of the L bead, and screwed it to the wall.
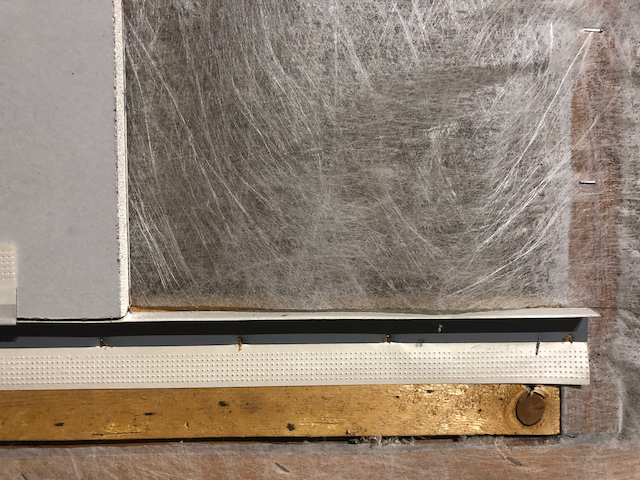
I tacked on the top piece of L bead with staples, capping the lower bead. It’s likely I’ll use spray glue or mud for the final assembly. Finally, I’ll caulk the back of the joint where the two pieces of L beam lap, and paint the reveal area before laying the finish floor and installing the baseboard. Finish floor and baseboard are mocked up in the photo with a couple scraps of 3/4″ plywood. Actual base will be fir, cut down from pieces of 4″ wide t&g finish flooring.
While I don’t plan to use the drywall as an air barrier, it seems like this detail would be easy enough to seal with some caulk and/or tape.
It’s more labor than typical baseboard, and reliant on a flat and level subfloor, but I think worth it for the appearance I’m after.
Any suggestions for improvement?

GBA Detail Library
A collection of one thousand construction details organized by climate and house part


Replies
What is your air sealing barrier? Draw it in section and post...
What is your finish floor?
If it is field finished hardwood, even if you have a dead flat subfloor, you will probably need to scribe the bottom of the base to the floor if not using shoe mold.
Primary air barrier is at the sheathing. The foundation-to-roof wall section I submitted for permit is inaccurate, but this partial wall section attached shows the as-built condition. Doesn't include the floor or baseboard, but I'm sure you can imagine how it continues. When I did a blower door and fog machine test, there wasn't any air leaking around the rim joist (or sill plate, for that matter). As I said above, I'm not using the wall drywall as my primary air barrier, but I might go ahead and treat it as a secondary.
Post probably wasn't clear--my finish floor is 4" t&g fir. Will be finished in place. No plans to use base shoe, as it would sort of run counter to the effect I'm after. You may be right that it will need to be scribed in.
Thanks for the feedback.
—David
OK - good that gyp is not your main air barrier. As to whether or not it can be your second, the wall section, as you noted, does not include the base, so not really helpful to your question.
Your post was clear - finish floor was mocked with 3/4" ply so I presume it will be 3/4" site finish. The aesthetic of the detail does not support shoe mold, so I presume you won't want shoe mold. Thus, in addition to the challenges with your detail you also need to plan to scribe the base. I was trying to communicate that your subfloor being flat does not matter - what matters is your field finishing, which is done by humans so it does not end up flat.
There is some good info here:
https://blog.buildllc.com/2010/10/3-modern-base-details/
https://blog.buildllc.com/2017/09/flush-base-guide/
This like a very fussy detail, I would not bother with it. Plus it is also a dirt pocket, adds a hard to reach crevice that needs to be vacuumed. I can't see doing a decent job without a Z trim piece which is custom bend or special order.
Thanks, Akos. Those are both useful links—I found them a couple months ago when I first thought about how I was going to do this.
You're right that the detail is exacting and fiddly to build, although I guess I'd argue if properly executed, it doesn't *look* fussy at all. First time I ran into this kind of detail was about 15 years ago, when I was the trim and finish carpenter on a remodel job. I was hired on late in the remodel, after the drywall was installed and the prep for the detail (which was a mess) had been done. Needless to say, I wasn't able to run the trim as designed, and that's part of what set me thinking about how to do it better.
I'll mud and caulk the test section I installed to see how it looks, but suspect you may be right, and a custom bend z trim will be far better. As it happens, my local building supply will custom bend sheet metal profiles, and I only need about 120 LF. If they can do that for reasonable cost, and if the results are clean enough for interior work, I'll likely go that route. Don't know why I didn't think to get a custom bend quote earlier—thanks for the suggestion.
—David
The first L-bead closes out the drywall edge obviously, but the second L-bead could probably be eliminated and replaced with a piece of coil flashing (or similar) that could run from the subfloor to behind the drywall to cover the exposed blocking inside the reveal.
The baseboard trim can be used as a spacer to set the drywall onto, or as a story stick to mark/cut the drywall to the proper height (plus the height of reveal gap for either method). Or rip a few pieces of ply/MDF that include the reveal gap height. Or shoot a laser. You can cut the drywall to height after it's installed, instead of installing it at a specific height.
The big box stores usually stock a 5/8" galvanized Z flashing (usually used as a head flashing between sheets of exterior panel siding), which may be a cheap/easy solution to having a custom Z profile bent. It's like a shallow-offset version of a window cap Z flashing. Our local blue box has it for $5.68 for a 10 foot stick (quick web search).
@chrisd_innc:
Z metal for the win!
Finally got the chance to try this over the weekend. Drywall set to proper height on top of a pair of 2x4 spacer blocks, then spray glue + narrow crown staples to attach 5/8" z-metal, then paper tape spray glued over z-metal edge and drywall, then mud. (Will need a second coat ). The dark metal makes for a very dramatic reveal, but I think I'll paint it white for a little more subtlety. For some reason, my local building supply only stocks 5/8" z metal in brown and galv, not white.
L-bead gives a little nicer edge to mud against, but is a bit more labor to install. Overall, both methods are fast enough and accurate enough to make the detail worth doing, at least for me. The most labor is in running the blocking, but that makes for a more solid trim install, regardless of the whether the base is flush + reveal or traditional. Esp. w/ 24" OC studs.
BTW, coil flashing is what was used on the job I was on 15 years ago, referenced above. Not a great solution, in my experience, and really hard to get flat.
Pretty excited about how this is going to look when finished.
As short as that upper leg on the Z-flashing is, you might want to use hot mud on when taping that first coat. Might help with future cracking in that area.
That's going to look awesome, I would love to do that detail on our house.
Devil is in the details, of course. If the goal is this flush look with a consistent reveal, yada yada, that's fine, but don't think of it in any way as a money saver.
Some of the base in my house is scribed (no shoe) where it made sense and because it's cleaner. But, this contemplated design complicates things because the bottom of drywall needs to be dead level as well. Basically, you've removed another degree of freedom in the pursuit of a clean design.
Nothing wrong with it, and you may balk at this, but I 'finger in the air' estimate this as 2x a normal trim job executed well. (And probably 10x a builder grade trim job.)
Oh, this is absolutely not a money saver compared to conventional trim—no way, no how. *Possibly* a money saver compared to the price for actual reglets designed for the purpose, as least in my area, but that's about it. And yeah—I'm the same guy who started a thread about the economics of green building.
FWIW, the bottom of the drywall doesn't need to be *dead* parallel to the floor—the reveal can conceal a little bit of wiggle (maybe an 1/8" over 8' or so), which is part of what it's there for (plus the snappy shadow line). But I expect your 2X estimate is about right.
If I was still doing trim and finish for a living, that's what I'd want. And yes, I'd probably be cursing the architect the whole time.
Plus, in my area, drywall contractors can afford to be super picky and would either pass on the job or price it in the so-high-its-worth-the-hassle range.
Fortunately or not, I'm doing this all myself for myself. Or *to* myself. I expect a person can deal with about anything for 120 LF.
As I said, I'm a sucker. Certain slick details, I lose all reason and just want to make them happen.
Flush baseboards are not difficult to execute, but they are definitely less forgiving than traditional baseboards. Some of the products mentioned by @DavidDrake and @chrisd_innc are all good solutions.
In new construction or a major remodel, you may achieve this detail faster with a dedicated flush baseboard bracket, such as Dorsis Linus.
The installation sequence would be a little different - you would install the the flush baseboard bracket first and then use the top flange as baseline (and rest point) for hanging drywall. Then you would tape and mud the joint. The flooring material would slide into the cavity created by the baseboard bracket. The flush baseboard insert goes in last after wall paint, and you could scribe it if the floor is uneven at places.
Look at a few construction details at https://www.angelbau.com/dorsis-linus-modern-flush-baseboard.