Attic and duct encapsulation with closed-cell SPF insulation
Last summer I took on a project of insulating an attic with DIY closed cell spray foam insulation kits. As part of this project, the HVAC ductwork located in the attic was also encapsulated in closed cell spray foam (HVAC contractor put thin Reflectix on the main trunk of the duct system and they used R-6 flex to the register boots … their work was extremely sloppy and not thorough at all… I removed the Reflectix, and installed metal ductwork in place of the flex duct, myself) . Wall cavities in the occupied space that are adjacent to the unconditioned attic space on the other side also got an application of closed cell foam. It was a lengthy project as the foam had to be applied in several passes of ~1 inch lifts to reach the desired thickness, in temperatures between 65-75F, and on days when the RH was low …. as such, application of the foam was basically limited to a brief window of time in the summer mornings when it was sunny outside. I successfully got all the foam sprayed in during the summer, and afterwards it had to be trimmed where the foam was sprayed broad of the framing members. Trimming the foam was extremely difficult to do, as I was limited to using an oscillating tool unless I wanted to spend several hundred dollars on a specialty tool dedicated for that purpose. In any case, stopping air infiltration and energy loss, and maximizing the R-value was the goal of this project. While the nature of the DIY spray foam kits prohibited a less than perfect application, the project was a success in reaching the aforementioned goal of making the space extremely energy efficient. The space where the spray foam was applied is approximately 1500 sq. ft., and the entire space was easily heated during the coldest of days during this winter with only two small oil filled heaters (one heater on each floor of the structure).
I chose to install the closed cell foam insulation in the attic at the ceiling level, and to do this the foam had to be applied in several different phases, spraying mostly from above onto plastic wrapped OSB tacked to the underside of the ceiling. I wanted to install it in this manner for more than a few reasons. First, to minimize the volume of space that needs to be conditioned by the HVAC system. Second, to allow any possible, extended off-gassing to occur separate of the occupied living space and into the attic where it could escape through the ridge vent (I also installed an attic exhaust fan, just in case, that I can easily turn on via a rocker style light switch hidden in a utility closet if needed to quickly exhaust any possible off-gassing/odor during the extreme heat of the coming summer months). Third, I didn’t want it against the underside of the roof deck should a water leak through the shingled roof were to occur; I want to quickly be able to locate the leak and repair it before any damage to the wooden structure of the roof were to occur. Fourth, if I ever had a need to remove/repair/replace the sheetrock over areas where the foam was applied, it’s not going to be a huge mess to do so had the foam been applied directly to the sheetrock.
Below are some of the pictures of this process from start to finish. Please feel free to ask any questions about the pictures and project/process that you may have.
CONCERNS – Now that the project is complete, I am a little concerned about continued off-gassing of the closed cell foam. While the foam was sprayed last summer, and while I have no reason to believe an extended period of off-gassing is taking place, if for nothing more than peace of mind I’m willing to spend the time and extra expense of installing a Class I vapor barrier between the closed cell spray foam and the occupied living space to prevent/minimize any possible dangerous, undetected off-gassing of the closed cell spray foam into the occupied living space. The product I’m looking at for this application is ARMA FOIL-VB. This product is only 4 mil thick with a water vapor permeability rating of 0.0058 perms. The manufacturers website states it can be used as a radon gas barrier, so I’m assuming it will also work to block off-gassing of closed cell spray foam insulation.
FIRST QUESTION – I’m located in Climate Zone 4. Will installing such a vapor barrier over the foam insulation cause any issues with moisture on the inside of the living space? As the pictures of my project show, the foam was rough trimmed and it will be impossible to have the ARMA FOIL vapor barrier lay down perfectly flat against the foam. Will this be an issue? The closed cell foam is a vapor barrier in and of itself at the thickness it was applied, so I assume not, but I want to be sure before I buy this product and tack it up on the ceiling and to the walls of this living space.
SECOND QUESTION – After trimming the foam, I vacuumed (several times, with a HEPA filter laden Shop-Vac) all surfaces of this living space to remove any residual spray foam dust. The areas where the foam had to be trimmed, while vacuumed thoroughly, still has a small amount of very tiny, loose spray foam particles that could be disturbed and become airborne when the vapor barrier is applied, or if brushing into the trimmed areas of foam occurs before the vapor barrier is applied. To prevent this from happening, is it OK to paint closed cell foam insulation with a water based paint like Benjamin Moore Super Spec or Ultra Spec vapor barrier primer/sealer to lock the rogue particles of spray foam to the surface they are now loosely resting on? And then, on top of the painted spray foam surface, applying the aforementioned ARMA FOIL vapor barrier?
Thanks for reading and for any advice/suggestions to my questions and concern.
GBA Detail Library
A collection of one thousand construction details organized by climate and house part


Replies
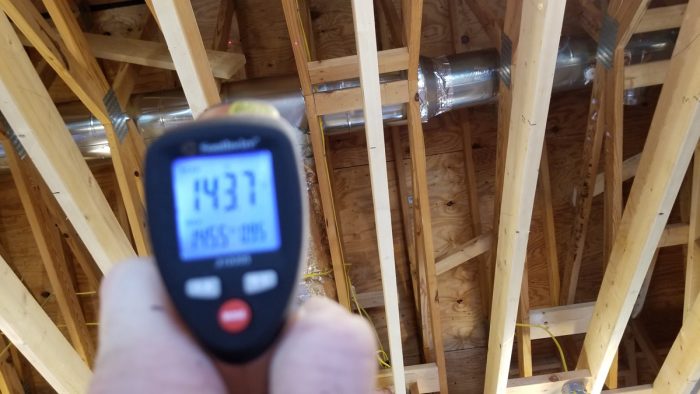
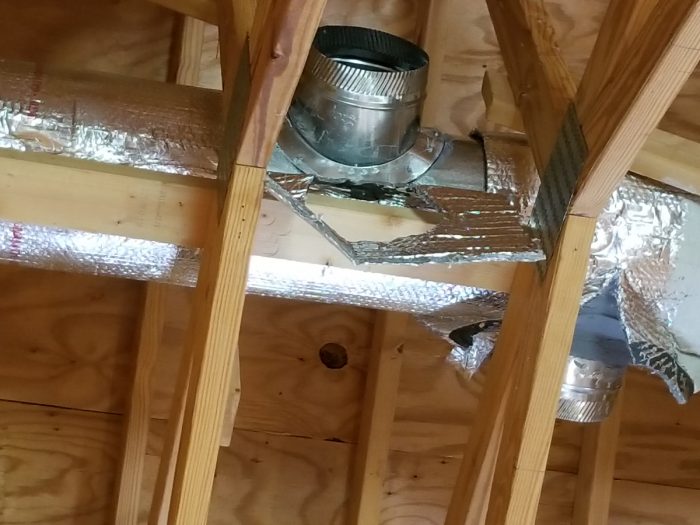
Preparing the ductwork for foam encapsulation
Poly-Iso box construction/installation for recessed lighting
Scaffolding and plastic wrapped OSB forms for installation of closed cell spray foam at ceiling level
Installation of closed cell spray foam insulation
Installation of closed cell spray foam insulation (continued)
Installation of closed cell spray foam insulation (continued ... )
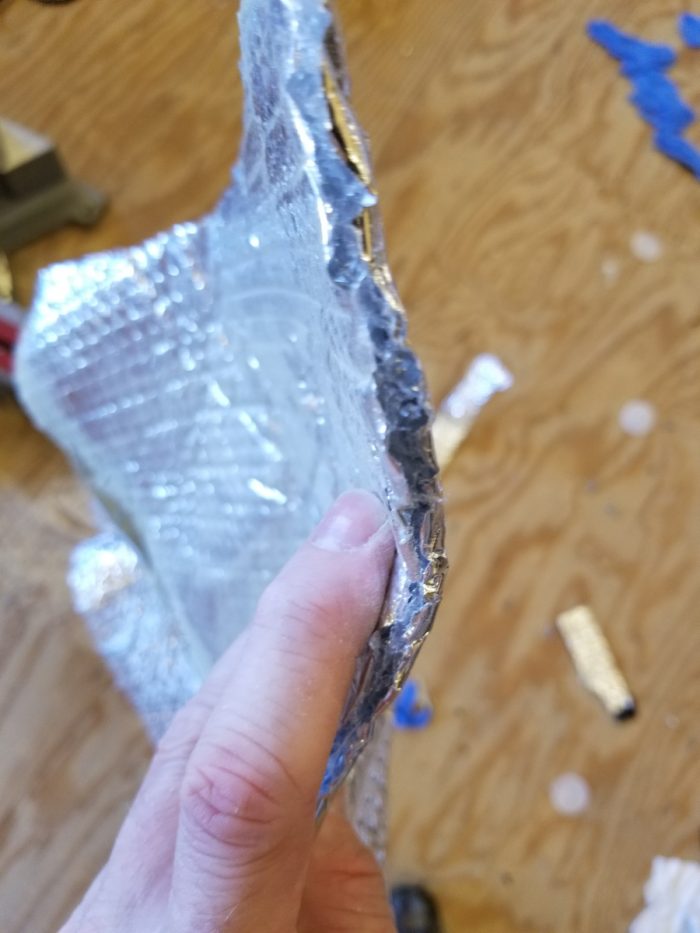
Trimmed closed cell spray foam
Trimmed closed cell spray foam (continued). Here in the third image you can see the sheen of the spray foam skin layer after the plastic wrapped OSB was removed.
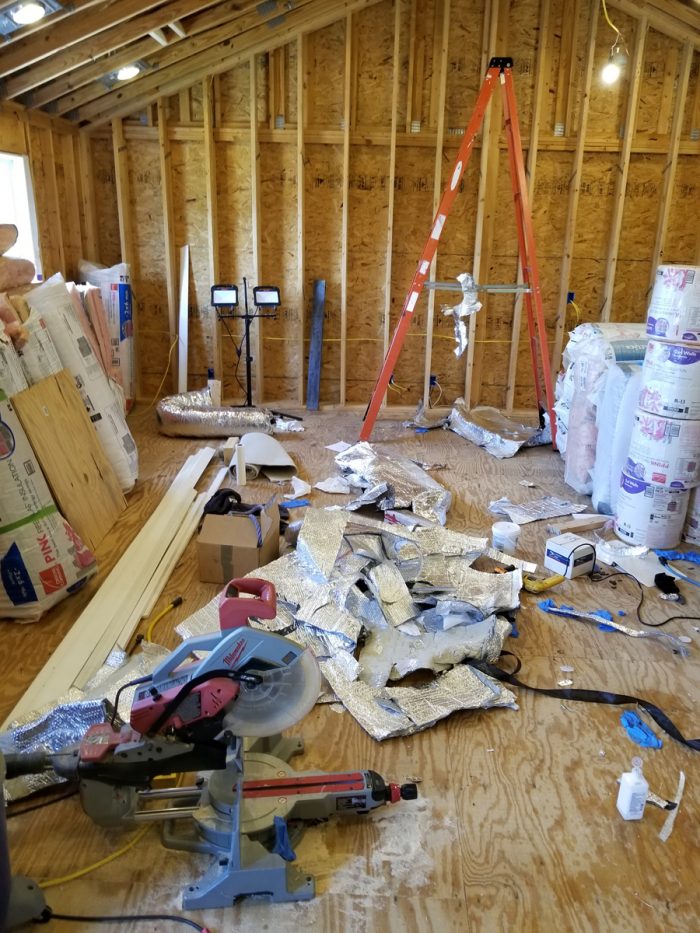
Big mess that had to be cleaned up after trimming. In the last image you can see the mess all cleaned up, and two new pieces of 23/32 plywood sub-floor installed. I had some isocyanate ('A' chemical) leak out of what I thought was a completely expensed spray foam kit onto the plastic I covered the subfloor with, but somehow the isocyanate found its way into the porous sub-floor. To neutralize any possible isocyanate or uncured foam that had gotten into the porous sub-floor, I saturated the entire floor with a mixture of amonia, water, and Tide washing detergent (non-ionized surfacant) .... 2 times ... and then a mixture of amonia, denatured alcohol and water 1 time. After all the nasty stuff I've learned about isocyanate and uncured spray foam, I was still a little skeptical after all this, so I just ripped up those two sheets of sub-floor and put down two new sheets of sub-floor.
If you look to the left of the image, you can see I have black plastic hung over the window that I let down during the day to prevent UV light from coming into the structure and fading/damaging the foam while waiting to cover the foam with vapor/air barrier and then finally 1/2 drywall.
Wow, this is an incredible amount of work. I can't even imagine. I would not recommend this approach ever be repeated as there are far more efficient and environmentaly responsible approaches. That being said, you are clearly cable of some very detailed and grueling work. Whats done is done.
You need to put up drywall or 23/32 sheathing as a thermal barrier. What are your plans in the that regard?
I think an airtight drywall approach would be help manage any off gassing. A class 1 vapor barrier should be okay against the inside of the foam and if you use one, plan to detail it as an air barrier.
I would not paint the foam. Just provide exhaust ventilation and wear a respirator.
*Edit, oh and before proceeding, blower door guided air sealing or DIY verification with window fans and a thermal camera would be a very good idea.
It was a lot of work, but I'm OCD and it didn't bother me at all. Trimming the foam with an oscillating tool took nearly 40 hours to complete, by itself.
I'm going to put up 1/2 drywall over the foam. Will good quality mastic tape for HVAC ductwork be what I need to use on the aluminum foil vapor/air barrier, or is there a better tape that is suited for that purpose? I need something that will seal up well around the drywall screws at the framing members.
I have a friend with a FLIR camera and blower who is going to test the space for air leakage. It should be pretty tight when I caulk at the top and bottom plate, and spray Great Stuff around the windows.
Thanks again,
I use 3m 8087 for anything easy to tape like plastic sheet to plastic sheet. You can put it on a 3" tape dispenser and it goes on quick as there is no backing.
https://www.energyconscious.com/weatherization/tapes/3m-construction-seaming-tape-red-2-8125-in-x-55yd-8087.html
3M all weather tape is very good for more challenging situations taping to anything wood.
https://www.energyconscious.com/catalogsearch/result/?cat=0&q=all+weather
Thanks, I'll check those out.
I saw that the 3M all weather tape (3M 8067) is rated at 0.19 perms, which makes it a Class II vapor semi-impermeable tape (it is .09 off from being a true vapor barrier tape). Do you know of any other 3M or DuPont tapes that are Class I vapor impermeable?
If you lap your joints, you will have it a very very thin hairline that will be at that perm. 99% of your tape will be layered with you class 1 barrier.
Any foil tape will be class 1.
That makes sense, thanks. I'll lap it by 3 inches at the seams as the vapor barrier foil is 51" in width.
I'm going to put a 2 inch strip of the 3M All Weather Tape the full length of the vapor barrier at the location of each of the framing members the vapor barrier covers. How well does this tape accept and seal up around screws being driven into it? The data sheet for it has "Nail Sealability" as a metric, but no mention of screws. The only reason I ask is because I've driven screws in other types of exterior tapes (Tyvek house wrap tape, Zip System tape to name a few) and I've seen the screw sometimes deform the tape because the tape gripped the screw a little too well while it was being driven through it.
As a homeowner who added 2200 square foot to his house, I thought I was crazy. I showed this to my wife. Suddenly buying $6000 worth of metal working tools and building a c-channel staircase three stories high (which I did), didn't seem to crazy anymore.
You sir should receive the DIY award in the category of "I can't believe you frickin' did that"
Good on ya. I've got nothing for you other than "wow"
Dave, I don't know ... you may have me beat! Spiral stairs aren't that expensive. Buying $6K in tools and building a 3 story spiral staircase is pretty crazy! How long did it take you to complete the staircase? Your wife would have killed me if I were in your shoes, because I would have probably just installed a residential elevator ... those can get real pricey. I hope you and your wife are young and don't have knee problems!
This space of mine is actually going to be a retail space on the bottom floor and my workshop on the top floor .... for now, anyway. It'll eventually become living space (rental units) when I'm old and ready to retire. You should see the next phase of this project .... the deck I'm building to make it possible to get wood and sheet goods up to the second floor workshop. Your wife would die if you did something as crazy as what I'm about to do with this deck I'm building!
Here's the deal with my foam - I'm in a rural area with only two spray foam contractors here. One of the contractors recommended putting open cell foam in the crawl space underneath my building, so he was out immediately after recommending that ... after reading all the horror stories about botched foam here at GBA, I was not going anywhere near this contractor. The other spray foam contractor declined to spray closed-cell foam at the ceiling level, and was insistent on spraying open-cell foam under the roof deck, which is what most people do because it's easier and quicker to do. He didn't want to spend the extra amount of time it took to spray closed-cell foam around all the obstructions at the ceiling level. Both were priced essentially the same per sq. ft for the R value I wanted to achieve (R-42-49), which was basically equal to what I paid for the DIY kits to get the same R-value. So, the only thing I was out was the time it took to do it myself (1 day to build and install the poly-iso boxes around my recessed lights, 1 day to tack OSB up onto the ceiling, 1 day to build the scaffolding, 5 days to trim and clean up the foam, 32-40 hours total of taking my time and spraying the foam when ambient conditions were perfect and in the lift heights that the manufacturer recommended). And there was a little extra expense to do it at the ceiling level vs spraying it to the underside of the roof deck ($100 for 1/2" sheets of poly-iso, $250 in OSB and plastic, $300 for the wood to build my own scaffolding), but I could have saved $350 of that expense if I would have just put up drywall on the ceiling and sprayed the foam directly to it on the attic side ... I could have saved the expense of one of the foam kits and time of trimming back excess foam if I wouldn't have sprayed the wall cavities full.
Call me unorthodox, but about 12 days total labor, an extra expense of $650 to do this at the ceiling level, and to know nothing was missed and that it was done properly without any shortcuts taken ... that little bit of time and expense is nothing at all for something that's going to last me at least the rest of my life. And the peace of mind of having it at the ceiling level ... I will know about a roof leak as soon as it appears, and I'll be able to find it quick and easy and repair it. And with always rising energy costs, I am not going to be heating more space than what is absolutely necessary. No worries at all about rodents poking holes through the foam into an encapsulated attic space and me not knowing about it until there's a moisture/mold problem, or me never having to regularly crawl up into the attic and inspect for things like that. That little bit of time, labor and extra expense was well worth it for what I see as benefits to having closed cell foam sprayed at the ceiling level.
J. Eric,
It's not a spiral, it's a huge staircase made of c-channel. so it has two landing. It has floating 4x12 CVG fir treads. Its' really an architectural interest piece to detract from the fact that our 4300 sf traditional started life as a 2100 sf split level. We solved the main issue of split levels by doubling the size of the foyer, but wanted to open it up a bit more, so solid stairs were out.
The quotes to build this were off the charts. Just the CVG treads alone were $500 a piece. I sourced them reclaimed for a fraction of the price. It took me three years to complete. I did it in sections. I had mocked up wood stairs and would just replace a section at a time.
The c channel is C-10 15.3, so of course the foundation needed to be underpinned. Just another of many "projects" I get myself into. As one of my buddies said, "If Bob Villa would have told me he was going to do that, I would laugh in his face, but when you said it, I figured it get done." Sounds like we are cut from the same cloth on that one. Crazy projects no one else we know would even think about doing.
Well, at least now I have a new Hypertherm 45xp, a new lincoln mig welder, a Makita LC1230, a bamd saw, an awesome 15 year old (almost as new) Rigid drill press I picked up off Nextdoor for a song, and a host of other awesome tools. Time to start making yard art.
great project, thanks for sharing. Just proves the old saying, if you want something done right, do it yourself. Cheers
You can never have too much space! If you have pictures of the staircase, share them ... I would love to see it ... it sounds really cool. I think it's awesome you went out and bought the tools and done it yourself. Keep those tools and get some ROI from them, even if it's just yard art! =)
I used to build spec homes before the 2008 market collapse, and from experience I've learned that nowadays a large percentage of contractors will always take the path of least resistance ... aka, they take all the shortcuts they can ... so, I usually do most of my own work, if I can, to know it's done right the first time around.
What you said about your buddies and Bob Villa made me horse laugh. I'm the same exact way. I've also completed many of my own "projects" that people would shake their heads at and tell me, "don't do it, it's not possible" ... and I just jumped into the "projects", head-first, and made them work. Sometimes you have to throw a lot of money at it, but if you want something bad enough there is always a way.
You did a really nice job trimming all of that spray foam. We typically don’t recommend spray foam in walls on this site due to the thermal bridging of the studs. I would normally recommend contracting out a job of this size because it will likely be cheaper to have a contractor do the work since the spray foam kits are very expensive for the amount of cured foam they produce.
You were right to replace the wood that the uncured spray foam component leaked onto. Your cleaner mix won’t “neutralize” the chemical in the kit, and most of the problems people have with spray foam is do offgassing and other issues from UNcured, or improperly cured, foam.
Be sure to use a metalized vapor barrier if you’re worried about long term offgassing of the spray foam. The volatile components that offgas can migrate through thin plastics so poly sheeting alone is of limited benefit here. If your foam cured properly you really shouldn’t have to worry about it though — properly cured spray foam is a very stable inert material.
Bill
Bill, thanks. I could have done flash and batt, but I will eventually be installing 1 inch of poly-iso or XPS continuous exterior insulation to reduce thermal bridging when I remove the vinyl siding and install LP smartSide.
Do you have a metal vapor barrier you can recommend? I'm looking at ARMA FOIL-VB. I just think for the minimal cost to install it, it's good added insurance against the unknown about this type of insulation as there is still on-going research about any long-term effect on ones health from exposure to it
( https://www.energyefficientsolutions.com/ARMAFOIL-VB.asp?gclid=Cj0KCQjw3qzzBRDnARIsAECmryonzEW5y26e4DvMI6-4syM08JQzJwQ-e-OdPyhzsZY7PCIvKWyfyycaAliYEALw_wcB )
>"Bill, thanks. I could have done flash and batt, but I will eventually be installing 1 inch of poly-iso or XPS continuous exterior insulation to reduce thermal bridging when I remove the vinyl siding and install LP smartSide."
XPS would be an even less-green choice than all of that HFC blown closed cell foam that was installed. The CO2e footprint of R5 XPS is comparable to R15 of HFC blown polyurethane (or R25 of HFO blown polyurethane.)
At 1lbs density, foil faced sheathing polyiso has the CO2e a full ORDER OF MAGNITUDE lower than XPS, inch for inch.
https://materialspalette.org/wp-content/uploads/2018/08/CSMP-Insulation_090919-01.png
Dana, thanks for the recommendation of the poly-iso for the exterior. That's what I'll use. I didn't realize installing closed cell foam was harmful. I felt like I was doing a good thing for the environment by installing the closed cell foam, reducing my energy consumption needed to condition the space. Thanks for making me aware of that. I was thinking more about the effect on energy consumption, than I was the actual installation of the foam itself.
Thanks!
Spray foam is like anything else in terms of “greeness” — it’s a tradeoff. You won’t beat the spray foam for air sealing completeness, but did you actually gain enough in energy efficiency to offset the costs of the product you used? Normally I like to recommend mineral wool in stud cavities and exterior exterior rigid foam. I only use spray foam in places where it’s really the only option which tends to mean unvented roof assemblies and certain rimjoist applications.
I completely agree with Dana about using polyiso over XPS on the outside. You’ll get a little more R per inch this way too, and less R value reduction due to aging over the life of the product. Dana successfully converted me over to polyiso some time ago from my previous “XPS has and advantage in cold weather” thinking. Use XPS in underground applications where it has an advantage over Polyiso, use polyiso on the outside walls of your house where it has an advantage. Consider using reclaimed polyiso here too.
Being smart about what material you use where can go a long way.
Bill
Bill, it'll probably take at least a few decades for the foam to pay for itself and real savings in energy costs realized. What I was hoping is that the air tightness of the foam in the ceiling will give me enough extra energy efficiency to help offset some of the deficiencies of a home solar power system like the Tesla Solar Roof ( https://www.tesla.com/solarroof/design ) + Tesla Solar Panels, and get me close to being able to generate my own energy most, if not all, of the day. I have a friend who has the Tesla Solar Panel system, and if his home wasn't older and had been insulated a little better he'd be able to generate his own energy for the better part of the day. That's my goal ... I'll install the Tesla Solar Roof as soon as the roof on my building needs to be replaced.
I'll definitely take your advice, and the advice of the others here the next time I insulate a structure. I wish I would have trolled a little deeper into the GBA Q&A's before I proceeded to insulate this building of my own, and had read advice like you, Dana and Matt have given here in my post. What you said about using different types of insulation where they're best suited in a structure will be my future approach when the time comes again.
Thanks again, I really appreciate the feedback and info.
The vapor barrier you have selected would be acceptable as aluminum is highly impermeable to most gasses vs polyethylene and other plastic sheeting. Many chip bags actually have a very thin metal coating to reduce permeability, which is why they are silver inside.
XPS and most DIY ccSPF both use highly potent greenhouse gasses to produce the foam and should not be used at this point except when they are the only option. XPS is easily replaced with EPS or Polyiso. I know of only one DIY ccSPF that uses the low global warming potentila blow agent HFO: https://www.handifoam.com/product/handi-foam-high-density-low-pressure-spray-polyurethane-foam-spf/
The only two applications for ccSPF that make sense to me are rim joists that were that were not air sealed from the exterior and retrofit hot roofs where it does not make sense to replace the roofing material.
The high R value is in the bay is diminished by the framing and is pretty much the highest $/R value. Always look at the total wall R value and $/total R contribution when choosing insulation. I attached some examples, although I did not update the costs accurately. They represent R49 in the bays, R30 in the bays (R30 rockwool), and R30 + 1" interior polyiso. Going from R30 to R49 in the bays gains R5.3, while adding 1" polyiso to R30 om the bays adds R9.1.
The OP still has the best DIY spray foam job I have ever seen and is clearly pretty skilled.
Matt, thanks for confirming on the vapor barrier I've been looking at. It's reasonably priced and won't add much to the total cost of this project.
I wish I would have known about the high amounts of HFC in DIY closed cell foam. I didn't realize that, or I would have looked for an alternative like the handi-foam you linked to. I was drawn to the particular brand of foam I used because of its green color that helps indicate properly mixed chemicals when spraying. I thought all DIY foams were equal, and that they all were green friendly.
Based on those examples you've shown, It appears I wasted a lot of $$$ in the walls by filling them full of closed-cell foam. Does this hold true even for walls that are adjacent to the attic space that are under roof ( walls not directly exposed to the exterior .... like a knee wall) or is there some added benefit to filling those wall bays full of foam? Does thermal bridging take place at the same magnitude in knee walls connected to the attic space as it does walls connected directly to the exterior? I think during the summer months it could actually be worse in knee wall type assemblies because of the higher temps in attics than what is on the exterior of the attic space, but in the colder months it seems that thermal bridging would occur less in knee wall type assemblies. The only place in this build where I have closed-cell foam directly on an exterior wall is on the large gable in the pictures, and a small section in the closet at the stairway. The rest is in the attic or adjacent to the attic. In the attic space itself, I was able to completely cover the bottom chord of the roof truss (the chord that my ceiling drywall will be affixed to) in closed-cell foam. There's 3-4 inches of closed cell foam covering them, so there shouldn't be any thermal bridging occurring there.
>" I know of only one DIY ccSPF that uses the low global warming potentila blow agent HFO: https://www.handifoam.com/product/handi-foam-high-density-low-pressure-spray-polyurethane-foam-spf/"
Unfortunately the 3lbs density (rather than 2lbs) undoes most of the CO2e benefit of the lower impact blowing agent. The net impact is comparable to that of 2lbs density HFC blown polyurethane, but still WAY lower than XPS.
Despite a comparable polymer chemistry, the lower density and low-impact hydrocarbon blowing agents used for sheathing polyiso make it about half the impact per R of HFO blown closed cell foam (and lower than Type-II EPS, which is a higher impact polymer, with and more polymer per R.)
Ooh, I had missed that it was not 2lb density. Hrm.. so I don't know of any HFO blown 2lbs density closed cell foams available yet...