Feedback on Wall Assemblies
My partner and I have been designing a home in central Maine (climate zone 6). Originally we had been planning on using 2×6 studs with rockwool batts in the cavity and then wrapping the exterior in 3″ rigid rockwool boards. With the price increases over the past few weeks, we’re now looking for a cheaper way to a decent thermal envelope. We’ll be doing most of the labor ourselves and with friends and family.
I’m interested in Stephen Bonfiglioli’s wall design that puts the thermal break on the inside in the form of foam strips on 2×6 studs and then uses 2×8 batts to fill the stud cavity. One challenge with it though is that the 1″ x 1 1/2″ strips of EPS foam that he uses would only give a thermal break of ~R-4 and I believe in our climate zone, the code requires an R-5 thermal break. I realize that the Bonfiglioli wall doesn’t make a complete thermal break at the corners — I’m waiting to connect with the local code enforcer about this, but I kind of doubt that he’ll care about that.
Attached are a few mockups of some variations on Bonfiglioli’s wall that would have at least an R-5 thermal break. I’m very inexperienced, so I was hoping to get other’s take on which (if any) of these designs might meet somewhere at a reasonable intersection of simple and cost-effective. If we go with one of these walls, we’d also be adding a poly vapor barrier between the drywall and whatever material would be on top of the foam strips.
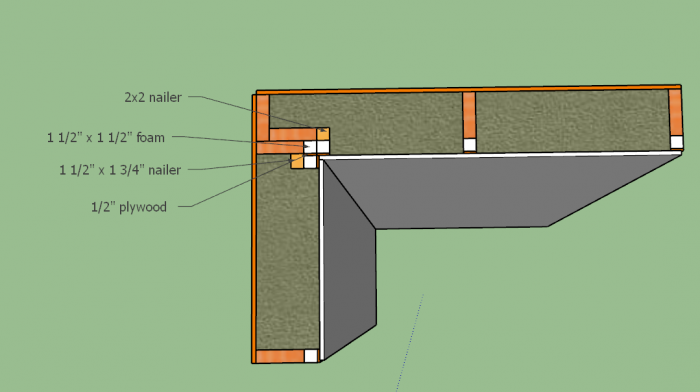
1. 1 1/2″ x 1 1/2″ EPS foam strips covered in 1 1/2″ strips of 1/2″ plywood or OSB: If we went with this design, I’m guessing we’d need to use 2 1/2″ drywall screws to connect to the studs or nailers behind the foam strips. We’re planning on using 1/2″ ZIP sheathing on the exterior of the house, so we could use some combination of waste from that and standard plywood. The foam would have to be custom ordered, but it sounds like there are a lot of manufacturers who do that. This design would require a 2×2 nailer and a 1 1/2″ x 1 3/4″ nailer in every corner.
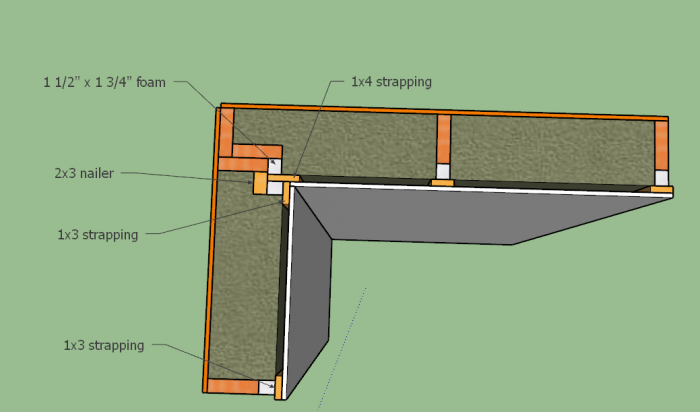
2. 1 1/2″ x 1 3/4″ foam strips with strapping: This design would use 1x3s centered on the foam strips on the studs like in Bonfiglioli’s wall, and each corner would have foam strips offset behind one 1×3 and one 1×4 with a 2×3 nailer behind the offset 1×3.
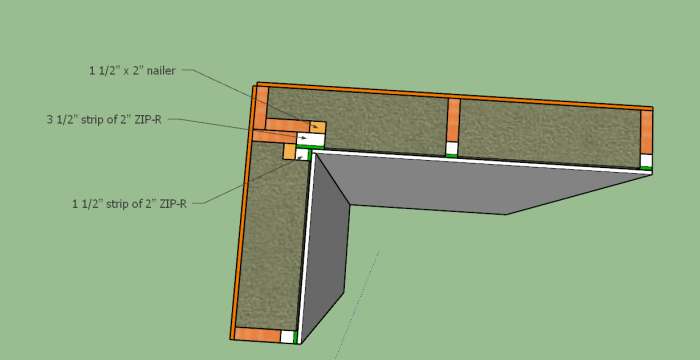
3. 1 1/2″ strips of 2″ ZIP-R with two 1 1/2″ x 2″ nailers in the corners: This design seems the easiest to me and obviously creates the best thermal break — although I’m a little hesitant about cutting up all that polyiso with a table saw and spreading that crap all over the place. My worry with this is that there would be a 1/4″ gap between the batt insulation and the drywall with nothing preventing the batts from bowing toward the drywall. I don’t know if this is something to even worry about, but it seemed like this could result in a small gap in insulation at the top of the wall.
4. 1 1/2″ x 1 1/2″ foam strips with strapping: This one is just like #2, but with thinner foam and a 1 1/2″ x 2 1/4″ nailer at the corner. This would cause the batts to be compressed by 1/4″ where they overlap with the strapping, but I’m guessing that isn’t much of an issue.
What do you all think? Any of these seem like the right choice to you or should I be going back to the drawing board?

GBA Detail Library
A collection of one thousand construction details organized by climate and house part


Replies
Recommend simulating your wall assemblies in this tool:
https://www.ubakus.com/en/r-value-calculator/?
The Bonfiglioli wall certainly seems compelling.
* Could you replace the 2x6 with T-studs for even more performance?
* Could the EPS foam be swapped for XPS?
* Will the foam be fastened mechanically (screws) or with adhesive?
Would recommend benchmarking against some of the common double walls. One advantage of these is that the vapor barrier (retarder?) can be inside the wall instead of against the drywall, which minimizes the penetrations from outlets.
Thanks, Erik! To answer your questions:
-We're opting for 2x6s to keep costs down.
-Yes, we could switch EPS with XPS. You could get a R-5 break with an inch of foam that way. The downsides being that XPS is more expensive, worse for the environment, and I'd have to cut each piece to size.
-Bonfiglioli uses 1 1/4" roofing nails to attach the foam to the strapping and then 3 1/2" ring-shank nails to attach the foam/strapping pieces to the studs and sills. I was thinking of doing something similar and adjusting the nail sizes depending on the foam thickness.
We considered double walls, but decided against them after having heard of a lot of moisture problems around here with them. With our cold winters, a vapor barrier that sits behind the inside wall seems like it would trap moisture inside that part of the wall.
The current thinking on GBA is to use a vapor retarder, like Intello or Membrain, instead of a vapor barrier. You can simulate the wall in the Ubakus tool and see what the vapor levels are in the wall. Would suggest taking a second look at the double wall concept.
Deleted
Most codes have provisions for U factor based compliance. You would have to do a bit of hand calculation to show that your assembly has the correct U factor. You can look at this link of a simple assembly calculation:
http://effectiver.ca/calculator/wall.php?id=1142
I would use polyiso strips. These tend to be higher density and higher R value. For the small amount of rigid you need, the cost difference is negligible.
For the strapping use at least 5/8 plywood, 3/4 would be better. You want something that will hold screws well and won't be too bendy. My local lumber yard will rip plywood to size if ordered ahead of time.
Get framing nailer for putting up the strips. Screws are slow and easy to overdrive. A budget nailer will pay for itself in no time. If your budget allows, a cordless framing nailer is great.
Zip R can work but it is pretty dusty to rip and the foam is not adhered all that well.
I would not bother with foam at the corners. The detail gets too complicated for minimal energy savings. You want solid corners that don't move.
Evan,
Great post,
I went all in on the Bonfiglioli system in early 2019 on a 42' x 18' (756 SF) addition with a shed roof that is 10' at the low end and 15' at the high end. Some sections are full height. The roof has 8" closed cel' spray foam in 11" deep I-Joists. Pictures attached.
Layers from the outside in were:
1. Horizontal Cedar and Pine T&G
2. Furring for airgap
3. Taped Huber Zip Panels (I did not obsess over all nail holes but patched the egregious ones.)
4. All penetrations and widow sills taped with flexible flashing tape
5. Sealed with expanding foam around the minisplit lines through the ZIP layer. With minisplits you need condensate drain line penetrations as well so mount the heads on an exterior wall IMO.
6. 2 x 6 studs
7. R30 Rockwool Comfortbat
8. 1" blue rigid foam on all studs, sills etc. Had to add some nailers at the corners because I did not, as you are, design the the corners ahead of time. I attached strips and furring in one shot using 2 1/2" nail gun nails into the studs.
9. Intello wrap fully taped (love the stuff)
10. Sheetrock
I did the foam, furring, insulation, and intello install with a handyman, wife, and myself. We were weekenders and it took about 3 weekends off and on.
Things I'll do differently:
• I ripped all the 1" foam myself. Never again, what a mess, I'll buy it pre cut.
• Your attention to corner details is spot on and thanks for the skp details...I've done similar. I'm building a wall corner mockup for my framer.
• The minisplit penetration was for 4 heads, thus eight lines. I should have built a rational chase though the wall and been able to seal it less casually, it's airtight but ugly.
• I did not use sealant at the joint between subfloor and wall framing sill but will do it this time.
• Inside the sprayed ceiling foam, I would fill the rest of the 11" I-Joists with either Rockwool ahead of sheetrocking, or blown in cellulose afterwards. This would make for a super insulated roof.
• Regarding the electrics. The wires crossing the studs at ~18" AFF interfered with installing the Rockwool. It had to be slit and fitted. This time I am creating an electrical chase inside the structure along the floor so the insulation will be as continuous as possible. Some light switches have to be on exterior walls so I'll build nice looking vertical chases up to their height. See the attached photo of worst-case condition.
• The structure was framed out with soffits and an attic. But it was a HUGE pain to insulate and wrap around all the ledgers. It took forever and is somewhat less airtight. This time, the shell will go up, then all insulation and Intello goes in across flat, full-height walls. This will be much easier and faster to seal up. Then the ledgers and soffit frames would then get built on top. of the Intello.
• The new 14' x 28' structure but will be tighter than the first which has a Morso wood stove, so I'm planning on using 2 Luminos heat exchanger fans at each end of the space.
• We are building on piers again and will follow Malcom's kindly posted article', attached below.
Good luck!!!