Floating Shelf Hardware and Mortising a Deep Pocket
Please delete if this isn’t the appropriate forum for this.
I am doing a project with a bunch of floating shelves throughout kitchen, bath, living, etc.
They are a solid stock old growth redwood with many inside and outside corner miters. About 8-10″ deep shelving.
I am looking for a floating shelf hardware where I can pre assemble/glue miters and slide the shelves in place easily.
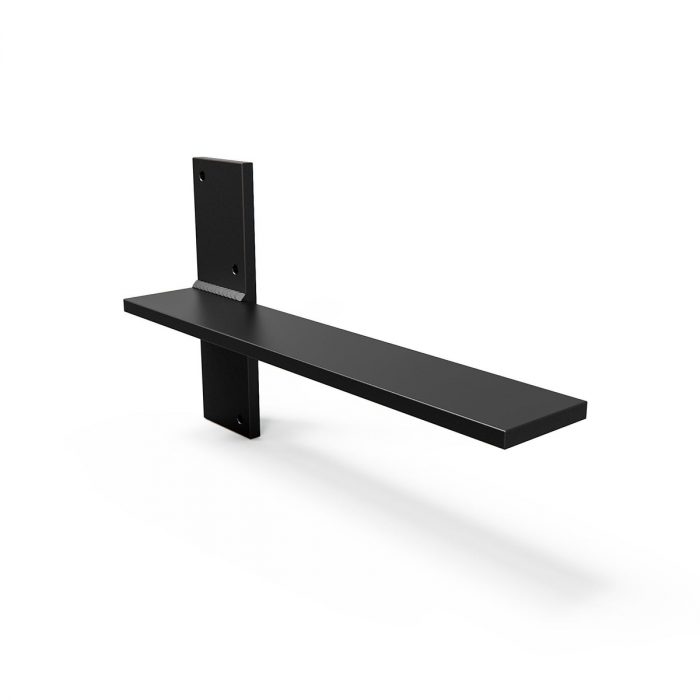
I was thinking of using these type of robust brackets but I need to figure out a way to mortise a deep 1/2″ pocket (7″ ish deep) in the back of the solid redwood stock I am using for my shelving.
Router bits aren’t long enough…dado on a table saw not long enough….I don’t have a ton of shop equipment. Maybe a chain mortiser or porter cable mortise lock machine(these don’t go that deep anyway).
Anyone have any ideas how I can efficiently mortise a deep channel in the back of my solid shelving stock so I can slide it onto these flat bar brackets?
Thanks ya’ll! and feel free to delete if this isn’t the right forum for this type of question.
Nick
GBA Detail Library
A collection of one thousand construction details organized by climate and house part


Replies
No need to delete, Nick, as many builders are here and some do custom woodwork. I would recommend heading over to the forum at our sister publication Fine Woodworking. I found this seemingly related thread there but I am sure you can get the readers there to answer your specific question.
Nick,
How visible would the bottom surface of the shelves be?
You lost me a little on the inside/outside corners /miters, but as for the deep mortises and related ideas:
Options if the shelf bottoms would not be visible, or minimally visible:
1. Drill and countersink the steel brackets and attach shelving with nice screws (bottom face mount)
2. Route a channel in the bottom of the shelf and recess the steel brackets into the shelf. You could cover with a filler block from the same wood to blend if needed. You could also slice a piece of veneer from the entire bottom and reattach after, which would make it quite invisible.
If the shelf bottoms will be visible:
3. Make a drill jig with with bushing guides. Drill out the waste, chisel out the top 3-4" nice and clean, and then use the top section to aid in get the bottom of the mortise cleaned up. You may need to grind up a chisel to get that deep.
4. Get different steel mounting hardware. I haven't looked into this, but something that inserts into round holes, or multiple holes would make life much easier.
Good luck with your project!
Steve
There's a product/brand called Hovrsolutions (dotcom) that may meet your requirements. This is not an endorsement, I've just seen their ads.
I plan on a similar project for my place and I am going to get custom made brackets. 1/4" plate cut to 1 1/2"x3" for attaching to the studs with round bar welded to the plate at 90 degrees. Plates pre drilled for screwing into the studs.
I will locate the studs, cut the drywall out to fit the plate, and then caulk the plate to the drywall if on an exterior wall to keep the air barrier intact. One bracket every 32" of shelf.
Going around a corner gives the shelving gets much better support as you are no longer bending the mounting hardware. I've used simple steel angles underneath to support. These 2x6, so not deep.
I've also used standard Ikea floating shelf hardware which only needs a hole drilled into the shelf and a small routered pocket for the mounting plate. You do have to preinstall the hardware onto studs, measure than drill/router. Those Hovr brackets do seem much sturdier though.
Another option where it is easier to drill a hole: https://www.sheppardbrackets.com/
I don't know if this helps, but this is how I tackled floating shelves in my kitchen remodel in 2014. I wanted the shelves to support fairly heavy loads (cast iron cookware etc) and I wasn't convinced by any of the hidden brackets I could find. Instead I drilled directly into the wall studs for some sturdy hanger bolts. I wrestled with the same question as you, how to miter an appropriate hole into a solid shelf, and eventually made them as a box made using white oak MDF, but the hanger bolt concept might still work for you.
The nut on the end of the hanger bolt worked out just right to fill the slot in the shelf box (electrical tape to prevent any rattles). The electrical cable is for low voltage LED lighting routed into the shelf bottom. These two shelves were made by the kitchen cabinet makers, though I later became more confident with the table saw to make my own elsewhere.
I was renovating a kitchen from the 60's that had floating shelves that were made from 6/4 white oak that I had to take out. I could not figure out for the life of me how they were attached, nor could I budge them in the slightest. Eventually I just cut through them with Sawzall cuts perpendicular to the wall. Once I had cut them into three pieces I could see that they had two attachment points and could pivot them around the attachment and get them out.
So what was the attachment that had held for 50+ years and still defied my crowbar? It was a piece of 1/2" threaded rod. The stud in the wall had a 1/2" hole, as did the shelf. The threaded rod was a friction fit and once it was pounded in it was snug. You'd have to be able to drill a perfectly level hole to make this work, I'd recommend the longest bit you can find.
problem with the dowel style shelf brackets is I want to preassemble my mitersand then mount the shelving as a unit. So with the rod style brackets you can't really slide the preassembled shelving with mitered corners into place.
On the HOVR style brackets which are more like a long french cleat-you would be able to put your pre assembled mitered shelving up against the wall and just drop it down onto the cleats.
Downside with the HOVR hardware is $$$$
I have used the threaded rod system on a few occasions. I like to embed LED lighting under the shelves, so we left a slot for the lighting which also gave access to the nut and washer for the threaded rod. It's finicky but worked great: https://cdn.branchcms.com/39ZRppKR8d-936/images/gallery/3-kitchen-14.jpg (To make it even more complicated, the backsplash and window jambs are plate glass!)
What are the dimensions of the slot you need to cut? Height, depth and width?
probably 7"ish deep into the back of the shelf, 1/2" or 9/16" kerf....many feet long.
I am actually going to put a 1/2" chain on my chain mortiser and see if I can use that to hog out a deep channel in the back of the shelving stock.
A great solution for your DIY floating shelf project is the studlock floating shelf bracket solution by Ultrashelf https://www.ultrashelf.com/floating-shelf-brackets
So what do you think? Is this a spam-bot, AI, or a marketing intern?
I think not wordy enough for spam-bot/AI, my guess is marketing. It would help if GBA would show comment history to know if this is a quick login for 1 post or just an actual enthusiastic user.
dan_saa,
I don't understand how the comment history functions on GBA. It works for some posters, (I can see you have previous posts) but other times I click on posters I know are regulars and get no results.
I can only see threads that the user has started in their history.
DC,
Thanks. That explains it.