Adding Spray Foam Between Wall Studs With Different Depths
I’m renovating an old house that used real (true to size) 2×4 studs in the wall.
Some places (maybe 30%) I’ve had to reframe and used 2×6 (1.5×5.5″) framing in the walls.
I’ll be spray foaming closed cell everywhere (I know, I know) and realized (well, I read Martin’s as-always brilliant article) that the thermal bridging of wall studs is very impactful.
It got me thinking that in my case, where some of the studs are 4″ deep and some are 5.5″ that the foam contractor’s plan to spray 3.5″ of foam creates even more of a thermal bridge resulting in an even greater degradation of the overall insulating level of the walls.
So, I was thinking maybe I should fur the 4″ studs out to 5.5″ with XPS and have the foamer spray to 5″? The additional foam costs along will over $4,000, so I’m not too happy happy about it, but I’m really worried that all that exposed bridging wood will let lots of cold in.
I could also ask about switching to open cell and going all the way to 5.5.
Or is there a completely different and better solution?
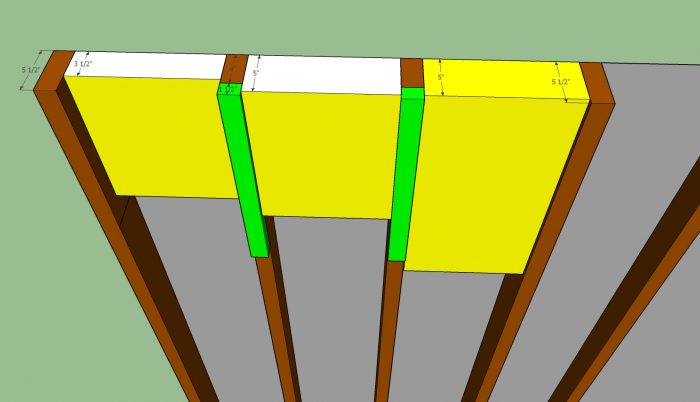
Here’s some pics of what I’m talking about.
Thank you!

GBA Detail Library
A collection of one thousand construction details organized by climate and house part


Replies
I could put a layer of insulation around the entire outside of the house -- which is about 4500 sq-ft.
Cost is a factor.
This is what it looks like now.
You definitely don't want cc SPF, go for open cell. In your case there is absolutely no benefit to closed cell foam.
Bumping up your framing to 2x6 depth all around is cheap R value upgrade with SPF install, since you are installing new windows, exterior rigid would not be hard but I would not call that a cheap upgrade.
If you want ultra budget but more DIY, keep all studs as is, insulate with batts/dense pack, wrap the house in peel and stick (you need this to air seal the board sheathing) than install 1.5" to 2.5" of rigid on the outside. 1.5" is good as most siding can still be directly nailed up through the foam, 2.5" is more insulation but needs rain screen for siding. This would get you a very high performance wall but is more work.
Thank you so much!
I'm not 100% clear.
Option 1 is: Stay with 3.5" CC and fur out the 2x4 to 5.5" and fill the rest with open cell
Option 2 is: Fill the difference between 3.5" and 5.5" will batts
But, in any case, wrap the house in peel and stick?
Or only peel and stick if I'm going with option 3: Add rigid outside of either 1.5" or 2.5"?
I can have the contractor compare filling from 3.5" to 5.5" with CC vs. OC for pricing. Then compare those costs to filling with batts. But, wouldn't the thermal bridging of the studs cause a potential condensation issue with batting?
BTW, roof rafters will be a full 7" of CC (code needs R-49), with peel and stick on top of the deck, then asphalt shingles (right?).
Thank you so much!
2)
Option 1: as is with 3.5" of cc SPF
expensive option, not very green not great R value
Option 2: as is with 4" of oc SPF
about the same assembly R value as the cc SPF option, much less polymer, much
cheaper
Option 3: furr out to 5.5" and oc SFP
cheapest R value upgrade with SPF, minimal extra cost and about 35% higher R value
Option 4: as is (or furred to 5.5") with batts/dense pack, add exterior rigid if you want higher R value
vapor open peel and stick is now needed as air barrier (since there is no SPF in stud bay)
cheaper material cost, more labour, higher assembly R value (with exterior rigid).
Any of the above options work well.
You only need to wrap the house with peel and stick if you are dense packing or using batts, not need for SPF as it forms the air barrier. In this case the peel and stick also serves as your WRB.
Since it looks like it is a 2.5" story structure, SPF in the roof is usually the simples and most efficient way.
I would go for a mix of ccSPF and ocSPF/batts though. Depending on your climate zone, you only need about 3" of ccSPF for condensation control, the rest can be cheaper material. There is no benefit to going to full 7" of cc SPF unless your contractor charges more for any of the other options.
You can check out the details about insulation ratios and climate zones:
https://www.buildingscience.com/documents/building-science-insights/bsi-100-hybrid-assemblies
If you choose to use SPF as your air control layer, just be aware that a lot of air leakage happens at the edges and transitions where spray foam doesn't help. The sheathing makes a better continuous air control layer. Then you can use whatever you want for insulation.
I thought that a good spray job eliminates (or at least nearly eliminates) air leakage?
My contractor is using an HFO agent (BASF), so it's a lot greener than otherwise.
I believe he's giving me a very good price ($0.85/BF). Am waiting to hear if using OC for part of the wall would be cheaper. Am I correct to say that if we ignore the cost, CC to 5" or 5.5" would be better than either all OC or 2" of CC and 3" of OC?
I've been trying to get a good understanding of when peel/stick is good to use. I understand it provides a vapor barrier and that CC at a certain thickness also creates a vapor barrier thereby eliminating the need for the peel/stick. What I'm having difficulty with is understanding whether the peel/stick will protect that which is exterior to the CC. In my case, plywood sheathing and old 1" pine boards on the exterior walls and roof of the house. And then there's the need to breath. Which is what I have to tell myself to do when trying to comprehend this stuff.
BTW, I'm in zone 6
Joseph,
A couple clarifications:
1) I believe Akos' suggestion to use a mix of ccSPF and ocSPF was for the roof, where this would be necessary. I believe he is suggesting to go all ocSPF in the walls (as one of the options). It is cheaper with only VERY marginally poorer performance than ccSPF.
As you seem to understand, the ccSPF, although higher R-per inch, loses ground on a U-factor basis due to the more exposed framing.
2) Not all peal and stick membranes are vapor barriers. Akos recommended vapor open. Though, (Akos if you're reading) I would be interested to hear the reasoning for vapor open if using exterior insulation. It probably offers some benefit with EPS. Less so with XPS and much less so with foil-faced polyiso, which is already a VB.
3) The old adage that houses 'need to breath' is not well liked here on GBA :). Mostly because, at best, it doesn't mean anything useful, and, at worst, it implies something that is not true.
The 'vapor profile' of your wall depends on the specific characteristics. It sounds like you're not pursuing the exterior insulation route, and so you definitely do not want a vapor barrier on the exterior.
If you go with 100% ocSPF, you will want some 'light duty' vapor retarding capacity on the interior, such as via drywall paint, but not a vapor barrier.
I found the thermal bridging argument against foam a bit oversold. Yes, a thinner layer of higher r-value insulation will have more of a thermal break impact than a thicker layer of lower r-value. But if you have a layer of the same thickness that difference goes away. Have you considered 2" of spray foam and 3.5" of batting? That would be an R-13 batt as used in a 2x4 wall. That would be cheaper and eliminate the bridging concern.
In terms of how best to get the 2x4's flush with the 2x6's, the obvious solution is to tack a piece of 2x2 o the front. I'd also do it along the floor so the drywall and baseboard has something to attach to along the bottom. This is important if you're using drywall as an air barrier. I wouldn't go with 1.5" of foam, because you'd have to use 3" drywall screws and that makes it harder to do a good job with the drywall. With the cavity full I think the gain in insulation is nominal with trying to fur out with foam.
The thermal bridging argument is quite solid. If you run the math on the assembly an actual 2"x4" stud wall insulated with 3.5" of cc SPF works out to around R15.5 including interior drywall, siding and air films.
The same stud wall insulated with 4" of oc SPF is R13.2.
Not all that much difference.
If the installer is not careful with the ccSPF and gets only 3" of insulation in the wall, it is the same assembly R value as the oc SPF wall.
2x6 wall is similar. 5" of cc SPF is R20, 5.5" of oc SPF R18.
You are paying much more for insulation that barely does a bit more.
Wow, very cool. Is there an online calculator that will calculate the overall assembly R level?
It sounds like 3.5" of CC (which creates around R24) is degraded by a 2x4 (actual size and 16" OC I assume) to R15.5 -- that sounds like a big drop to me.
And a 2x6 wall which would have R38 (5.5" @ R7/inch) is degraded to R20 -- that's huge.
Doesn't this lead to conclude that furring the 2x4 with 1.5" of XPS would make a big difference?
Yes, furring the studs with insulation does make a big difference provided the insulation fully fills the stud cavity. If it doesn't, such as the case with cc SPF, you are still short circuiting the high R value insulation with the wood.
There are some online calculators such as:
https://www.ekotrope.com/r-value-calculator
https://www.ubakus.com/en/r-value-calculator/index.php?
Most have to make some assumptions to simplify the calculation so don't expect accurate results for strange assemblies (partially filled spf walls are strange), but a good starting point for cost vs assembly R value checks.
My calculations were done in in excel, which still makes some assumptions. The reality is that if you want very accurate numbers, you need to run a Therm simulation. Not hard to set up, but does take some time and a bit of a learning curve.
Bottom line is thermal bridging really sucks when you have high R value insulation, I cringe when I sometimes see steel stud walls with cc SPF around me. The thicker the wall, the worse it gets.
No cc SPF is R7. That is the initial R value when installed used mostly as marketing fluff. Aged a couple of years, it is between R6 to R6.5 at best. I would use R6 for any energy loss calculations and R7 only for the building official.
If you want to fur out your studs with foam, your better option is to rip a sheet of 1.5" ZIP R or 1.5" nail base insulation. This gives you foam+wood to screw your drywall into, much easier install. It is a bit dusty operation, so invest in a narrow kerf blade for the table saw and a bigger shopvac you can connect to the saw.
You almost never want a vapor closed peel and stick on a wall. There are many products that are vapor open (ie VP100 or Sopraseal Stick VP), use one of those. Since the cost is about the same, there is not much point for a vapor closed product. A vapor open product does allow a bit of drying with the right exterior insulation (fiber faced polyiso, unfaced EPS or rigid mineral wool).
Thank you so much!
I'm sure you know that all the literature says 6.9 to 7.4 per inch.
So no peel/stick on the exterior of the walls. Nor on roof decking?
Tyvek work on the outside of the walls okay?
Here's what I've already done to the roof rafters.
With SPF you don't need peel and stick on your walls. Doesn't hurt (vapor open only with oc SPF) but regular house wrap works just as well.
On your roof, you only really need peel and stick where you can expect roof issues (eaves, valleys, dormer transitions). The rest can be regular underlayment. Since the roof needs a layer of closed cell foam for condensation control already, the peel and stick and underlayment can be any type, vapor open or closed doesn't matter.
Roof picture looks good. I would rip some 3/4 ply and nail it up over the foam strips. Would make drywall install much easier. 1x2s don't work for this well as they tend to split.
Make sure your spray foam installer gets behind the knee walls. You want continuous SPF layer from top of wall plate, out to the soffit, up along the roof rafters and back down.
Do you mean that the degradation of the overall wall assembly's level of insulation is not as much as some people believe? In my case, what got me thinking was that the thermal bridging was not just from the 1.5" edges of the 2x studs, but down around the edges, so that a total of 5.5" of the stud (1.5" edge from 2" down each side towards the exterior). Or, just 2" on the edge for the old studs.
I don't understand why it would be a problem to use 3" (or 4" or 5") drywall screws should I use XPS to fur out the smaller studs.
I also don't understand if you think that filling the stud bay would create a negligible improvement in insulation or if furring it out with XPS vs. with wood would be the cause of the only negligible insulation improvement?
Thank you.
It is very difficult to get an even layer of ccSPF in a wall, and the installers are going to try to minimize how much they have to trim, so they'll probably err on the side of a bit too thin. I wouldn't expect a 3" layer in a 2x4 wall, you'll probably get something like 2.5" in a lot of spots, and a bit over 3" in others. Allison Bailes wrote an article a while back explaining how you can't just average out the R value in a situation like that, the thinner spots tend to dominate heat loss and you end up with a lower overall effective insulating value than you'd otherwise expect.
If you're committed to using spray foam here, I'd use open cell and completely fill the stud cavities. Open cell spray foam is commonly overfilled and trimmed with a roller-type of trimming machine. This ensures a nice, even and full fill everywhere so you actually get the R value you're expecting. The ocSPF material is cheaper too, and greener. If you furr out your 2x4s to 2x6 depth, you can fill everything to the same depth and have a pretty good assembly.
As Akos mentioned, spray foam only air seals within the confines of each stud bay. Areas between the sill plate and subfloor, for example, don't get sealed. You'll still need to pay attention to all the little gaps OUTSIDE of the studbays that the spray foam can't get to to air seal. This is one of the reasons exterior rigid foam is a good thing -- it is typically installed over the exterior of ALL the framing in full sheets, so it covers every little gap. A bead of sealant around the perimeter is then all you need to air seal the entire wall, assuming you're also taping the seams between sheets of rigid foam.
My personal preference for walls is mineral wool an exterior polyiso continous insulation. Dense pack cellulose in the walls can do a good job too, but mineral wool is easier for DIY work.
Bill
This is very interesting because I went over (repeatedly) with the contractor that when we conctract for 3.5" or 7" that is what I expect.
3.5 does not equal 3 for me.
Also, these are 100 year old studs that are truly 4" deep, which is how we agreed to a real 3.5" -- he actually said that for CC they really like to leave a little below the plane of the inside edge of the stud because it's so hard to trim.
My idea would be to trim the 4" stud to 5.5" to match the new 2x6 depth. Given the difficult of trimming CC, it sounds like it would be better to fill the 2" (3.5" to 5.5") with OC. I just don't know if changing materials and/or trucks would make it costly.
We also went over the importance of sill plates and rim joists and cracks and crevices.
My own spray foam contractor often offers to fill the rest of the void with ocSPF. I don't think it's a big deal for him to switch over, but it might be due to the type of rig so it might not be the same for everyone.
Is there any particular reason you don't want to just fill the entire thing with ocSPF? It would be easier, and work just as well -- and maybe even a little better -- in this application.
Note that they will stick a wire in the foam to check for depth. I suggest you double check. A straight edge laid across the studs will help you gauge fill depth, just make sure you know how deep the cavity was before foaming started so that you know how thick a layer is by how much space is lefter over afterwards. What I do is go around a mark any low spots with some spray paint (color selected by whatever is cheapest that day :-), then have the spray foam guys come back and fill any low spots in. You can do this check after the foam goes in and has completed the initial cure, so it's a same-day thing that can be done while the crew takes a short break. They don't have to come out a second time to fill in the spots you mark with paint.
Bill
Wow, thank you all so much: Akos, Tyler, Bill, DCContratrian, Michael!
I learn so much incredibly useful knowledge from you all.
I'm waiting to hear back from the foam contractor.
My understanding is that:
OC (whether exclusively or to top off the CC so that it fully fills the cavity) would be better than any amount of CC that doesn't fill the cavity.
Furring out the stud to 5.5" thick makes sense.
With a good VP like spray foam, there is no need for peel/stick on the exterior of the walls. On the roof, peel/stick where water might get it and accumulate like valleys.
Did I get that right?
I think you pretty much got it, with one clarification:
"With a good VP like spray foam, there is no need for peel/stick on the exterior of the walls."
The simple answer is, correct, you don't need a peel-n-stick membrane, and you definitely don't want a vapor barrier membrane on the exterior of your wall.
I think it's helpful to separate out the functions of an applied membrane into 3 categories: bulk water management, air flow management, and vapor management.
–Water: An adhered membrane does a good job of bulk water management. Arguably better than something like tyvek, but tyvek also works in this regard for your situation, and proper detailing is what really matters here. The exception is on the roof at the areas Akos/you mentioned, and in those cases, it doesn't typically matter if the membrane is vapor impermeable (it usually is--Ice and Water).
–Air: An adhered membrane usually does a better job at controlling air leakage—especially when the exterior is old board sheathing—than something like tyvek, which really shouldn't be relied upon for this task.
–Vapor: Different adhered membranes manage vapor differently. It depends on the specific product. Which one you want (if using one) depends on the specifics of the assembly.
So how does this relate to your use of the different types of SPF?
–Water: Neither foam option on the interior of your sheathing is directly related to bulk water management. Either way, you want to do a good job managing bulk water, regardless of your WRB.
–Air: Both ocSPF and ccSPF air good air barriers at installed thickness, so that negates the need for the peel-stick membrane in that way. But be mindful, as Michael pointed out, that an air barrier must be continuous through all the joins and corners. That would be the main advantage of the exterior membrane air-barrier is ease of getting continuity.
–Vapor: It's first important to recognize that the majority (by a large margin) of vapor transport through a wall is via AIR movement. So reducing air movement is your number 1 task at hand. As far as vapor DIFFUSION, there is a difference between ccSPF and ocSPF. ccSPF is fairly vapor impermeable, while ocSPF is fairly vapor open. But IMPORTANTLY, in neither case do you need or want your WRB (such as an adhered membrane) to be vapor impermeable. The wall doesn't need a vapor barrier; certainly not one placed at the exterior sheathing. What it needs is a proper 'vapor-temperature profile' of components. When using ccSPF, you need to ensure it is the proper thickness ratio to the interior ocSPF (or batt/loose-fill if flash and batt). This is because of the vapor-temperature relationship. When using only ocSPF, you have better outward drying, but the general recommendation for zone 6 is to limit vapor diffusion from the interior using an interior vapor RETARDER. There is some debate (and I am unclear) on precisely how much retardance is needed, but certainly NOT polyethylene. Usually it is just the drywall with a vapor retarder paint. Others will have better offerings on preferred retarder.
That is a fantastic explanation of the purpose and application of membrane barriers! Thank you!
So with CC foam thick enough to create the a good vapor (and therefore, air) barrier, and thereby not have to worry about condensation on the exterior boards/sheathing, all I need to protect against is bulk water getting to the sheathing, right?
And this is done with a vapor pearmable membrane such as Tyvek, VP100 or Sopraseal Stick VP? If so, are these all readily available at building supply places?
And then whatever finish exterior (vynil or wood siding, hardisiding, stucco, etc.) can be applied right over the membrane?
One important item.
For your roof, you MUST have a layer of closed cell foam for condensation control, in zone 6 that is 50% of your total R value must be cc SPF. The rest can be open cell or fluffy insulation.
Walls can be all open cell.
I can't say I fully understand why roofs require condensation control while walls don't, but I've read that so many times on this site that I know and believe it.
Insulation contractor says best thing to do it fur out the 4" studs to 5.5 and fill all wall bays to 5" with CC.
The question remains (with my limited-understand) will it be a better performing (insulating) wall doing that (5" of CC in 5.5" deep cavities) or 3.5" of CC and another 2" of OC to completely fill the cavity?
Water vapor in a wall will tend to flow from warm to cool. In a heating-dominated climate the vapor drive is predominately from the inside to the outside. What you want to do is vapor seal the walls at the interior and have them vapor-open at the exterior so they dry to the exterior.
If you have a vented roof you can do the same thing with the ceiling. However, if you have an unvented roof you can't expect it to dry through the roofing, because the roofing has to be waterproof. So you set it up so that any vapor that enters during the winter can't be driven to a place where it's cold enough to condense, and so that during the hot summer months it can dry toward the interior. This is why there is a minimum required thickness of closed cell foam on an unvented roof. It forms an air-tight, vapor-tight layer, and the minimum thickness ensures that the inner edge of the foam never gets cooler than the dew point of the interior air.
"Water vapor in a wall will tend to flow from warm to cool. In a heating-dominated climate the vapor drive is predominately from the inside to the outside. What you want to do is vapor seal the walls at the interior and have them vapor-open at the exterior so they dry to the exterior."
Ah! So that is also why we want a little vapor retarder as the final interior piece of a wall assembly (like painted sheetrock)?
And with enough CC or OC between wall studs, the wall is effectively vapor-proof. So the painted sheetrock retards vapor from getting to the surface of the insulation from the inside, and the any vapor/moisture that gets past the siding hits a permeable membrane such a tyvek that allows the sheathing beneath it to breath?
"If you have a vented roof you can do the same thing with the ceiling. However, if you have an unvented roof you can't expect it to dry through the roofing, because the roofing has to be waterproof. So you set it up so that any vapor that enters during the winter can't be driven to a place where it's cold enough to condense, and so that during the hot summer months it can dry toward the interior. This is why there is a minimum required thickness of closed cell foam on an unvented roof. It forms an air-tight, vapor-tight layer, and the minimum thickness ensures that the inner edge of the foam never gets cooler than the dew point of the interior air."
This is where I'm still confused. I understand that vapor on the inside won't condense on the inside surface of the insulation because the inside surface isn't colder than the dew point. I understand that painted sheetrock over the insulation further retards vapor getting to the surface of the insulation. These are the same as for walls.
Exterior to the insulation is first sheathing and readily damaged by water. On the of the sheathing is a membrane. On top of the membrane are asphalt shingles. The shingles prevent bulk water as well as vapor from getting to the membrane.
Here's where I lose it: Sometimes roofing is imperfect or gets damaged or for some other reason moisture or vapor gets past the shingles. If the membrane is felt, the moisture and/or vapor will go right through the felt and hit the ply or osb. Without drying, rot will start. If the membrane is peel/stick vapor impermeable, then any moisture that gets past the shingles would still need to find a way past the membrane to cause rot.
From what I read, the danger of peel/stick is exactly what I put forth as its benefit: That any moisture that gets past the peel/stick and hits the sheathing has no where to go and won't dry and therefore cause rot.
And yet the common advice is to use peel/stick in valleys, along the bottom edges and other spots prone to having moisture get through the singles. How do we come to what sounds to me like a compromise solution where we protect only somewhat (or rather, in some areas) against moisture penetrating the shingle layer?
Joseph,
Your confusion on this matter is justified. Suffice to say it is not black and white. This has been discussed at length on GBA before. See:
https://www.greenbuildingadvisor.com/article/sandwiching-roof-sheathing-two-impermeable-layers
I'm not sure if a real consensus has developed on this, but these types of roofs are built. They're probably not the most 'forgiving' assemblies, and certainly when building new, it doesn't seem like the assembly to shoot for. Maybe others disagree and have experience successfully building them and seeing them work into the future.
Just heard back from the foam contractor and went back and forth on cc vs oc for the additional 2” from 3.5 to 5.5”
Bottom line is both foam types went up in price by 38% in the last couple of week and the added labor for oc means that the increased cost is way out of my budget.
If I wanted to putt batts in to fill the 2”, which would be the best to use?
Faced or unfaced fiberglass? Mineral wool? I don't see a lot of options designed for 2". In fact, at HomeDepot, I also see "Knauf InsulationR-6.7 EcoRoll Unfaced Multi-Purpose Insulation Roll 2 in. x 16 in. x 48 in."
Or could a common 3.5" thick batting do (compressing it when finishing with drywall)?
Thanks!
As others have asked, is there a specific reason why you are shying away from all open cell? That is the advice several people have given, and its not apparent if you are missing that, or if you have specific reasons not to pursue that path. Knowing your reasons will help better guide answers.
You mention cost, but you seem to be comparing a wall with all closed cell to a wall with (still) lots of closed cell, then a bit of open cell. A wall with all open cell, I think, is going to be quite a bit cheaper than both.
If you do go flash and batt, it would also be cheaper not to spray all the way to 3.5", but rather to simply hit your minimum ccSPF R-value to total R-value ratio for climate (or with a bit of margin, but 3.5" would be well above that margin).
https://www.greenbuildingadvisor.com/article/combining-exterior-rigid-foam-with-fluffy-insulation
If you're really most concerned about performance, you could reset and look again at the exterior insulation option, seeing as your sheathing is currently (?) exposed.
You are absolutely correct: I am (to say the least) shying away from all open cell. My contractor keeps telling me how material prices have gone up so much since I locked in and how much more labor the cleanup is for open cell. I know, I know....
And, yes, I understand there is a minimum CC that would achieve protection against condensation and thicker would add only to the R value which can be achieved less expensively. I learned that all here and am tremendously grateful. Why am I not instructing the contract to spray 2" of CC and leave it at that -- and then fill the rest with batting or mineral wool? I really don't know why.
Most likely because I'm working on this and so many other aspects to this job (HVAC, roofing, interior design, etc.), and managing my crew, and sourcing the material all while doing my day job and taking care of my family -- so I'm resigned to be far, far from perfect at absolutely everything.
And, I would really like this house occupied by memorial weekend when my wife has planned a huge family get together.
Sigh.
Too much info?
Regardless, thank you so much for the help and concern. This is truly a fabulous group of people here.
Ugh...Now I've got this stuck in my head. Take a look at these pictures. Am I wrong to think this house is ripe for external insulation?
And more
Last bunch
With a nice, flat exterior like that, and a relatively simple "square" footprint, I'd say "yes", your home would be a good candidate for exterior continous insulation. I'd try for 2" or more of polyiso, then just use batts in the walls inside (or dense pack cellulose). The exterior polyiso would give you a good air barrier, and very good whole-wall insulation performance due to reduced thermal bridging. You can save money using reclaimed or B stock rigid foam here too.
Bill
Thank you.
I'm off to figuring out the details of how this is done.
I was going have my contractor spray a full 5.5" of Closed Cell in some exterior walls that have hot water lines. The pipes currently have pipe insulation on them. Do the same rules apply here and closed cell is still useless in this scenario? Or, because I'm specifically calling out a full 5.5" inches of Closed Cell things change due to no air gap.
If you encapsulate water lines in exterior walls, you run the risk of them not having enough interior heat to prevent freezing.
Every location is different. Every building is different. But the safe move is to insulate only behind (i.e. to the exterior) water lines. You can use rigid foam board just for these areas, and then mark them off as not to be touched by the spray foam contractor.
Thanks Patrick - I lost you on the "insulate only behind (i.e. to the exterior) water lines" - Is there a picture you could point me to?
Right now the hot water line is within the 2x6 wall. Are you saying only use rigid foam behind the water line and leave the rest of the bay untouched?
Basically. You don't have to leave the rest of the bay untouched, just the area in front of the pipe.
Cold pipes too.
You probably won't be able to get anyone to put a "full" 5.5" of closed cell spray foam (ccSPF) into what I assume are probably 2x6 walls. ccSPF is usually underfilled to avoid the need to trim it flush, since it's difficult to trim. Open cell is usually overfilled, then trimmed flush with the edges of the studs.
I would block off between the water lines and the interior of the home if you put spray foam in these walls, so that the pipes are "exposed" towards the interior of the home. This will reduce freeze risk compared to fully encapsulating the pipes within the wall insulation. Best is to avoid running water lines in exterior walls though.
Bill
Thanks Bill for getting back to me. The full 5.5" of closed cell for this "specific" portion of exterior wall (2x6) is called out as a separate line item on my bid, so not sure if that helps things.
So, are you saying I would frame a box in the bay where the the water line runs and leave no insulation inside this "box"? I was having difficulty following.
Zone 5 by the way.
I would strongly suggest that you get a plumber to relocate those lines out of the exterior wall. I had this problem in a circa 1980 house and that’s what I did. I still have some drain lines in two exterior walls that can’t be relocated. But the supply lines and baseboard heat pipes were not that difficult to relocate. I was then able to properly insulate and air seal those bays, and not worry about frozen pipes here in zone 5. It was a very good decision.