Frost wall foundation details for stone and siding construction
I am planning a slab on grade build (24″X8″ footings, 4′ deep, with 4’6″ frost walls). I am having issues with the location of all the sub components on the frost wall width, specifically on the stone detail wall (front wall only).
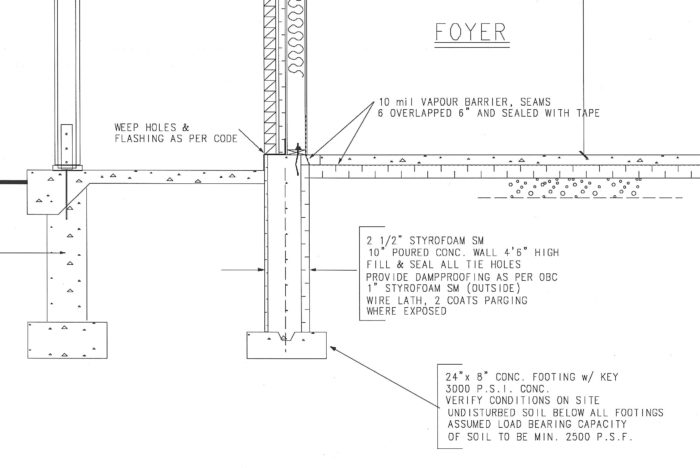
The stone detail is proving to be a width/support issue. Even with a 10″ wall, I run out of space quickly : 1/2 drywall, 2X6 wall, 7/16″ OSB, 2″ XPS, house wrap, 1″ mandated air gap and 3.5″ dimensional stone. The current detail (attached) looks ok (besides location of the poly and interior foam needs to be 2″, not 2.5″). My biggest issue is it has the stone resting on the 1″ foam. Most of the stone would rest on the concrete (2+ “), but I still do not know if it advisable.
I am also struggling with how to integrate the siding wall detail with the stone wall detail. I have almost too much width there (8″), but I think this is the minimal wall for a 24″ footing. In the end I would like R-15 equivalent at the slab edge. If anyone has a slab on grade with frost walls foundation detail that integrates R-15 slab edge insulation with the following wall construction:
1/2 drywall, 2X6 wall, with 7/16″ OSB, 2″ XPS, house wrap, 3/4″ rain screen and Celect lap siding.
I would love to take a peek and compare.
GBA Detail Library
A collection of one thousand construction details organized by climate and house part


Replies
Mai Tai,
I'm attaching the standard slab-and-frost wall detail from the Building Science Corp.
Note that you need vertical rigid foam at the slab perimeter as a bond break / thermal break.
I don't see why you can't make the frost wall as thick as you want -- whatever you need to support your stone veneer.
Thanks Martin.
The issue with the stone detail is that ideally I want exterior foam (on the current cross-section I have one inch of the stone supported by xps), and everything has to be flush. I am wondering if having 1" of the stone (out of 3.25" or 3.5" total depth depth) supported by xps foam is an issue.
Same thing applies to the siding portion, well illustrated by your cross-section. Looks like it is ok to have part of the sill plate on foam. How much is too much for a 5.5" (2X6) sill plate? Do I need to say stay at 50% width or below?
Mai Tai,
My instinct tells me that your plan to cantilever the 3.25-inch-deep stone veneer by 1 inch will work. Don't forget that you need Z-flashing at the transition between the bottom of the stone veneer and the top of the exterior rigid foam.
When it comes to supporting a 2x6 wall, the old rule of thumb we learned in the 1970s was that at least 3.5 inches of the 2x6 wall needs to bear on concrete; this was based on the idea that 2x4 walls worked OK when they were supported by 3.5 inches of concrete, so a 2x6 wall should work, too, even if only 3.5 inches of the bottom plate bears on concrete.
All of that said, if you want an educated assessment of your wall assembly, you should consult an engineer.
Thanks for the advice Martin. I am considering changing the stone detail to get 2" of foam on the inside only, just like the sided walls. This is a wooded area and I have a fear of carpenter ants. I will give up R-5 value for some protection against ants (I'll pay special attention to wall foam sealing).
"I will give up R-5 value for some protection against ants"
Good idea.
Another discussion point just came up, with regards to slab support.
Is it better to have a truly floating slab, or have a ledge all around so the slab sits on the frost walls (like Martin's picture)?
I will not have any load on the slab itself, all supporting walls are exterior or have a true footing /foundation wall.
Mai Tai,
You are much better relying on the fill underneath to support the whole slab than supporting it at the perimeter. That way, if you experience any settling you do not end up with stress cracks.
I don't think the detail Martin posted is intended to show a supported slab. The ledge only exists to reduce the width of the concrete. If you wanted to be sure the ledge didn't take up any of the weight of the slab perimeter, you could move the ledge down to several inches under the foam. That's what I routinely do.
Thanks Malcolm, I went with the floating slab...
I am a bit worried about cracks given my architect has specified an internal foundation wall midway through the house under the slab, to limit spans and accommodate point loads. I am worried all the slab around the mid wall will want to settle, and there will be some unwanted flex (and cracking) there.
Concrete cracks, and when it does, rebar will keep them small. And control joints position them where they are less of a problem.
Mai Tai,
As you add gravel in lifts inside your frost walls, compact each lift with a plate compactor. This compaction is essential if you want to avoid slab settlement.
Mai Tai,
As Jon and Martin observe, diligent compacting and control-joints limit cracking.
Why not suggest to your architect that the top of the central bearing-wall be reduced in width as you are doing at the exterior? Then the slab is free to move independently of all load-bearing elements.
Malcolm,
It's a bit late for your good suggestion, but I will use control joints on the slab. I wanted to avoid them as I may want to go bare/etch slab for a while (living quarters are all on the 2nd floor), but I guess now I will wait for it to crack, and then tile the first floor.
Mai Tai,
The detail I used on my house, and on a half dozen others I've designed, is to cut control joints at regular intervals and then grout them before applying concrete sealer. I typically specify a pattern that complements the room layout. In my own house they are on a three foot grid, but that is a lot more frequent than needed to control cracking.
Several of the houses featured in GBA blogs, like Stephen Sheehy's, used a similar process without the grout. In all cases you end up with a really quite beautiful finished floor.
I guess if you are going to choose, control joints are better than random cracks. I was hoping to keep the house slab as clean and smooth as possible, but I guess expecting it to remain crack free without control joints is a pipe dream.
"now I will wait for it to crack, and then tile the first floor."
I wouldn't hesitate to tile immediately; a robust isolation membrane like Schluter Ditra will protect the tile installation.