Heat pump dryer issue, full sized Whirlpool WHD560CHW0
As part of a deep energy retrofit I did to my home. I installed a heat pump dryer to simplify a vent and make up air system.
I found the full size whirlpool dryer WHD560CHW0
it works great and we are very happy with how it dries clothes. Its averaging about a hour and 20 to dry a load. Thats better then expected.
the issue I am having is there are two lint filter screens that I can clean every time on top of vacuuming it out often. After the second lint screen there are two metal mesh screens and the second one has begun to build up lint. Does anyone know a way to remove these to clean them. Whirlpool and the tech who cane out was no help. I may have to cut the screens out and make removable ones that can be cleaned.

GBA Detail Library
A collection of one thousand construction details organized by climate and house part


Replies
This is a common complaint. There's no good solution I've seen so far. I've considered doing what you're suggesting; note however that there is only one metal screen. The thing behind it that is accumulating lint is a heat exchanger (can't recall of the top of my head if it's the evaporator or condenser).
What I tried doing was installing a better seal between the "hybridcare" filter and that metal screen. It doesn't seem to make much of a difference. I also tried putting a couple of layers of cheese cloth right onto that metal screen. That worked pretty well, but it was a real pain in the ass to get to stay in place.
Thanks for your feedback. Mine does have two metal mesh screens. If you soom in far you may be able to see it. Maybe its a slightly different model or newer? The second one is directly in front of the heat exchanger. If i come up with a solution I will post it. For now i may just poke a hole in the side of the screen enough to get a small vacuum nozzle in there.
I can't see it in the picture, but I guess it's a revision. My model is a slightly different number. It's sad that they revised the design, but failed to fix the crux of the problem. Let us know if your vacuuming is successful.
I have the same issue with my Whirlpool HP dryer (my model is WED7990FW0).
It was a little over a year after using the dryer before I noticed some build-up on the fins of the coil behind the last filter screen. After spraying a little water on the lint, I straightened out a paper clip, pushing it through the screen to reach the lint on the fins, gently pulling on the lint to get it to fall off. With the lint being wet, it was easier to get larger chunks to fall off at once. Definitely time consuming and delicate work to avoid damaging the fins.
Since then I religiously vacuum out all three filters after each use of the dryer, and so far I've been able to capture all the lint before it gets beyond the last filter. Not an ideal situation, but since I store our vacuum in the utility room with our washer and dryer, not the end of the world either.
The dryer works really well, so we've been very happy with it so far. Hopefully this issue gets resolved when these units get updated in the future. Having this last screen be removable would seem to be the easiest solution, but I'm guessing the Whirlpool engineers were reluctant to let homeowners have such easy access to the easily damaged fins.
Thank you for these instructions. Seems worth it to try the paper clip trick, and install another screen in front of that hardware cloth...
Not able to help here.
But Thank you for posting your dry times. A while ago I was looking at the viability of heat pump dryers. All I know is hearsay of how long they take to dry, but from sifting through countless reviews of some newer models like the whirlpools, I couldn't really find actual numbers.
From a functional standpoint it's very practical for me to have it in one machine and it does both functions. But the big drawback is how people say it takes 4+ hours to do a load.
If your experience is 1.5hrs to dry and I assume 0.5hrs to wash. A 2 hr turnaround isnt too bad!
Does anyone else have experience to share on load turnaround times?
Thanks,
Jamie
The combined wash/dry units are a different animal. They do take hours to run, and are condensing dryers, but they are not heat pump condensing dryers, hence they are a lot less efficient.
Wash times with the matching Whirlpool front load washer are 55 min for standard. The washer has an incredibly high (and well balanced) spin cycle, so it removes much more moisture than what I was accustomed to.
Dryer reports a 1 hour 22 minute cycle time when settings are ECO and both the Heat and Dry levels are set to 4 out of 5 which results in perfectly dry fabric. However, if the dryer does not evaluate the moisture level at 4 out of 5 dry, it just keeps going, so the reported 1 hour 22 minutes can be much longer. On the flip side, it can also be much shorter. Tends to be longer with bulky items, about right with towels, jeans, heavy t shirts & flannel, and shorter with lightweight items such a percale sheets, shirts, etc.
I see no reason not to blast that screen with compressed air or the blower from a shop vac. You will move the lint hopefully to the filter if not it may land someplace where it will not restrict the airflow.
My guess is if you’re going to use a heat pump dryer a lot over for more than a few years even with exceptional filter cleaning. Disassembly and cleaning will become part of you skill set.
This video is a different model but the idea is the same. I would do a few things differently than the videos.
1 I would be working outdoors
2 Instead of a pressure washer I would use compressed air or a leaf blower wearing a dust mask followed by a garden hose.
https://www.youtube.com/watch?v=MB-F2bb4Yjo
https://www.youtube.com/watch?v=RpZDm3LlK7w
Walta
I have my units stacked so i had to buy the washer that worked with the dryer. When the service guy was out he told me to stuff the washer as long as you could push your hand through to the back without to much effort. I was skeptical about that. We have been doing that since, it takes two baskets to fill it. The clothes are just as clean and it balances itself better so you can use the highest spin setting. This make a big difference for drying times. Even this two basket load was around 1.5 hours to dry.
I did find that putting the heat setting to one below the highest and the dryness to the lowest setting gives you the lowest dry times and the clothes are plenty dry. Took some playing with.
Walta, if i blow it inward it will be going directly i to the heat exchanger, exactly where you don't want it. My picture doesn't really show the setup that well, i wish it was that easy. I think you nailed it tho, maybe yearly or every other the unit is going to have to be Dissembled and cleaned. Sucks for me the stacked in a closet in a drain pan. And those dryers are heavy! Its just a shame the normal consumer is not going to be able to do this and there dry times will keep increasing until its useless.
They make a coil washing machine with spray gun that i may invest in since I have so many heat pump appliances now. Were heating the whole house on a 12k btu lg mini split (zone 6) and hot water is a 50 gallon heat pump water heater that i have in heat pump only mode since I installed it in August.
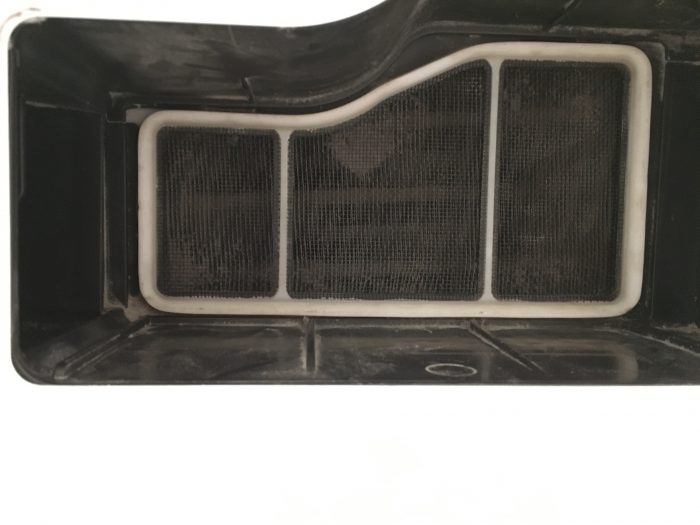
When I look at that screen it seems any lint is on the back of the screen and being pushed toward the screen with the coil in the background, it is hard to tell from the photo. It seem they choose to filter the air coming out of the coil with an unclean able screen in front of the filter, does not seem like a good plan to me.
I say the lint on the screen is in a bad place for air flow if you move it around, it will be blown back toward the same screen this time it may get thru the screen and get caught in the filter.
Please post a link to the coil washing machine.
The only scientific study I have seen found that coils covered in dirt but not yet clogged with dirt perform better than the same coil did after being cleaned coils.
Walta
No, the lint you see is on the coils, not the backside of the hardware cloth. It got there through the screen at the drum/ door, and through the double screen at the base of the dryer, and through the hardware cloth, to the coils. If you use compressed air from the outside you will force it further into the coils.
In the drum is a regular style lint filter, the air flows down and to the right from there where it goes through the second cleanable lint filter. After the second filter it goes through two screens towards the coil. Looking at the picture the air/lint goes forward into the coil not the filter.
Heres the coil cleaning deal.
https://rover.ebay.com/rover/0/0/0?mpre=https%3A%2F%2Fwww.ebay.com%2Fulk%2Fitm%2F312117339452
Also if you can find that study i am interested in reading it.
Checkin in to see if anyone cane up with any better solutions. We have been vacuuming the screen more often. I have not poked a hole in the outer screen because i think it will cause more harm. Im trying to come up with a way to make a hole and then cover it with some kind of screen.
I have model WED99HED0.
Don't know if this helps or not. But yesterday, I noticed that when drying on "Eco" mode (aka, no electric coils on), that the drum wasn't getting hot at all. So, I completely disassembled the dryer. I noticed literal blankets of lint coating everything. Vacuumed out as best I could.
One of the major issues that others have brought up is behind the secondary filter (bottom right of the machine) is a permanent metal mesh filter that leads to the evaporator coil and fins. This filter can be removed. However, this requires a nearly total disassembly. I'll post a link to a video that shows this process. As well as the instruction booklet. After these instructions, you can lift out that mesh filter to gain access to the evaporator coil and clean it off. This is a major design fault that requires complete disassembly to clean the coils.
https://www.kaltura.com/index.php/extwidget/preview/partner_id/1661131/uiconf_id/24888851/entry_id/1_3iubet1w/embed/iframe?
https://cvws.icloud-content.com/B/AVvt4lJjvdahLcSa7WGS9jPUqvcFAbcJD8c_JwZDCEFHoroYgGvfTh8N/wed99hedw0.pdf?o=AhVhIxQcsWw9e-wTjrHm887xQIdvnT0ztus9gju6fcfP&v=1&x=3&a=CAog2z0U119zhF6apARXMA75ord4dqg94Zz21_3redy6b7ISaRCG2Njxoi4Yps-P8qIuIgEAUgTUqvcFWgTfTh8NaiTpo5_DkbAHQACXXNT_F864X1H0aY12FUIUeyNN9OiJqHCsd6NyJCpxdPPKc2Seay_gJBSJu1xCf2v4cr4LCAC6hb2fQ-GZ0sAyRw&e=1589914101&fl=&r=9a236492-e414-49b5-9a06-57517b341974-1&k=UAU58bttrYIl5uz1oU7NZQ&ckc=com.apple.clouddocs&ckz=com.apple.CloudDocs&p=61&s=b44fUqiXd8H4-V8mZUS_YQvuUJo&cd=i
Not a solution but the newer compact units have a removable filter now in case someone wanted to buy a heat pump dryer.
After burning up a compact vent-less GE dryer just after it went out of warranty, we have liked much better the full size Whirlpool Dryer (WHD560CHW) for the past 6 months. This unit performs well, dries fast on speed mode, and solves the problem of having no option for a vent. We did have a tech come out and fix a horrible rattle on the left side where apparently a coil was vibrating against the metal.
As for the lint build up behind the permanent filter, this is a problem. The owners manual does warn "Lint should be removed every 2 years, or more often, depending on dryer usage. Cleaning should be done by a qualified appliance servicer." So far I have not found a tech who understands or is willing to do this, but I may keep looking. Maybe in a few months or so I will become confident enough to follow the video posted in this thread and do it myself; thank you for a video that finally focuses on this model!
Meanwhile I have had some success loosening lint without damaging the screen by using a salon comb with several smaller-than-toothpick metal forks. However then getting the loose lint to break-down and vacuum out through the screen is slow, so still looking for a better way of doing that.
I am facing the same issue with my WED99HEDW0. Since Whirlpool knew this would be an issue to be taken care of every 2 years, they should have engineered the Heat Pump (HP) mechanism in such a way that the whole HP mechanism at the bottom could be simply pulled out over built-in rails and cleaned.
After exploring the links in this thread and downloading HybridCare Job Aid W10764068A I gained the confidence to perform a thorough internal cleaning and removal of the build-up from the heat exchanger. The Job Aid contains excellent comprehensive instructions with videos. The section on Removing the Reed Lint Switch outlines which previous steps in the same Job Aid you will need to follow. It took me about 3 hours to carefully remove everything and another 3 to clean and put it all back together. I could probably do it again in half the time.
Note that model WHD560CHW is a little newer than the model WED99HEDW0 in the Job Aid. As far as I could tell the only internal difference was the location of the CCU (eliminating one component that needed to be removed).
@twwva Thank you for posting the photos. Can you confirm you were able to access the coils for cleaning without removing the stacked dryer, and without access to the back of it? If so, that may make this project much more doable...
Yes, I have been able to access and clean the coils without removing the stacked dryer (the dryer is on top) and without accessing the back. I have attached the cheat sheet that I use that follows the more detailed steps in the HybridCare Job Aid. ... It is worth noting that after 3 years in a demanding environment the drying is still working well. I have cleaned it 5 or 6 times. I recently found that periodically spraying Nu-Calgon Evap Foam No Rinse Evaporator Coil Cleaner on the coil prolongs the time in between needed cleanings.
Do you mind uploading this document again? I only see the 1st Page that shows what tools are needed, it doesn’t show any instructions/steps.
Unless those 12 steps are the instructions, as an amateur DIYer I was hoping for some pictures to go along with it.
That is just my 1 page cheat sheet for the steps detailed in the previously referenced HybridCare Job Aid W10764068A. Google HybridCare Job Aid W10764068A and a link to a PDF on s3.amazon.com should be one of the first results.
I perform this same cleaning process 1-2 times a year on our WED9290FC0. It's not technically challenging, but not a chore I look forward to.
While it may be possible to clean most of the lint off of the front of the evaporator if you cut the screen mesh, you can't get access to the "post condenser" coil which is near the rear fan. What I've experienced with our dryer is that lint trapped in the "post condenser" fins can lead to the compressor overheating and cycling on/off with a ~15m period. If you have an energy monitor on the dryer, it's easy to see this when this starts happening. Eventually, drying times will more than double.
We know that vacuuming the rear screen helps to prevent this (or at least extend the time before full maintenance is needed), but it's a pain to get to and we sometimes forget.
When the machine is clean, it works great. But the need to disassemble the unit to clean it is a significant design flaw. When it dies, we'll be looking to replace it with an LG or Bosch that has a coil cleaning cycle.
Before the full-size Whirlpool I had a compact GE that was easier to clean (the whole condenser came out) but the unit burned up in a year. As far as I can tell the LG and Bosch are both compact too. If you really need a full-size dryer are there any other options?
For anyone looking for an alternative to the Whirlpool, there is a company called Unimac that makes semi-commercial heat pump dryers at 6.9, 8.8, 10, and 12.2 cubic feet. I have no idea why you would need more than 8.8 cubic feet, but there you are.
They also make semi-commercial washing machines that spin at ridiculous speeds, so theoretically lower dryer time then.
https://unimac.com/international/products/tumble-dryers/industrial-heat-pump-tumble-dryers/uhp/
Forgot the link to the info: https://unimac.com/international/products/tumble-dryers/industrial-heat-pump-tumble-dryers/uhp/
Deleted
What's the pricing like?
Just as a note on the screen in question (that blocks access to the evaporator behind), I just made a few cuts in the screens (there are three sections in mine) so that they can be pulled forward (like a flap) allowing access to vacuum the component behind with a soft brush. Bend the flaps back when you're done (it's metal screen). 100% do not blow lint backwards into the cooling fins using compressed air!! If you get your fingers in there you can literally "roll" down the lint layer in order to remove it as the moisture combined with fine lint creates a fine blanket that has some cohesiveness.
I just cut a larger (to fit over the entire opening) screen using standard window screen which will remain in place ... if you use aluminium screen. You can use two layers of the regular screen, or try the finer ("no see um") variant. Just use the secondary fine lint capture box as a template, but go about 1/4" larger on all sides. This makes things a lot easier to clean every month or so.
You really do need to clean behind that fine lint trap as well as vacuum out the ports at the back of the dryer every few months so make sure you provide an easy means of access during installation.
We're at about 5 years with no issues so far on the Whirlpool condensing dryer/washer combination.
Appreciated this post and was the route I went. Filled the canister of a Dyson DC hand vac twice. Will need to go back and clean more thoroughly, but it's already working much better since.
Aus, that is a good save. Having done the full case-off cleaning now, I'd have two recommendations after trying to just clean the front face of the evaporator as you've done, particularly if you've been using the dryer for over 3 years.
1. Lint builds on the face of the evaporator (which you can see behind the front screens) as well as the condenser behind it. You can only access the condenser by pulling the unit apart. That manual I linked in post #37 with the video links makes it pretty easy to pull the unit apart. Having seen how much was in there after 5-6 years of use, I'd definitely pull it apart.
2. Adding the stainless steel micro mesh (0.125 mm holes) screen cut to fit in behind the secondary lint filter works great (Post #38 of this thread). I have a small vacuum with a straight brush attachment sitting close to the dryer and use it after every 2-3 loads to clean the secondary filter, and the lint that is captured by that micro-mesh screen. Since adding that fine mesh screen, there has been pretty much zero accumulating on the evaporator. Whirlpool could have done the same which likely would have kept things much, much cleaner inside.
Bosch's WTW87NH1UC model has a self-cleaning condenser which uses the condensed moisture to flush the fins I think. Probably other brands now do this as well but I haven't done any research. https://www.washingtonpost.com/lifestyle/home/are-you-ready-for-a-heat-pump-dryer/2021/06/19/caa6e5d2-c7a8-11eb-a11b-6c6191ccd599_story.html
Apparently Bosch has done this since 2017: https://www.youtube.com/watch?v=3CqTpV2lQfo Anyone has experience with this dryer's self-cleaning-condenser?
That's pretty smart..but you must take an efficiency hit if moisture is being added to the condenser to clean it, unless they damper the air stream down (unlikely) while cleaning. That said a screen is pretty simple to manage. Whirlpool just messed up on that detail. The screen should have been finer (like the secondary lint trap with an ultra-fine screen), and removable.
Now that I think of it, ordering a spare secondary lint filter and cutting it in half would make a 100% effective removable evaporator filter...ha.
Does anyone know if the static pressure increase would impact the operation if a user implemented either:
- @dennwood's suggestion of buying a spare secondary filter and using half of that in front of the hardware cloth
or
- the other posters suggestion of adding a piece of aluminum screening in front of the hardware cloth
Also, any added info on these "ports at the back of the dryer" referenced by @dennwood? Is this a reference to the single "cooling fan screen" noted in the use & care manual, or something else?
I have a WED9290FC0 and have now arrived at the same problem. I'm also interested in an answer to your questions. My plan is to do a tear down to clean the coils. Thank to everyone who paved the way with videos and cheat sheets!
This video was helpful...https://www.kaltura.com/index.php/extwidget/preview/partner_id/1661131/uiconf_id/24888851/entry_id/1_t9n1awi8/embed/iframe?
Manual is here to help if needed:
https://www.dropbox.com/s/0ql4kb89qeed48b/W10764068%20L-88%20Whirlpool%20HybridCare%20Duet%20Dryer%20with%20Heat%20Pump%20Technology.pdf?dl=0©_to_dropbox=true
This is a multimedia manual so if you click the embedded play buttons, a video will load with each step. These are the same videos you see linked in various previous posts but the complete set is embedded on applicable pages in the manual. It's quite easy to follow along. You can download the service PDF, as well as the linked videos. It's not a bad idea to do this now, before they are gone.
There is a screen at the back where the cooling fan exhausts…they recommend cleaning once a month with a vacuum. You should also vacuum the intake louvers (for cooling air) on the rear panel ...opposite side of cooling exhaust port.
You will need to pull the unit apart to clean it. I'd also remove the pump cover and vacuum it out with a wet dry vac. You can use a combination of foaming AC condenser cleaner, a squeeze bottle of hot water, and a wet dry vacuum to clean the coils.
I've attached three pics..the first is what it looked like after just attempting a clean with the dryer fully assembled. This is after 8 years of use....it should have been cleaned a few years ago! I also found a rather large leak on the blower motor cover which was leaking dryer air into the enclosure. The factory had rather carelessly applied weather strip to the part and left about a 2-3" long gap.
The last pic is with the job done. There is no getting around taking it apart to clean as the rear coil (condenser) is impossible to clean otherwise...and you can see that the surface was covered.
I've added a micro mesh screen in front of the 3 OEM screens (now cut on three sides), cut to shape from aluminium storm window screen material. You want to make sure the white flexible seal around the original evaporator screen assembly can make contact with the fine lint filter cartridge when it is inserted.
On the back of the unit, there is an exhaust grill for the 5-6" fan used to cool the compressor. It clogs up with dust/lint, so I'd vacuum it every 4-5 months. Intake air is through the dryer's back cover, where louvres are stamped into the cover. Those could use a vacuum at the same time you're doing that cooling fan grille.
After using the dryer for a few months now with that added 0.125 mm stainless screen, I'd say 100% do it. It does not have a noticeable impact on performance, and it does capture lint that is visible (which has not been captured by the secondary lint filter!) after just one drying cycle. I use a small vacuum now to do a 20 second clean up after 2-3 drying cycles of the secondary filter and that added stainless screen behind it.
From a little more research, LG has a similar feature as well: https://www.youtube.com/watch?v=8I-7KpQ1K70
and the US model has the feature name imprinted right on the bottom left of the unit: https://www.homedepot.com/p/LG-Electronics-24-in-W-4-2-cu-ft-Compact-Ventless-Stackable-Electric-Dryer-with-Dual-Inverter-HeatPump-Technology-in-White-DLHC1455W/316457781
After the disassembly / cleaning I figured another step would be to add a finer screen behind the secondary lint filter. You can order up stainless steel micro mesh with 0.12 mm holes via amazon which should pose no issue for air movement, but will capture more lint/dust. I cut the screen to fit over the existing opening, while leaving the soft gasket at the edges exposed. That soft gasket seals up against the back of the secondary lint filter cassette so you want to make sure it is not obstructed. Two layers of aluminium fine mesh window screen are used for support, and the third layer is the micro-mesh screen. I used a hot glue gun at the edges to hold the screens together. We'll just vacuum it when the secondary filter is removed for cleaning.
I've attached a pic of the offending solid screen that is fixed in place and blocks access to the evaporator surface. I just cut each of the three sections on three sides so each section can be pulled back if needed to vacuum the evaporator surface (with dryer fully assembled). Quite a bit of the evaporator surface is hidden behind the OEM screen/plastic cover, so you'll still need to take the dryer apart to properly clean it if you see a lot of lint stuck in the evaporator.
I reviewed a video where one of the LG "self cleaning" units was taken apart. The condenser was clean (which is where the self cleaning hoses are situated) however the evaporator was pretty clogged up and would need full disassembly to properly clean! The crud in the drain tray would again require disassembly to clean.
https://www.youtube.com/watch?v=YgVX_k3xvf4
I'm a 1 year owner of Whirlpool HP dryer and have loved it so far. I've been cleaning the 2 lint filters pretty well every cycle, as well as scraping lint of the permanent mesh screen behind the second filter. Today I shone a light into the area behind the screen and saw the collection of lint on the evaporator! That started some googling which brought me to this discussion thread and the excellent posts that you and others have created to help us newbies out - thank you. Amending the screen and creating an additional fine filter has been added to my to-do list ;-)
Graham. glad you found that helpful. The fine screen addition has been working very well. The evaporator is staying quite clean :-)
Hi Dennis - that service guide you posted looks extremely useful. Thank you.
For those who have done this, am I correctly understanding that not all the steps in the manual / not all the videos need to be done? That to clean the coils, one goes to page 4-14 and follows steps 1-9 to remove the cover to the heat exchanger?
Most of it looks like removing screws and part, except the belt portions. How difficult is it to get the belt back on?
The manual references a "service filter" - is that the fixed filter?
Has anyone had any luck hiring a Whirlpool service tech to do this service? If so, how much did they charge?
I have the same question about hiring a service tech to do this more involved cleaning. When I bought the dryer, due to concerns about the longevity of the heat pump dryer, I got the extended 5 year warranty. Everything’s still working fine and I’m now at year 4, and have been vigilant about cleaning the exterior filters and vacuuming the screen but I haven’t had the guts to disassemble the entire unit. But I can see the lint buildup on the fins is getting worse and worse.
I got the stainless mesh and made the tertiary filter as per your post. I did do one thing differently which was to use adhesive aluminum foil tape to join the layers together. I found this helps to smooth the edges and you can add layers of tape as needed to make it fit snugly inside the rubber seal. I made a cardboard template initially, using the filter canister to trace the top of the opening.
One other thing that may be useful is that I (temporarily) adapted my vacuum’s crevice tool to accept a length of tubing which is much easier to poke into the area where the evaporator is. I also found a toothpick and toothbrush were handy to loosen up the lint that had collected 😉
@graham T, those are good tips. I too have redone the filter by using fire stop caulking around the edges as the hot glue gets soft during a dryer cycle. Like you, I also picked up a straight brush attachment for the vacuum so I can get in there directly. I think aluminum duct tape is a good choice too. I may just try some aluminized duct tape to hold the "new" filter in place. Here is what I did with the fire stop caulking which is fine with heat :-)
1. Lay down some plastic wrap on a solid surface.(wax paper would work too).
2. Apply a small bead of caulk to the back of the heavier screen.
3. Lay the heavier screen on the plastic wrap (so it won't stick) on the flat and apply the finer screen over top.
4. Apply a small bead to the edge of the finer screen.
5. Lay plastic wrap over your lamination, and then a flat heavy surface over that, like a pile of books.
6. Leave it for a day. Then unwrap and trim the edges. That gives you a screen that is impervious to dryer heat.
@buildhelm, based on what I saw inside my dryer, I'd say having it cleaned up at the 5 year mark is not a bad idea. Someone who knows what they're doing should be able to do this in 2 hours (or less) with no issues. You could print out the .pdf attachment here and hand it to them as well :-)
The dryer otherwise has been perfect...zero issues over about 7-8 years now. Here's that service guide link again, although the forum software is actively omitting the .pdf on the end of the link. It works if you copy/paste the entire link into your browser.
https://s3.amazonaws.com/sm-backend-production-attachments/Job+Aid+-+W10764068+-+Rev+A+(L-88).pdf
Thanks Graham and Dennis for the instructions. I ordered some super fine mesh and made a tertiary filter. I look forward to seeing if it helps. (BTW I ended up with enough material to make about 5 more of these so if anyone else needs some let me know, otherwise it will likely sit in my basement forever).
Do you take this tertiary filter out to clean it regularly at the same time you clean the secondary filter?
Using this service/video guide, follow procedures as I've indicated. Remember that the pdf has video links (blue box with right arrow/play button) embedded which still work fine :-)
https://s3.amazonaws.com/sm-backend-production-attachments/Job+Aid+-+W10764068+-+Rev+A+(L-88).pdf
Step 1 - 4.4 Removing the Top Panel and Console
Step 2 - 4.7 Removing the Front Panel and Door Switch
Step 3 - 4.10 Removing the Belt Drum and Rollers (you don't need to remove rollers)
Step 4 - 4.12 (step 7 only to remove blower) Instead of using 5/8" socket, you can just grasp the blower itself and firmly rotate counter clockwise. Use 7/16" open ended wrench to stabilize shaft as in figure 1.
Step 5 - 4.13 Removing the Drain Pump and Float Assembly (you are just removing the cover to clean out the resevoir)
Step 6 - 4.14 Removing the Reed Lint Switch
Now you will have access to clean the evaporator and condenser coils. Try using a squirt bottle with water, along with a wet/dry vac to clean the coils. This worked great for me, likely better than using AC Safe Heavy-Duty Air Conditioning/AC Coil Foaming Cleaner.
Also, doing this again, I would just remove the existing screen behind the secondary lint assembly and replace it with stainless steel micro mesh with 0.12 mm holes (can order via Amazon) while everything was disassembled. Don't use hot glue as it will soften each time the dryer is used! Use epoxy or a high temp silicone sealant to fix the screen at the edges. I would vacuum this screen whenever cleaning the secondary lint filter every 2-3 loads.
REASSEMBLY NOTE: Inspect the seal strip at the back of the
heat exchanger for damage. Check for correct installation
and placement along the edge of the heat exchanger outlet.
Ensure seal between heat exchanger and bulkhead.
REASSEMBLY NOTE: When reinstalling the cover onto the
heat exchanger, ensure that the evaporator and condenser
tube sleeves are properly installed around the tubes
between the cover and housing of the heat exchanger.
The belt on the drum and drum itself is pretty easy to sort. Just rotate the drum by hand (with the belt on it) to make sure it has no twists, and is routed correctly on re-installation. You may want to take a good look at the belt routing under the drum and snap a few pics before removing it.
The job itself looks more complicated than it is when looking through the steps. It's pretty straightforward once you start pulling screws and components apart.
I've attached an edited version of the service manual to just include the sections you need for disassembly.
@buildhelm, I keep a vacuum and nozzle by the dryer and vacuum the screen etc every time the fine filter is cleaned. Otherwise it would for sure impede air flow after 5-6 loads with the fine lint that is trapped by the screen.