HELP – Maine deck bracket condensation inside crawlspace
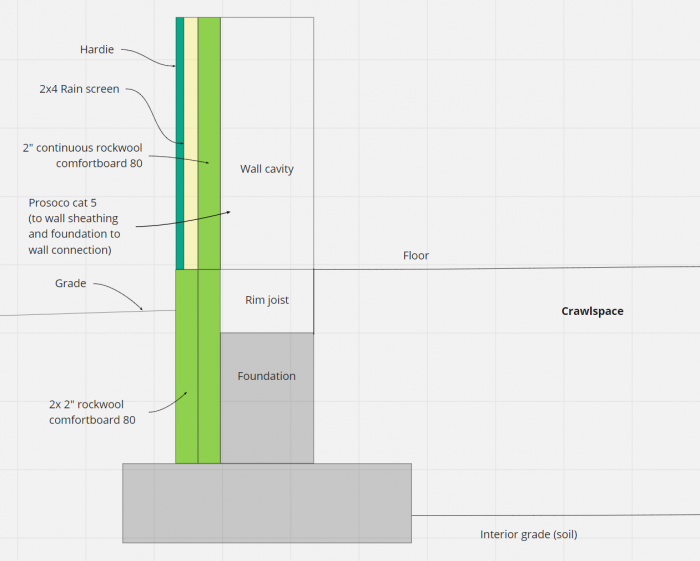
So it’s been a couple years now that I’ve been working on my DIY energy retrofit to our house. Here’s our wall assembly:
1) plywood sheathing
2) prosoco cat 5
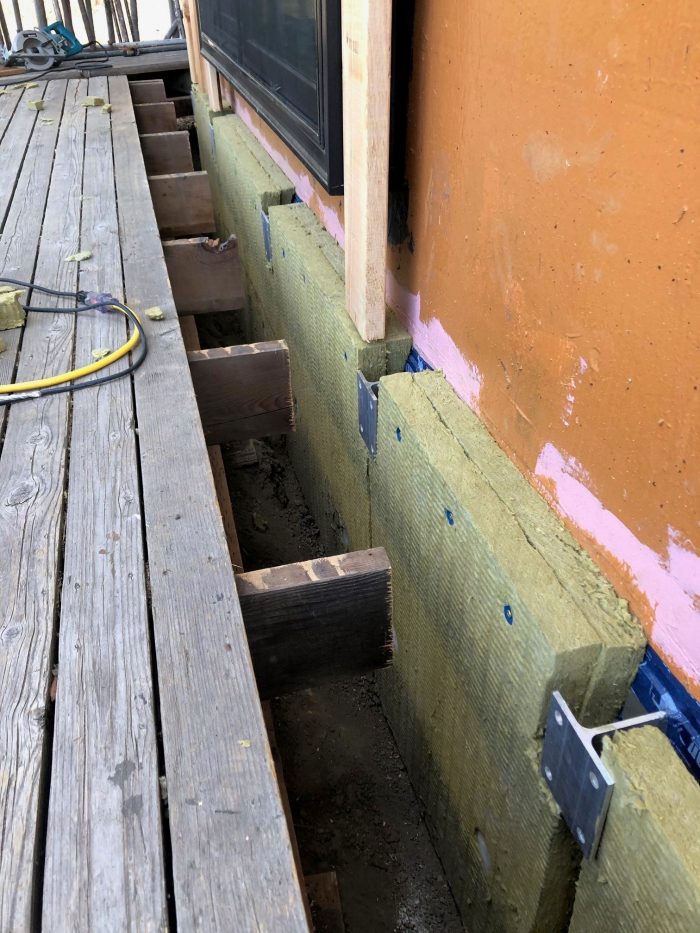
3) 2″ rockwool on plywood sheathing and two 2″ rockwool layers on stem wall foundation
4) 2×4 rainscreen
5) woodtone hardie lap siding
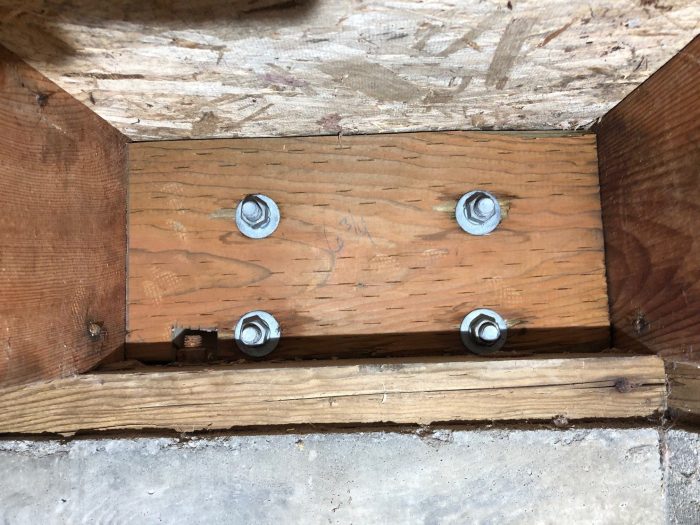
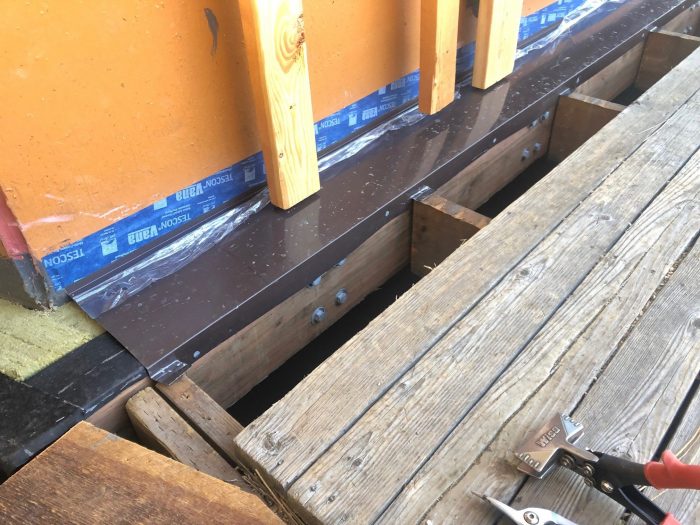
It was August 2020 when I installed the maine deck bracket for a future deck install. My reason was this was a way to fit the 4″ of rockwool behind the 4×8″ ledger board I planned to install.
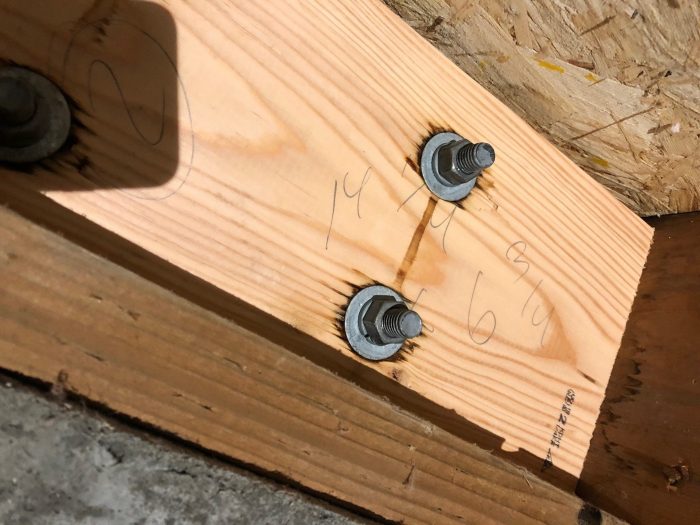
I can’t believe I didn’t see this sooner but I have condensation on the main deck bracket bolts that attach through the rim joist and the extra 2×8 blocking I added (see pics). We have a conditioned crawlspace but it currently isn’t encapsulated (next year’s project). I’m obviously concerned for water damage that isn’t reversible as to take off the ledger board at this point would almost not be an option unless the damage is clearly not able to be fixed another way. I’m hoping to solve this by just adding a vapor barrier over the bolts on the crawlspace side to eliminate the condensation but am not sure if this will solve it? There’s definitely water wicking into the blocking, I’m afraid if I add an air barrier it’ll just trap the water in. What do I do? Wait for summer? Will the damage be too much if I wait until summer? Do I use a heater to dry out the wood then add an air barrier?
I would like to use a spray vapor barrier like VISCONN from 475 building supply + rockwool comfortbatts vs. a spray foam but thoughts here too? Am I totally off my thought process? Is there another solution?
Thanks for your help! Zach
GBA Detail Library
A collection of one thousand construction details organized by climate and house part


Replies
A dab of canned foam over the bolts should solve your problem.
If you are looking for extra insulation, you can also cut and cobble some rigid between the joist. Use a large mallet to tap the foam in place and create an indent for the bolts so the foam sits flush against the rim joist.
Great job with the rest of the build!
The area behind the bracket is essentially uninsulated due to the thermal bridging of the bracket. So you've got a cold spot. That spot needs thermal insulation and it also needs an air barrier and a vapor barrier to keep moist interior air away. Since you're in a heating dominated climate the vapor barrier should be on the interior.
So how to do that? I'm thinking easiest way is a dollop of spray foam over each bolt head. If that's not enough insulation then you probably want to seal and insulate the whole rim joist as if it weren't insulated on the exterior.
The bolts are essentially thermal conductors, drawing heat out which makes them cold on the inside. Once those bolt heads drop below the dew point of the air in the crawlspace, you get condensation.
I would use canned foam over the bolt heads here. If you cut the bottom off of a WAXED paper cup, you can use what's left of it to make a nice form for some canned foam. Put the cut cup against the rim joist with the wide mouth end against the rim joist, then tape it in place. Fill about 1/2-2/3 full with canned foam. Once the foam cures, you can trim the end and remove the paper cup, leaving nice little formed insulation plugs around the bolt heads. The "waxed" part of the paper cup is very important to be able to get it to release from the canned foam.
If you put rigid foam into those joist bays to cover the entirety of the rim joist in the area of the bolt heads, I would cut out holes in the rigid foam around the bolt heads and still fill those with canned foam. I've had issues in the past with moisture finding its way into things like this and causing problems, so I prefer to have fully adhered insulation in these situations. Fully adhered insulation, which pretty much means either canned foam or spray foam, has no possibility for leaks so it does a better job.
Bill
Nice trick with the paper cup! Might be good to mist the surface and the inside of the cup with a tiny bit of water to aid curing since the wax will inhibit water vapor, needed for curing, from getting in.
To my eye your deck attachment does not seem to meet modern code requirements to prevent lateral separation.
https://www.finehomebuilding.com/2015/11/11/attaching-a-deck
Walta
Looks like there is an ICC report which includes lateral load capacity.
https://deckbracket.com/wp-content/uploads/sites/45/2018/08/esr-1331.pdf
Though it seems that per page 2 #5.5 design calcs by a registered design professional are required.
The thing is that the lateral capacity of the ledger to the house doesn't address the lateral attachment of the joists to the house.
I would suspect that laterally tying the joists to the ledger would be sufficient (given the rating of the deck bracket), but it would need to be designed; there is no prescriptive allowance for the situation.
I actually sent an email to Maine Deck Bracket on this topic 2+ years ago and they never got back to me. Here's what I asked:
"Hi Folks,
What’s your recommendation on fulfilling the 2015 IRC deck lateral connection requirement while using your product?
It would seem to me that the depth of your product combined with a double ledger/beam puts the joists too far from the house framing in order to use the lateral tie products on the market (e.g. https://www.fastenmaster.com/fastenmaster-2015/lateral-tension-system.html).
On the other hand, given the lateral rating of the Deck Bracket itself, one might make the argument that laterally tying the joists to the ledger/beam (with one of the lateral tie products) would then transfer the lateral load to the ledger which in turn can transfer it to the house.
Please let me know how you’ve been recommending to handle this situation."
mountaincabin,
As Akos said: nice job. If (heaven forbid) you end up doing this again I'd suggest a couple of minor changes.
- Run the cap flashing down the ledger before attaching the deck joists so that you don't have those small cuts over each of them.
- Set your joists 3/4" higher than the ledger so that there is a gap between the cap flashing and the decking above which will allow both water and debris to drain.
Malcom,
That makes so much sense re: setting the joists 3/4” higher than the ledger to allow for drainage and reduced debris collection. Fantastic idea!
John,
I think I got that detail from FHB's Breaktime forum a decade to so ago.
Thanks Malcolm. I'm to not have the redo the ledger but I would do some things with this differently too. I'm curious to know more about your idea here. This is where I have a gap for my rainscreen air vent. I was going to keep it at same level or higher so that it doesn't get blocked by debris or snow. Thoughts?
Mountaincabin,
We don't have snow here, but I usually keep the cladding on walls over desks 3" above the surface to avoid the gap getting blocked, and minimize damage from splash-back. Just as with with roofs, having the ventilation gap blocked by snow isn't much of problem, as the temperatures are cold enough that any moisture that accumulates won't cause problems.
Thank you all for the info. I am curious, am I not able to just use a spray vapor barrier over the bolts then insulate with rockwool comfortbatts? Wouldn't this do the same thing to solve the problem? I've worked hard to not use any foam in the house, definitely will use if needed but looking for an alternative too. Thanks.
Nope, that won't work. The reason is that the vapor barrier itself will get cold and become a condensing surface. You really have to use a non-permeable insulating material here, which means rigid foam or spray/canned foam.
Note that canned foam like Great Stuff is NOT two-part spray foam of the type you sometimes here horry stories about. Canned foam is pretty benign stuff.
Bill
Ok appreciate this explanation Bill. I got the cups (forms) this morning and the spray foam.
Try to keep the bolt in the middle of the form. Ideally you want 1+ inch of canned foam on all sides of the bolt.
Bill
Vapor barrier needs to be on the warm side.