How to I properly insulate and seal an HVAC plenum through a garage slab?
Hello,
I have a difficult situation. I had to completely gut the existing HVAC system in my 1991 house due to numerous major issues (flex tubing like Swiss cheese facing into the plenum, kinks, leaks, a branch off the end of the trunk, returns in the wrong place, missing registers in some rooms, too many in others, etc. After ripping everything out in the house and basement, Now the trunk is all metal, sealed, insulated, properly sized, reduced correctly, dampers on all branches, etc However, I found another problem.
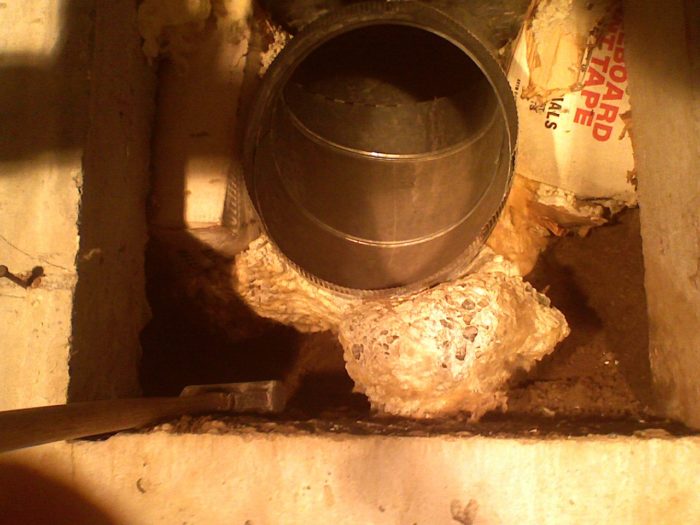
The furnace itself sits out in the garage. The return is on top and the supply is on the bottom. A 14″ trunk (too small) emerges from the foundation wall in the basement (in a roughly 2×2′ notch at the top of the foundation wall). When I was removing the trunk, I found that they simply used a 14″ elbow under the furnace (not a proper plenum box). Further, they had stuffed cardboard and debris around this piece of ductwork. Some concrete from the garage pad pour made it around the 90, while fill under the pad was leaking out (see attached picture). Fastforward to today. I have ripped out the 90 and I am chiseling out the concrete over pour and debris to enlarge the space so that I can fit in a proper cement elbow plenum.
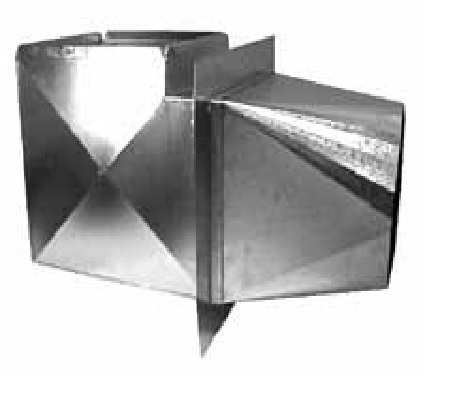
The new plenum is a large metal box with sound insulation lining the inside and a transition that changes from square to 16″ round ductwork: used for concrete slab penetration when furnace is located in garage and supply run goes through slab and foundation into the basement. I assume this means that it can have cement poured around it (direct contact) But, being in the Pacific Northwest, the ground has lots of water in it most of the year. Even when I ripped out the 90, rust had formed between the concrete and the metal duct.
My hope is to make a concrete lined box slightly larger than the cement elbow which I can slide the whole piece into place. However, I do not wish any metal to come into direct contact with the concrete. I would much rather put some sort of layer of plastic and rigid insulation of some sort completely surrounding the bottom and sides – but what I do not know.
Any help or advice would be greatly appreciated.
Thanks!
GBA Detail Library
A collection of one thousand construction details organized by climate and house part


Replies
Jeff,
One approach (not cheap) is the go to a sheet-metal shop and have this fitting fabricated in stainless steel.
Another approach (the one you suggested) is to create a large enough void in the concrete to assure that the concrete does not touch your galvanized fitting. The space between the concrete and your galvanized fitting can be filled with canned spray foam.
This type of fitting is notorious for creating turbulence that increases the static pressure in your duct system. For more information on this issue, see Image #3 in this GBA article: Stuff I Learned at Joe Lstiburek’s House, Part 2. In your case, the duct improvements you are implementing are going a long way toward solving your problem.
Hello Martin,
Thanks so much. Your article intrigued me further. The good thing about the cement elbow is that is is oversized. But perhaps turning vanes would be appropriate. I am also fabricating a new mixing box to incorporated the three revised and migrated returns. The new HVAC plant will be ready in the middle (whatever that come out to be).
The entire duct system was a disaster, and this was one of the biggies that was left. I would love your input further. It seems that of all the Taunton Press books, the one that is needed is a comprehensive HVAC book! (I have told them too). Code check is covered, but when it comes to HVAC, there are two kinds of information available out there - simple, common sense books (don't put your child in the duct)...or you need a degree in mathematics (and nothing in between). Three months of internet research, and I came up with roughly 8 best practices on my redesign.
As I was buying the parts at a HVAC distributor, a seasoned contractor saw my "as built" and what I was planning to do. He was appalled by what a "professional" had done. He liked my design and mentioned a few tweaks (in the 5 minutes he had to look at it). I would love for you to take a look (if you are agreeable). Perhaps there is more I can tweak. Let me know, and I can share my contact info and send you some pictures and plans.
I have much more concrete to remove in the meantime. Thanks again for your help and advice. I have posted a picture of the far south end of the house from the new trunk (so far - NO FLEX - ALL METAL - air tight)! I will insulate afterwards with R8 Foil Scrim.
Jeff
Jeff,
The main thing I notice from your photo is that you didn't use take-offs to make the transition between your trunk and your branch ducts. There is less air turbulence when you use take-offs instead of 90 degree connections like you used. Take-off fittings make a gradual transition to help the air around the corner from the trunk duct to the branch duct. I will post photos of take-offs below.
.
Jeff,
Your wrote, "Of all the Taunton Press books, the one that is needed is a comprehensive HVAC book!"
You are right that a good book on the topic is needed. In the meantime, GBA is doing its best to fill the gap. For forced-air systems, I recommend these four articles:
All About Furnaces and Duct Systems -- (This article has information and links to useful resources that you might be interested in, especially in the section called "Designing a duct system.")
Sealing Ducts
Keeping Ducts Indoors
Duct Leakage Testing
Hello Martin,
Yes, when I was designing the system, I saw the angled take-offs. However, the other side of the plenum, I have not nearly as much room. I wish the plenum was near the center of the home, but it is offset. So, on that run of the trunk, I have limited space for the 9 branches. My worry was that if I did angled on one side and straight on the other, balancing would be much more difficult.
As for my concrete work, my hope is that I can make a 1" to 1.5" concrete space around the plenum and use foam or polyisocyanurate (1" is R6, 1.5" is R9). That of course is also dependant on how well this garage pad over pour comes out. I am renting a small breaker as chiseling was going good with the mortar, but not when I got to the 1991 concrete pad (much harder and not a lot of swinging space in this small hole). I think a vapor barrier, some rigid foam and I will probably paint the exterior of the plenum with duct mastic for extra assurance against leaks and a moisture barrier.
What do you think?
Jeff
Jeff,
Take-offs don't establish the angle of the branch duct. They are designed to reduce turbulence. After the take-off, you can install an adjustable elbow to aim the duct in any direction you want. Gentle angles are always better than abrupt angles.
Balancing can be accomplished with balancing dampers.
It sounds like your plan to protect the galvanized fitting from corrosion will work.
Ugh...so that's done....with a hitch. The furnace base was simply sitting on the floor only attached to the scrap of wood on the wall. Even better, the furnace unit was just sitting on the base (not one screw attached it to the base lip). They obviously filled the pad around it meaning the base was sitting on gravel and dirt beforehand. So, in this space I will put the plenum with R9 rigid foam surrounding it (sides and bottom and fill the perimeter and underneath with mortar. I assume I should put a layer of rigid foam where the furnace base box will sit so it too is not in contact with the garage pad. Since my unit is in an unconditioned space (the garage), I assume I should insulate the new furnace unit somewhat since sheet metal has no R-Value from the conditioned air inside running from the return to the supply side. Any suggestions?
Jeff,
Installing a furnace in a garage is always a bad idea, but you probably already know that and feel that you have no choice.
There are two problems with what you are doing: (1) Furnaces are poorly insulated, so you will be losing a lot of heat to your garage. (2) Furnaces and plenum connections often leak a lot of air, so your furnace can suck dangerous fumes from your garage and introduce those fumes into your house.
Some of these problems can be solved with mastic and vinyl-faced duct insulation; others can't. You need to have access to your furnace for maintenance and filter changes. Some furnace panels which are designed to be removable for maintenance reasons are quite leaky -- so there is really no solution to this problem other than "do the best you can."
If you ever have a chance to design and build a house in the future, don't put the furnace in your garage.
Hello Martin,
Yes - Here in the Pacific NW, this is the norm. Due to all the rain, no one has basements, so they automatically put the water heater and furnace there. It was unusual for me to even have a daylight basement as I lived on a slope lot. However, half of that area was a "michigan" basement (dirt covered with plastic and vents open to the exterior. I spent three years removing 17 tons of material in and out to create what I grew up with in the Midwest - a basement. It remains unconditioned though - like the garage. The previous furnace I spent time sealing every crack and putting seals on the furnace filter cover and every seam; along with insulation around the return and supply air boxes. Yes, it was a band-aid at best. The return mixing box (where return air from the 2nd, 1st and Ground floors joins together comes in above the furnace. I don't know a "better" place I could place the furnace due to the existing structure (at least it is not in the attic which I see builders do). Yes, I would do many things different - I will just have to try and create the best sealed and insulated ducting above and below the plant and hopefully find a furnace that is tight and efficient. I will likely have to seal and insulate it further though - it is the weak link in the entire system.
Jeff