How would you flash this difficult corner in stucco?
severaltypesofnerd
| Posted in GBA Pro Help on
How should I flash the pictured tricky corner?
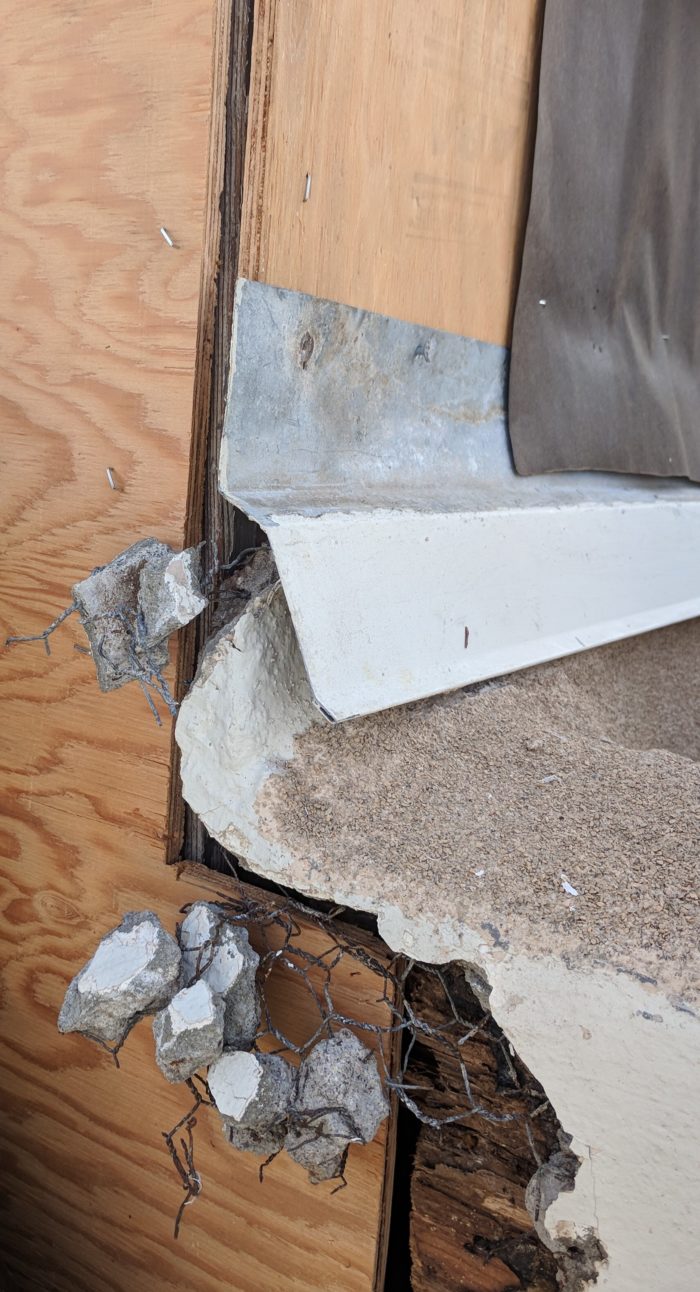
This is at the junction of a two story section and a one story lower flat roof done in foam. The pictured flashing was installed about 20 years ago, the wall below rotted and became a termite nest for various reasons, perhaps including the flashing.
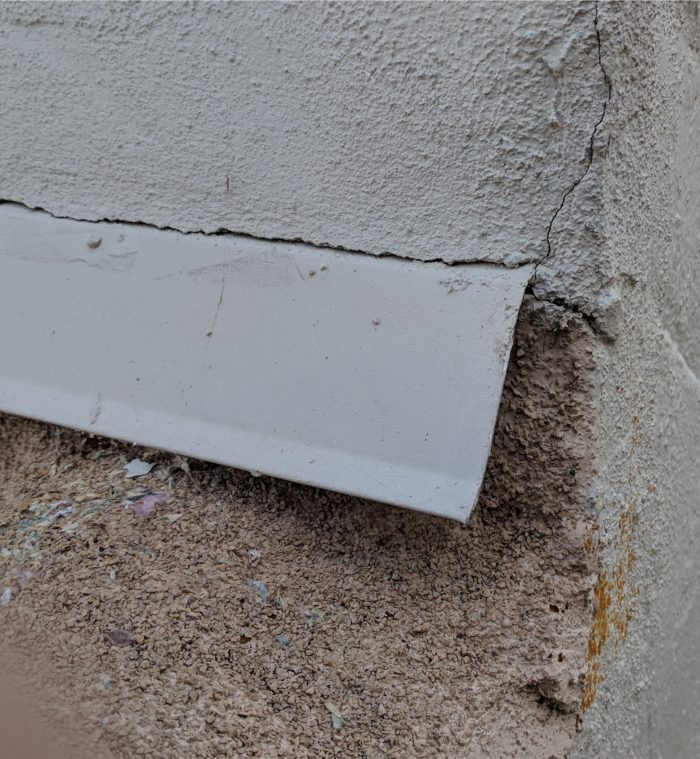
The second picture is the twin of the flashing from the opposite corner. There’s no evidence of rot there, but then again, the first corner’s problems were not understood prior to removal of stucco.
The entire stucco corner below the window is off.
GBA Detail Library
A collection of one thousand construction details organized by climate and house part
Search and download construction details


Replies
Bryce,
The photo raises a lot of questions.
You have a transition from a vertical wall to a low-slope (flat) roof.
You also have a transition from the low-slope (flat) roof to the wall below the roof.
Thinking like a roofer, I notice one egregious design error: The roof has no overhang. Ideally, this roof would have an overhang that protects the wall below. As it is, it appears that water is dribbling off the roof and saturating the wall below.
There are lots of ways to fix this. My first question is: Are you willing to extend the roof so that it has an overhang?
There are so many problems here.
The house is 1937, San Francisco Bay Area, mild non-freezing pro-termite climate.
There are plenty of other errors, including a flashing that depending on a drop of tar placed in 1937 and never refreshed, resulting the loss of the entire wall. The leak here was caused by failure to maintain the wood window above, and the curious 1937 decision to have a 4x4 hole in the old growth redwood sill.
Changing the roofline is not an option. Adding an eyebrow flashing at this area is a possibility. An awning is a possibility. Either way, this area still has to have some integrity, and water getting behind the stucco has to go somewhere.
Oddly I'm thinking of deliberately channeling any water that gets in here to the interior plaster. It's twisted, but might fit the bill.
The picture is the original 1937 redwood sill, showing the corner detail involving a giant hole. The corner appears to be non-structural, as it was there exclusively for the weight pockets of the two double hung windows at the corner. It was formed from two 1x8 flat boards nailed at the corner. Over time the boards separated (it looks like one coat of white lead paint, there is no evidence it was ever repainted after 1937).
The one story section is an addition.
The windows were replaced with inserts, by a team of people wearing blinders, who did no repair or painting of the frame, just covered it in sheet aluminum caulked tight.
The three items in combination did this wall in.
----------------------------------------
Now we just have to flash the wall/wall/roof transition point, per the original question. The problems at window level and above are dealt with.
A view of the entire corner.
How best to flash that stupid bit above?
How best to deal with the mirror corner?
All without changing the roof line.
Oh yes, of course. This is a west facing wall and gets direct blown wind driven rain. Quite frankly it would take a huge overhang to make any difference.
The question remains: what can I do to flash THIS section, even if it's not the only solution?
Perhaps something shaped like this:
http://www.davessheetmetalinc.com/product/masonry-outside-corner/
Use a stucco rain screen drainage mat product behind the stucco.
Bryce,
Edit: If you are doing the work yourself, using a pre-made flashing profile, like the one Jon k=linked to, is probably your best bet.
@JON R -- This is the transition from a two story outside wall, to a one story wall above a flat roof. With a masonry outside corner flashing the problem repeats itself on the two story wall. The edge of that flashing would wick water inside.
I can build a flashing of any shaped needed. So far the best I can figure is to take the far edge and built a small "hat" flashing to keep water sheeting on the stucco surface from wicking in the edge of the wall-to-roof flashing.
I will use a 2.8mm keen rainscreen where possible, and an usual detail:
an inside flashing designed so that when the corner leaks again all water drains not in to the wall, but directly to an interior sheetrock wall.
It's a horrible corner.
Brice,
No, you have created a completely different situation. Put an end-dam on the leg of the flashing on the two storey side and it won't let in any water. The intersection where the roofing ends is now covered, as is the end of the existing L- flashing.
The problem with the existing situation was that the roof, the flashing, and the wall were all in the same plane. Water had multiple ways to penetrate that intersection, and no protection.
Do you mean an end dam like this? Where would the water coming through the crack between the Z-flashing end dam and the stucco go?
How about a vertical expansion joint below the window? The current setup has to crack somewhere, as two wall planes plus the parapet wall are all one rigid assembly (in earthquake country)!
Yes that's it.
Stucco houses have metal flashings and other penetrations all over them. As you say, they also usually use frequent expansion joints, all of which have the same condition of metal against stucco, and rely on the stucco to ensure that the amount of water able to penetrate through capillary action is so small that it dries before any damage occurs.If you are still concerned you can use colour-matched caulking in the joint.
Stucco is a reservoir cladding. That is it absorbs and holds water even in the absence of gaps or cracks. That's why detailing stucco successfully depends on having a gap and drainage plane behind it to keep the moisture from getting deeper into the wall.
@Malcom I'm good with stucco drying, rain screen. I'm confused about the flashing detail here, I still can't find a good way.
I have decided to incorporate a vertical expansion joint 6 inches in from the corner.
Bryce,
The problem stems from the house being originally built with details more appropriate to desert climates in order to get a certain look. Typically the lower roof would have metal cap flashing which would integrate with the end wall flashing and you wouldn't be where you are right now.
That (fairly useless comment) aside, if you are confident in the vertical stucco expansion joint not letting in water, I'm not sure why you are so worried about an inch high end dam against the stucco?
Here's where I am so far. An end dam. The expansion joint will go just inboard of this Keen 2.8mm rainscreen is shown in the picture.. It's janky but the best I can come up with short of airlifting the house to Arizona.
The vertical joint drips onto the bottom flashing/weep flashing.
Don't get me started on the OTHER side of the same 2 story section, which has no weep whatsoever. Whatever ends up behind the stucco has to dry out in the attic below.