Insulating Mud Sill and Electrical Panel
Hi,
I’m trying to install 1.5” Rigid foam tight to my Mudsill. My electrician stapled wire runs along about half of it and I really don’t want to reroute all the wiring. If I just get my rigid as tight to the wires as I can, then tape the top using Tyvek tape, will that be a sufficient air barrier? I’ll also cover it with mineral wool.
Would a better approach be to tape the Face of the Mudsill and wire, and lap onto the top of my foundation wall, and then butt my rigid up to that? Also taping the top gap again? I’m just unsure how airtight the housewrap tape is.
I’m also not sure how to insulate around my electrical panel. I searched the site but couldn’t find much.
Thanks, Michael.

GBA Detail Library
A collection of one thousand construction details organized by climate and house part


Replies
There are some areas that spray foam can work really well and this is one of them. A small “froth pack” could meet your needs. Ventilate if you can and where ppe.
Thanks for the reply. After reading Martin’s article on insulating rim joists in older homes, I’m considering just air sealing (Caulking) the gap between the foundation and Mudsill, and leaving the “face” and top of the Mudsill uninsulated (Rockwool will eventually sit on top of it).
Older home with no sill seal and non-pt mudsill in CZ4. I just insulated all the joist cavities with 2” rigid / expanding around perimeter, and 1.5” eps on foundation walls. I’m also going to add some rockwool to the cavities and then fill the 2x4 walls with rockwool too. Is this assembly going to present problems if that one portion of mudsill is exposed? There are definitely signs of moisture from bygone days (before we bought it), but I keep a pretty close eye on it and there is no evidence of recent moisture intrusion and no wood rot. I’ve been working all around it the last few weeks and tapped, poked, and prodded almost all of it with no major concerns.
Thanks!
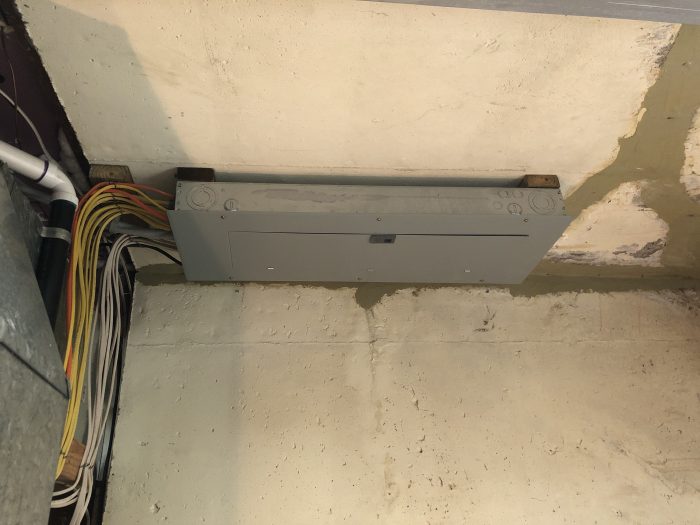
It looks like your electric panel is mounted on some 2x4s to keep it off the wall (a good idea, BTW, which will help keep the panel from rusting out). I would slide some rigid foam behind the panel, 1.5" would probably be a tight fit that would work well here (you might have to loosen the screws in the panel a bit to get some wiggle room to slide the foam in, then tighten them again after the foam is in place.). Put that piece behind the panel in so that it comes to the ends of those 2x4s, then put rigid foam around the perimeter of the panel. That part should be easy.
I would probably just pull up the staples for the wire along the mudsill and reattach the cables slightly out from the wall to give me room to work. I like using the plastic staples with two small nails instead of the metal staples. The small nails are easier to drive with a small hammer, so they're easier to work with in tight places. Once the wires are out of the way, you can easily insulate the mudsill. You could also use spray foam and just bury the wires, that would work too.
Bill
Bill -- Pulling wire staples is something that can be hard for someone who isn't experienced to do without damaging the wire insulation. Do you have tips to share?
Thanks.
I usually do it like this:
Grab one side of the staple with your linesman's pliers, resting one side of the pliers on the wood.
Twist the linemans plier
This will usually pull the side of the staple up without mashing the cable jacket. You can then either reset the pliers against the wood and to another twist'n'pull, or grab the top of the staple if it's high enough and pull it out while rocking it back and forth. I've sometimes used a small wood block (scrap piece of 3/8" or so plywood usually), to allow me to do the "twist'n'pull" higher up so that I can get the entire staple out. With a bit of practice, you can do this pretty quickly.
Another thing I've done is to use a large flat-blade screwdriver as a prybar, working against a wood plock with the tip of the screwdriver under the top of the staple. This lets you lever the staple out without putting pressure on the cable jacket.
If you're VERY CAREFUL, you can grab BOTH sides of the cable jacket from the staple, and pull out. Emphasis on careful here, you can damage the cable using this method. This is a last resort if you can't get the staple out any other way.
Sometimes I rock the staple back and forth from the side with my linemans pleiers with the intent of breaking the staple if I can't get it to pull out. Once it snaps off (the steel used is similar in hardness to a nail), I just use a small hammer to pound the remaining bit of staple into the wood to get a clear surface.
The plastic staples with two nails are easier to get out, since the nails are smaller diameter. I've grapped the sides and done the twist'n'pull with my linemans pliers, or sometimes I use a small nail puller on the side. These are a LOT easier to get out, so it takes less force. I prefer this type of staple and don't really use the formed metal staples anymore.
Note that a good set of lineman's pliers are indespensible for electrical work. I particularly like the Klein ones with the hardened cutter blade. They aren't cheap, but they work very well and last forever. Note also that you want a SMALL hammer for putting in the plastic staples, not a regular framing hammer. The smaller hammer (I use one about half the size of a framing hammer) allows easier work in tight spaces, and is less likely to mash the cable if you have a misfire.
Bill
Thanks Bill! The more I've researched and read through anything related to this on GBA, the more I'm of the mind that I might just air seal the mudsill joint at the foundation and leave the top and face of it exposed. For me, the risk of eliminating the chance for the untreated sill with no capillary breaks down to the footer to breathe by covering it in foam is greater than the cost of it being a thermal bridge. Plus it saves a lot of hassle trying to either squeeze or spray foam into an excessively tight and uneven surface.
You can mitigate the moisture risk somewhat by use EPS for insulation instead of XPS, polyiso, or spray foam. I used Type I EPS on my own rim joist for exactly this reason. EPS, especially the more crumbly Type I, is the most vapor open of the rigid foam types. I have foil faced polyiso on the exterior, so I wanted the interior side insulation to allow for a little bit of drying potential.
Bill
This might work, gonna be a lot of cut and cobble should I pursue it. Right now I have stacks of 1.5” R-Tech EPS waiting for the walls, but both sides are faced. Does that matter from an ability to “dry” perspective? Thanks again!
https://www.homedepot.com/p/202532855
Yes those facers reduce the vapor permeance of the eps. The spec sheet states <1 perm (a class II vapor retarder).
I think R-Tech uses an aluminized mylar facer on at least one side. That probably puts you into vapor BARRIER territory, but I haven't look at the specs for the particular product. With EPS, the facing is what gives most of the reduction in vapor migration. EPS itself is the most vapor open of the rigid foams.
You can sometimes peel off the facer without damaging the material, but it's a pain to do and I don't recommend trying it unless you only need a small piece. If you have a Menards in your area (the "green" box store), they carry type I EPS up to 2" thick, and sometimes also type II EPS (the one with the higher compressive strength and about double the price of the type I stuff).
BTW, if you are worried about mositure, you could try painting the area you're insulating with Coppercoat first. I did that myself in my rim joist areas. Coppercoat is similar to the treated wood treatment but in a paintable form. It inhibits mold growth and rot (but won't prevent it completely if things get really wet). It's a little extra insurance. It stinks though, so I recommend wearing a respirator when applying it.
Bill