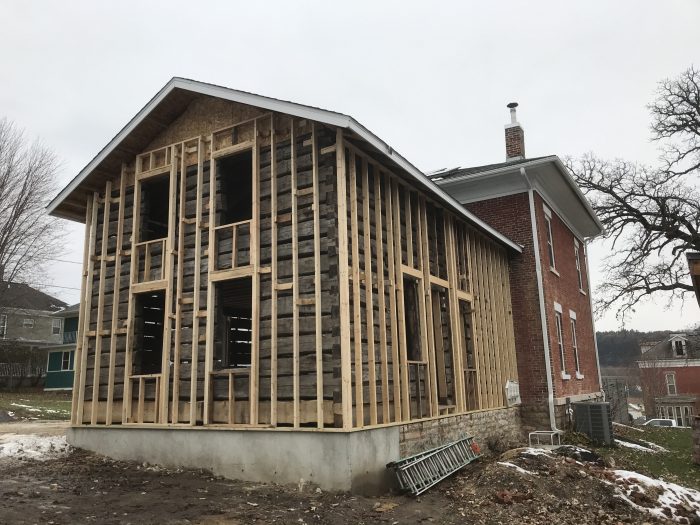
Insulating 1850s log house being attached to 1860s brick house
I’m in the process of reconstructing an 1850s oak log house onto my early 1860s greek revival brick house in northeast Iowa. The building is being reconstructed onto the foundation of a portion of the brick house I took apart due to severe structural issues. Complicated, I know. The foundation of the brick part I disassembled and am rebuilding the log house onto has a basement under it. I did add a 5′ U shaped concrete extension to acheive the full 29′ of the new-old log building. The log building was 15″ narrower than the existing foundation, which left me with roughly an 8″ ledge on both the long ends of the log building. The old stone foundation was was roughly 2′ wide, which gave me plenty of room to build the new floor, log walls and new 2×4 walls onto. The new U shaped concrete pour extends 6″ beyond the ends of the logs on the gable end of the building. I studded up 2×4 walls on top of the 8″ foundation ledge and plan to insulate the cavity.
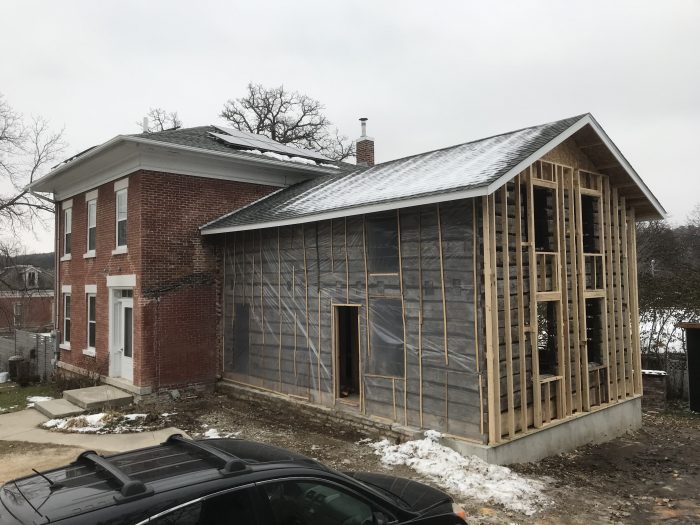
The plastic on the exterior is temporary- only enough to keep the snow from blowing through this winter.
The front facade will be brick veneered with brick from the portion I took apart. The other two sides will be sided with smooth LP Smartside clapboard siding.
The logs will be exposed on the inside. I plan to use canned spray foam (like 100 cans of dow great stuff; stupid, I know, but I don’t know of a different way to spot spray between courses) to fill the area between the log courses. On the inside between the log courses I plan to cut strips of metal lathe and apply hydraulic lime daub.
My plan to insulate the walls involves filling the cavities (all roughly 6″ to 10″ deep, depending on the irregularity of the log surfaces) with blown in cellulose. I’ll put up one course of 1/2″ OSB sheathing all the way around, fill the cavity with cellulose, add the second course all around, fill the cavity, and repeat till I reach the top of the walls. My plan for the sloped (exposed) attic ceilings and the gable end is 3-4″ of closed cell foam with R-21 fiberglass below that. Outside of the sheathing I plan to install Tyvek, 1/2″ furring strips, and the siding on top of that.
Given the front will be brick veneered, I plan to run vertical furring strips up the log walls, staple on rosin paper, and spray 2″ of closed cell foam to the paper. The brick veneer will get tied back to the vertical furring strips, and there will be a 1″ air gap between the back side of the brick veneer and the closed cell foam. I’ll use wicking rope at the bottom of the brick wall.
The new log portion as well as the second floor of the existing brick house will be heated with a 36k Fujitsu xlth 3 zone heat pump. There will be a 12k floor unit on the first floor of the log building, a 12k floor unit upstairs, and a 15k wall mounted unit in the common area of the existing brick portion. I heat the first floor of the brick house with a jotul f3, and have a brand new natural gas furnace as backup.
My questions are:
Does the wall profile seem ok? Beyond the spray foam between the log courses, there really isn’t an interior vapor barrier.
Should I be concerned about the cellulose near the bottoms of the walls? When I studded up the walls (that all hang out and away from the log walls), I used treated plates that cover the entire top of the foundation. So the cellulose shouldn’t be in contact with the top of the foundation. Should the bottom few inches of the cavity on top of the plates be sprayed with closed cell foam?
At door and window openings, there’s a gap between the interior log walls and the outer stud walls. The plan is to bridge those areas with 1/2″ osb to keep the cellulose in place. Does that seem reasonable?
Other concerns?
Thanks for the help! Paul
GBA Detail Library
A collection of one thousand construction details organized by climate and house part


Replies
You can buy the 2 part spray foam, largest size you can afford.
Buy extra nozzles
https://www.betterenergystore.com/productpage.asp?p=3
plan your work, give the trigger a pull every once in a while to minimize nozzle changes
I agree with Keith, one of the two part spray foam kits (they look a little like two BBQ tanks and a hose assembly going to a spray gun) might be a good fit here if you don’t have to wait too long between sprays. You can get extra tips, which are the part that clogs up if you want too long between sprays. I’d probably get the middle size kit though, the 200 board foot one. The 600 is probably going to be bigger than you need, but the 120 might be too small.
If you don’t want to use the two-part kit, at least buy yourself the great stuff “pro” gun that uses the bigger “pro” cans. This gun is around $40, and it lets you use a can of great stuff pro over a period of up to 30 days. The larger great stuff pro cans are also cheaper for the amount of foam you get.
Bill