Insulating Exterior Walls without Sheathing (from interior)
The task of this week is overhauling a bedroom that is adjacent to a busy road. Sound and temperature swings are issue in this room, despite new windows, due to a lack of insulation.
The house is a 1950’s single family home, Climate zone 4 (marine – San Diego). West facing exterior of the room is stucco over lath and tar paper, 2×4 framing with no insulation. The side of the room facing the busy road is wood siding over tar paper, 2×4 framing w/ no insulation
The project is to remove the 1/2 inch gypsum and insulate from the interior. I will pay particular attention to airsealing the cavity before insulation begins.
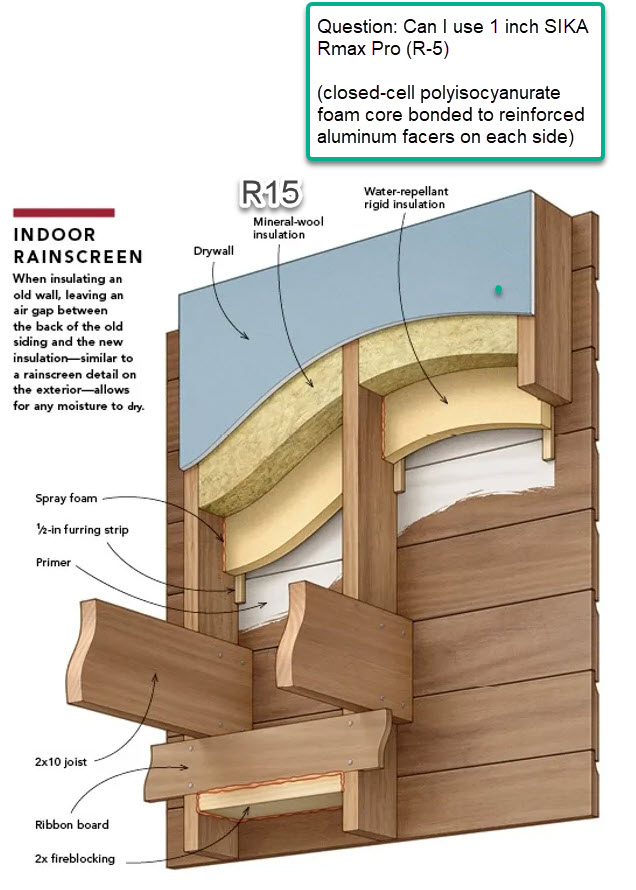
I plan to use 3/4 inch furring strips to provide an airgap to the exterior siding followed by:
-R5 Sika Rmax Pro (poly iso foam 1inch thick with aluminum facing)
-R15 Rockwool Mineral Wool
-Reslient sound Genie Clips + horizonal hat channels
-Doubled 5/8 gypsum with green glue
My main question is should I remove the aluminum facing on the polyiso to allow for interior drying? I am having trouble finding 1 inch XPS, so this is my next best option.
reference articles
https://www.greenbuildingadvisor.com/article/insulating-walls-in-an-old-house-with-no-sheathing?oly_enc_id=8220A9689390C2R
https://www.greenbuildingadvisor.com/article/insulating-old-walls
https://www.greenbuildingadvisor.com/article/an-intro-to-the-control-layers-of-a-wall
GBA Detail Library
A collection of one thousand construction details organized by climate and house part


Replies
Y0u won't be able to fit all this in a 2x4 framed wall, even with "honest" 2x4s that are actually 4" deep (normal 2x4s that have been surfaced/milled are 3.5" deep). An R15 mineral wool batt is designed to completely fill a 3.5" deep stud bay. You're adding 1.75" of "stuff" in the form of the 1" polyiso and the air gap. You would need to furr out the interrior to gain some depth to make this work. At that point, using rigid foam on the interior might make more sense.
You're not likely to be able to peel off the foil facing from polyiso without wreching the polyiso panel. If you want vapor permeable polyiso, use "roofing" polyiso, which has a kraft or fiberglass mat facer that is vapor permeable. Another option would be EPS, which is also somewhat vapor permeable.
I would include an interior side smart vapor retarder to limit outward moisture drive in the assembly.
Note that if you have windows facing the noisy street, those will be the weak spot in your soundproofing efforts. You may want to look into sound reducing storm windows to see if that might be an option here.
Bill
Hi Bill,
Thanks a lot for your thought on this. Agreed that the foam and airgap will require furring out the studs to fit that rockwool in place. No worries to me and part of the plan at this point. Seconded about considering exterior storm windows.
I will see what I can find on the interior side smart vapor retarder as well as sourcing some different foam to replace the foil faced poly iso. UPDATE: Found some 1 inch Foamular XPS (R-5), so I can use this instead of the polyiso, Permability is 1.1
Did I understand your comment "using ridgid foam on the interior might make more sense", are you proposing forgoing the rainscreen by insulating the cavity with rockwool, followed by XPS foam over the studs alongside the gypsum?
XPS is the least vapor open of the three common rigid foam types, and least green. It would not be my preference here. Polyiso would probably be my preference, followed by EPS. The reason for this is that polyiso gets you more R per inch, but EPS is probably the cheapest commonly available rigid foam. I would not consider XPS for this application.
I'm not sure I'd call that air gap a "rainscreen", but regardless, I didn't mean to imply not putting the air gap. What I meant was that using the rigid foam on the interior, AND using mineral wool, means that interior side rigid foam would act as a thermal break for the studs. Interior rigid foam will complicate your double drywall and hat channel installation though, which is the big downside for interior rigid foam in your application.
I would probably use the polyiso where it is, but use a kraft or fiberglass mat faced polyiso that would be more vapor open. If you put the rigid foam on the interior, you'd almost certainly need to mount the hat channel on furring strips. The reason for this is that hat channel mounts with clips, and that tends to concentrate the load of the drywall onto the relatively small contact area between the clip and the stud. This isn't a problem for structural material like a wooden stud, but it would compress into rigid foam -- even high compressive strength rigid foam -- and that would be a problem.
Bill
Hi Bill,
Thanks again for the help yesterday and keeping me on track. Great news, was able to find a local supply house with GAF Energy Guard Barrier in stock (1 inch, fiber glass matting faced poly iso, R6.1). Got 6 sheets which should be enough.
At this time I plan to stick with the cut and cobble approach, maintaining an airgap against the external siding. I will then insulate with R15 Mineral wool, followed by the resilient clips and channel. I can cutout the mineral wool in way of the resilient clips and make sure the insullation is not compressed by the furring hat channels with some patient cutting of the rockwool. This approach would allow me limit the increase of the wall depth to only 3 inches beyond what it was before, while decoupling the drywall.
It's possible that once the rockwool is up I ditch the resilient clips after all if it's quiet enough and just fur out the 3/4's enough to install double drywall.. I dont want to overcomplicate this as is, especially with the windows as the weakest link.
I made a quick sketch of it below
If the plan is for 2 layers of drywall consider mudding and taping one layer ruffly then the resilient clips supporting the finished layer of drywall staggering the seams.
Walta
My understanding is that would cause the "triple leaf effect" that could reduce the STC https://www.soundproofcow.com/triple-leaf-effect/#:~:text=You%20might%20assume%20that%20the,especially%20sound%20at%20lower%20frequencies.
Will Cyr,
Exactly. That's the problem with building up sounds attenuation assemblies from individual components, rather than looking at them as a system: they can interact in unanticipated ways and diminish the effectiveness. The safest strategy is to pick a complete assembly which has a tested STC rating and reproduce it faithfully.
Thanks, I hear you loud and clear. I suppose I should not play games with trying to reduce the depth of a tested and proven assembly.
WillCyr,
You are probably fine. The one variable that doesn't seem to cause these anomalies is depth. It's the layering of individual components that is problematic. What you are proposing looks good to me.
The double layer of drywall isn't only adding mass in these assemblies, it's also adding stiffness. If you put air space between the drywall layers, you don't ge the extra stiffness, so you're more likely to have resonances and have sound pass through what end up asking as taught membranes.
Stick with the conventional construction method which is clips holding the hat channel, then the first layer of drywall on the hat channel, taped and mudded (but it doesn't have to be a nice finish), then the second layer right over the first, taped and mudded and then sanded to a nice finish for painting. Green glue between the drywall layers helps a little too, but adds to the cost of the project. Using green glue doesn't significantly slow down the construction though.
I also don't see a problem with your proposed assembly. A small air gap between the back of the drywall and the mineral wool will actually help you a little in terms of sound proofing, so don't worry if the hat channel sticks out a bit past the face of the insulation batts.
BTW, when you put up multiple layers of drywall like this, you don't want the seams to line up. You want the seams staggered.
Bill
That's great news, thanks for your practical knowledge on the topic. This room isnt the biggest, so every inch counts.
The fun has begun, plenty of tar paper, some moisture issues near the windows that will need to be addressed, but the redwood framing seems to have kept the pests away over the last 70 years. Will start sealing tomorrow
I recommend you get some "Ramboard", which is like a dense cardboard sheet, and put it down over your nice hardwood floor prior to starting this work. Tape the seams and the perimeter. This stuff is relatively inexpensive, and comes on rolls. It's made to protect floors during construction work. By taping it up, you protect your floors from scuffs, and from drywall dust getting ground into the floor as you work.
Bill