Insulating Rim Joists With No Sill Plate
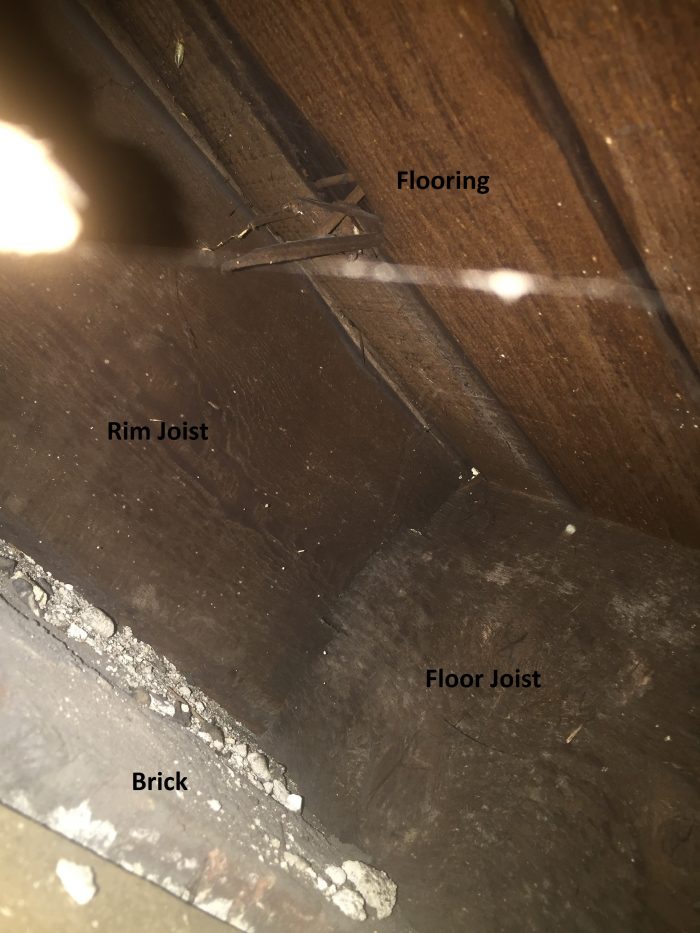
Hi. I live in a Northern NJ house built in 1895. The rim joist of the house do not have sill plate. The floor joist are embedded in the rim joist. The floor joist and the rim joist rest directly on the brick foundation wall. I guess this was before they started using screws. The house does have old nails in most parts. I have attached a picture of the rim joist and the outside.
I am afraid I’ll invite mold growth if I go the traditional route of insulating with foam and rigid foam board.
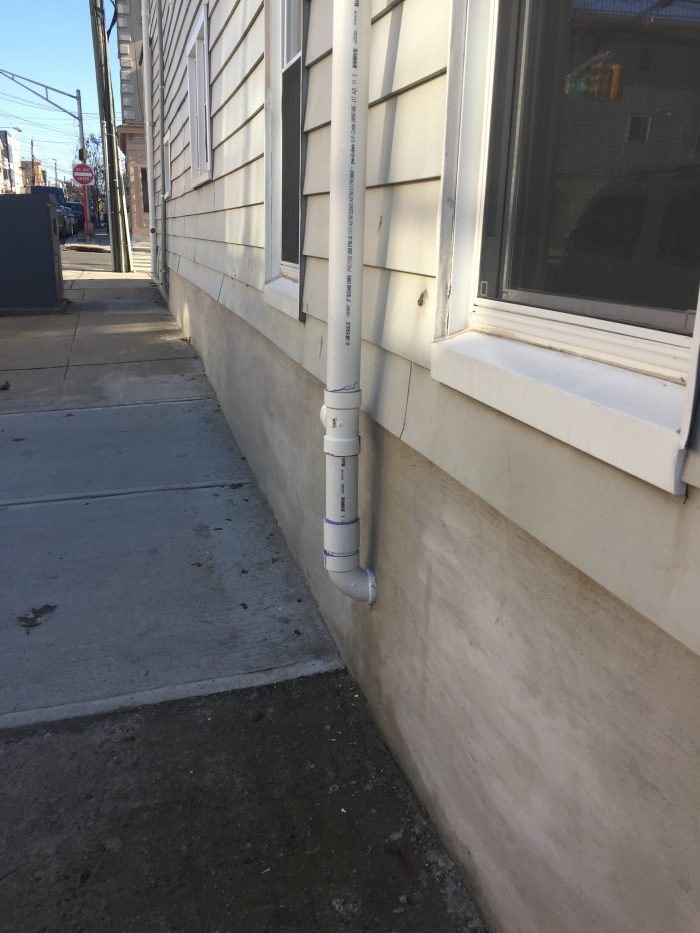
On the outside, the brick wall is 2ft high from the concrete ground with aluminium siding on top of old granular asphalt siding on top of clapboards. Anyone have any knowledge on how to insulate or air seal this issue?
Thank you.
GBA Detail Library
A collection of one thousand construction details organized by climate and house part


Replies
Hi Michael,
Another GBA reader was dealing with this very issue in your neighboring state. You might find some useful feedback in this Q&A thread: Rim joist insulation with no wood sill plate—influence on rigid foam?
Hi Kiley. I read that forum actually. My floor joist are not embedded in the brick foundation. The floor joist and rim joist are on top of the brick foundation.
Michael,
As others observed in the earlier rim joist thread, your safest option may be to leave well enough alone. The lack of a sill plate and a moisture blocking material under the sill plate is the key. Dropping the temperature of the rim and ends of the joist wood by insulating the joist pockets will cause it to take up moisture more readily. If you block the free air exchange it has enjoyed for 125 yrs it will likely stay damp, if not wet. The brick wall will be transporting moisture up to the timbers. Mold would likely be the least of your concerns after several years.
The current moisture load may be relatively light for the wood to be in such good condition after a century plus. This is a good example of where the "house must breath" ethic comes from. Drafty houses tend to prevent moisture build up. It is also possible that the species of wood used may be saving your bacon. White oak would have been easily available at the time and is resistant to rot. Not rot proof, but better many other choices. The builders may have used it for much the same reason we use treated pine now.
Square nails and wire nails co-existed when your house was built. Screwguns were rather a bit later. Owning several vintage bit braces and yankee drivers, I can judge that using screws would pretty much be limited to hanging doors and hardware.
Oak does have its limits, as my Dad found out when dealing with his circa 1830 house. The timbers that set on the field stone walls made it 150 years before enough moisture collected to attract the carpenter ants that crippled them. The floor joists in our case were reasonably straight tree trunks that had been flatted on the top enough to take the wide pine board flooring. The pocketed joists you have may simply be a hold over habit being used with milled lumber or maybe your rim joist is more a rim timber. Do you have any penetrations that would give you a clue?
It is somewhat unlikely, but possible that lead sheeting was placed under the rim joist to protect it from the bricks. It is also worth noting that the floor joist resting on the brick at least gives you the value of the full depth of the joist. If the pocket end was suspended freely above the brick you would have lost a chunk of the strength factor. Cracks would likely have appeared on the bottom side of the tenon long ago if not supported.
As for the three levels of siding, air sealing would be difficult. I am puzzled by the supplied photo, as it appears that the overhang of the aluminum siding is pretty normal. Even the windows don't appear to be set as deeply as three layers of siding would typically render them. Are you planning for a major overhaul of the house to reduce energy demand? Pulling off all the siding might not be feasible as the original clapboard might be nailed directly to the studs. If you are fortunate, the put boards on first and then tarpaper under the clapboards.
I would guess some detective work is in order. As a side question, did you or do you have old style double hungs with weight pockets? They are often very prone to leaking major amounts of air. The windows in the picture might be modern storm add-ons or new inserts. Slipping new windows into old double hung frames and covering the rope holes with thing trim was a common way to get new windows. If the installer was very good, they would remove the weights and pack the side pockets with insulation. Sadly, good installers were as rare then as now.
Are your floor joists at the approximate level of the bottom of the siding in that second pic? That would mean there is about two feet of exposed masonry between grade and the wood structure? That will help to reduce, but not entirely eliminate, the chances of moisture wicking up from the ground.
Another possibility would be to put rigid foam on the EXTERIOR of that masonry wall from grade up to the top of the rim joist. You could do some trim work to hide it and flash it at the siding transition. Since it looks like you have an exposed concrete wall now, you wouldn’t have much visual impact to worry about. You would need a decent looking exterior protective layer, maybe the large sheets of fiber cement sometimes used to make a board and batten type of exterior?
If you do your insulation work on the exterior, you avoid the issues of making the wood colder and wetter. Exterior insulation helps to keep the wood warmer, and warmer means dryer here. You’d also gain insulation over the exposed foundation wall which will be an additional energy savings in terms of heat loss. If you have two feet of above grade masonry wall and conditioned space (even a basement) on the other side, that’s a lot of heat lost going through that wall.
Bill
Thank you Roger and Bill!! Really appreciate your help!
Here's the picture on the other side. I do have a finished basement on the inside.
Yes, I did have old double hung windows with weights that were removed for the new windows. Unfortunately, the gaps were not insulated well and just air sealed with silicone on the outer area.
Yes, the clapboards are directly nailed to the studs with tar paper between the studs and clapboards.
The rim joist has a rectangular opening where the floor joist is embedded. You can see this in the picture.
Would you recommend filling the sidewalls with cellulose, taking into account the kind of rim joists I have? Also, would you recommend at least I can put silicone around the rim joist area to air seal around the brick and rim and floor joists?
Michael,
I can see from your second picture the amount of overhang three layers of siding would create. The first picture on street side seems to indicate that a pretty thick layer of something was put over the brickwork already. Aside from aesthetic issues, you might not be allowed to extend into what appears to be a public sidewalk.
You can be pretty sure the rim and joist ends are just behind the siding beltline like Zephyr says. The problem is your exterior insulation options are limited. Foam and a thin cement board might work in the tight alley to reduce heat losses through the wall, but the air access up the siding layers would be hard to make tight enough to risk then insulating in the joist pockets. Do you actually feel air coming in the mortise pockets around the joist tenons?
I am guessing you are not looking for the expense of stripping everything off and replacing all the windows in order to gain control over air exchange and drying potentials. You are asking about insulation in the walls after mentioning you know that tarpaper is between studs and clapboards. Are you in the middle of a major gut? A few rooms?
Three layers of siding pierced by windows sounds like a flashing nightmare on a repeat cycle. Are you aware of any places where water is sneaking in around window or door tops? I am not sure that cellulose or other "open" insulation would be a safe choice, even if you could make a big effort to complete an interior air seal. There are just so many points for inside air to move into the walls where cold siding is waiting. The rim board would be blind to insulation choices as the gaps in the three siding sandwich will be right there no matter what you do in the wall pockets. I still think leaving well enough alone is best. Popping window trim and sealing the frame sides with low expansion foam to reduce cold air infiltration might be a good bet for quick improvements. Be sure to check for water leaks before you foam.
As for silicone, I don't care for it myself, as I find it less able to overcome even mildly dirty surfaces than others. 125 yr old joist pockets are pretty crusty-dusty most times. You might spend a huge amount of time scraping and prepping the areas to little final effect. On brand new work it is fine. Maybe someone else can suggest their favorite go to goo.
If you are still planning for additional demo, beware of the old horsehair plaster and other joyful materials that may lie in wait for you. Testing for lead and asbestos will have to be done or re-sale could be blocked. Sadly, this seems like a bigger can of worms than just deciding to block some holes in a cold basement. You say it is a finished basement, so how are these particular joists exposed?
To answer Bill's question, yes the rim joist are about two feet up from the ground on the outside.
I don't have any major renovation going on now. I had a plumbing leak in the basement so I had to cut open the ceiling wall next to the joists.
I was planning on having a contractor come in and fill the cavities with cellulose.
Also, it's not tar paper per say between the studs and clapboards. It's like rosin paper from back in the day. It tears up like paper.
Michael,
Now I am a bit puzzled. Where and when did you open up a wall to discover the paper/clapboard nailed to the studs? Is there only the one joist pocket in the photo open at this point? Did the plumbing leak make you need to tear down a major strip of basement ceiling?
I am asking because if you aren't going to fill all the walls with insulation and only detail some joist pockets, then your energy savings will be fairly tiny. Foaming the window frame gaps would admittedly be relatively modest as well, but if they are currently blowing cold air at you, then it is a good place to start small.
As Zephyr noted, your non-sill plate framing being two feet above grade does relieve some of the moisture risk. Bricks come in so many different qualities that comment at distance on how much moisture they will transport is futile. The mortar is quite possibly a bigger moisture reservoir than the bricks. Again, your floor framing appears to be in very good shape for the age of the house. I would keep to my original thought and not try to add insulation for fear of promoting dampness just to gain a very small energy improvement. If the rim board has gaps under the edge sitting on the brick, you could seal just there. I would leave the tenon pockets alone.
You are of course the one stuck with the heating bills and any comfort issues. FWIW, my old 1930's house had no insulation on the first floor, yet very complete insulation on the second due to a lift dormer being added in the early 60's. I upped the attic insulation, but ripping out all the old weighted double hungs made the single biggest shift in our gas bill and overall comfort. We took the widows and weight pockets out completely down to the framed opening, so the window flange rested on the sheathing. We cut back the single layer of asphalt shingle siding to make room for a trim surround, which also sat on the board sheathing. Flashing and caulking provided a pretty sound seal against air leaks. The first floor walls were quite chill in February, but eliminating the drafty windows was a huge improvement. The house was doomed to being demolished thanks to our becoming the next victims of McMansioning, so insulating the walls became pointless in term of ROI.
I am gathering that your window install also removed the weight pockets, but I can't tell how they dealt with multiple layers of siding. If you think all that was done was some silicone along the edges of the aluminum siding, then the two concealed gaps between your layers could be feeding air in around the window frame. If you have some incense sticks, you can do a low tech smoke test to find out if the window trim is leaking air.
Filling the walls with cellulose may be relatively safe, but moist air transport through a myriad of places could push the moisture balancing properties to the limit. Cellulose would be better than blown fiberglass, which is more vapor open and not absorptive. I am really very hesitant to make a firm statement here given the odd siding situation. I generally tend to go all in and strip things down to the bones and build back with best choices. For all the cost and disruption it would take to make significant energy efficiency improvements that it may be best to carry-on and not open a can of worms.
Hello Roger,
Thank you for your reply. Yes, it was only portion of the drywall that I took out because it was leaking in a room. I was only planning on doing two rooms to cut out the drywall near the foundation and insulate and air seal.
Apparently, the window framing is created by the aluminium siding. I guess it was done when the siding was installed. Please see the picture attached. Because the original windows were so long, the newer windows were smaller so there is a "sealed" box on top on some windows.
When you say " If the rim board has gaps under the edge sitting on the brick, you could seal just there. I would leave the tenon pockets alone." Wouldn't I want to caulk and air seal the tenon pockets and not seal the gaps under the rim? This is so because of the moisture you mentioned travelling up. The rim joist are almost completely covered by the siding or clapboards outside.
Michael,
The top box on your window is certainly not a work-around that I have ever seen before. I do hope they put insulation into it. It suggests that there may yet be the entire frame of an older window unit hiding under the aluminum siding and trim. More on windows later.
I suggested sealing along the bottom edge of the rim board if you have air leaking in through any gaps between the bottom of the board and the brick. Sealing in this location would best impede the largest amount of easy air flow from outside. There is a fatal flaw in how effective sealing the bottom of this rim board can be post-operatively The small space you can't reach under each joist location. Sealing along the edges of the joist all the way round where is sits on the brick would help reduce air flow even more, but at a large effort for minimal gain. Those small points might already be plugged with mortar, I can't tell for sure from the photo.
Even after sealing the inside edge, the rim board's bottom edge gap will still be "connected" to outside air. This will act to allow moisture from the wall to be wicked away. Both from the wood and the brick. The bottom edge of the rim board is most likely within 1" of the bottom edge of all the siding, so the outside air activity will be there to balance humidity. The brick is obviously completely open to air. The tenon ends are up behind three layers of siding and possibly covered with the siding paper. The air leakage at the tenons location is likely to be very small compared to a gap under the rim board bottom. You could put some there as well, it might add benefit. There is also a small chance that the tenons don't go all the way through the rim board and are just dead pockets.
In regard to moisture coming up the wall, I think it is very much in your favor that not much is making it. Like Zephyr said your wall top is two feet up from contact with soil. Maybe a bit more what with cement side walks and such. And it has lasted for 125 years already.
Bricks come in many qualities. I have taken out bricks so hard fired that breaking them reveals an almost glassy interior. Others were almost as soft as clay flower pot material. This is the reason I can't make an informed comment on how much moisture might be coming from the brick wall. It is much clearer that moisture laden air from the interior of the house is your greater threat. Insulating the pockets with foam would be tricky to seal adequately and any interior air seeping around to the cold side would likely condense out. If you create a slow leak to the cold side of the foam, warm moist air will feed there, condense and not dry quickly because you have now isolated that space from easy air exchange with the house.
A vapor open insulation like fiberglass or rockwool would behave similarly in that warm moist air would migrate through and condense on the cold rim board. A large part of what has kept the wood in good shape is being warmed enough by the house side to not hit a condensation point often enough or for long enough to make the wood's moisture content go up enough to support mold or rot. This why leaving out insulation plans is a wiser choice in my opinion. Like I noted, sealing gaps to reduce cold air flow is what will produce some benefit with low risk.
Now back to the windows and doors. I can't suggest creating a negative pressure test for leak checking the windows because I don't know what forms of heating you use or if you have a chimney. So you will have to wait for a windy day I guess. Use an incense stick to check the perimeters of all the windows and doors. Focus on door bottom seals and the the seals on the double hung windows where the lock point is . Also check any hatches or doors to attic spaces.
I think you will find that focusing attention on these areas will provide much more benefit than attempting to insulate the relatively small number of joist pockets you currently have exposed. I have had three homes before this final one, and all had windows of bad to marginal quality. Air leakage really is a big comfort killer. Worrying over the joist pockets is somewhat akin to putting a scarf around your waist while wearing no jacket. Yes, your middle will be a bit warmer, but the air blowing through your shirt will be uncomfortable.
I wish I could suggest something that sounds more "thermal" that involves insulation, but most of what would have the highest effect would entail work that involves significant deconstruction of the many layers you have. I really do wish I could offer more help.