Insulation and vapor barrier for seasonal Adirondack camp
billy_clint99
| Posted in Energy Efficiency and Durability on
I am updating my family camp in the northern Adirondacks (Zone 6) that was built in the early 1900s, and am slowly rebuilding it from scratch, one piece at a time.
We primarily use the camp from May-Labor day, with occasional ski trips in the winter. Heating is handled by wood stove and propane heaters, and the water is turned off in the winter.
We recently had the ~1700 sq ft cottage seated on Techno Metal Posts and I-beams as the foundation. We replaced the failing floor structure with new 2×8 joists that have exterior XPS rigid foam below them, joist bays filled with fiberglass insulation, and house wrap as a vapor barrier below the subfloor. (This may be less than perfect, but it’s done and we’re still learning.)
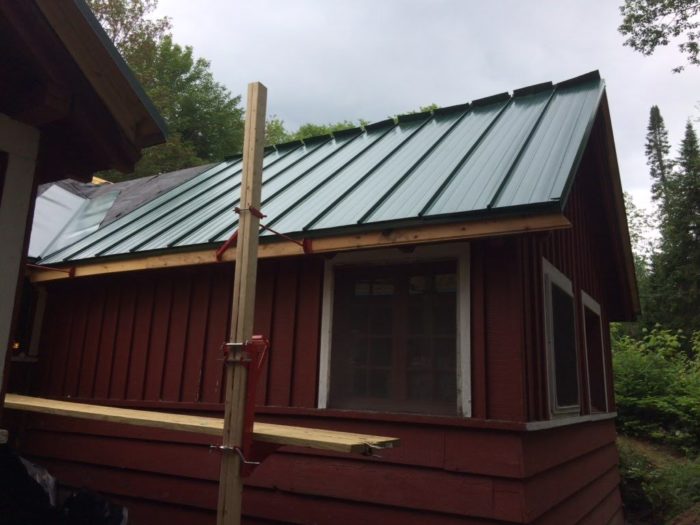
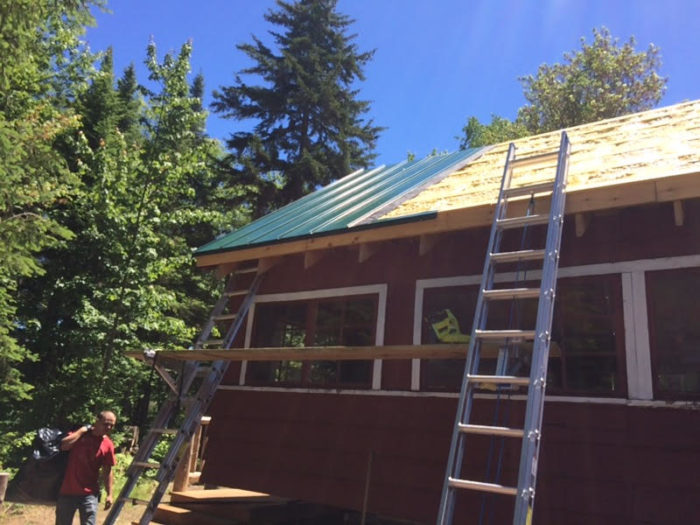
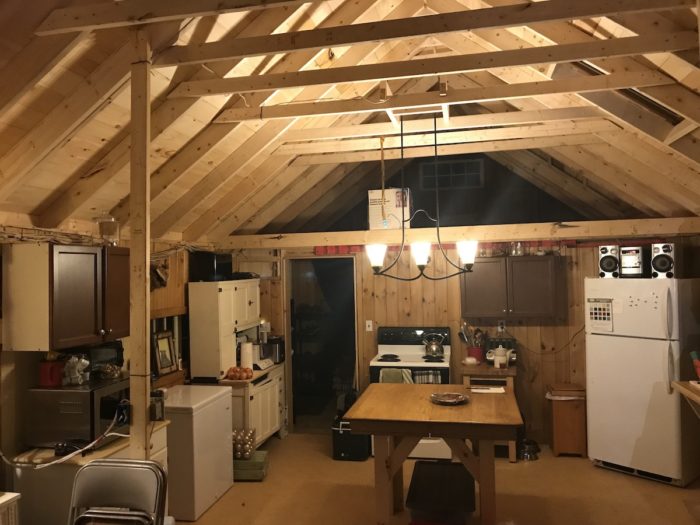
We also just rebuilt the entire roof assembly from the sills up, using 2×6 roof rafters, on top of which is 1×6 pine decking viewable from inside as the cathedral ceiling. Exterior of the pine decking is another 2×6 frame which is filled with closed cell spray foam insulation, covered with synthetic underlayment, and sheathed with metal roofing. Perhaps we should have used OSB or Zip here too, but it’s also done now.
My question has to do with updating the wall assembly in the coming months. The current “assembly” is 2×4 walls with exterior pine clapboard siding with lead paint and simple wainscot inside, with little more than mouse dung as insulation.
My idea for the wall assembly is as follows:
1. Remove all interior and exterior cladding down to bare studs.;
2. Install and tape zip system against exterior studs.
3. Outside of Zip, install 2 staggered layers of foil-faced 1 1/2″ XPS rigid foam and tape.
4. Install 1×3 furring strips as drainage plane outside of foam.
5. Clad with LP smartside or similar.
6. Inside, fill stud bays with Rockwool insulation.
7. Finish interior with simple Tongue and Groove boards.
Given that we don’t use much heat or any A/C in the summer, and only use it a few weekends per winter with wood heat, do I need a vapor barrier in here? What are the weaknesses in this assembly?
Also, would it be ok for the XPS foam to be exposed over the winter if we can’t get to cladding this season?
Thanks in advance,
Bruce
GBA Detail Library
A collection of one thousand construction details organized by climate and house part
Search and download construction details


Replies
The XPS insulation has been exposed on my house (Syracuse, NY area) since last December. I noticed degradation on areas exposed to sun in June and rolled on some leftover latex paint to protect it until siding starts next month. It took all of 2 hours to roll it on. The north side hasn't degraded much so I didn't paint there.
XPS doesn't usually come in foil faced versions. Are you actually referring to polyisocyanurate?
Foil facers hold up reasonably well to the weather & sunshine. The exposed edges can get a bit sunburnt by UV exposure, but not enough to really matter much.
In US climate zone 6 a wall with 3" of exterior polyiso (R15+) or 3" of exterior XPS (R12.6 at fully aged depletion of the HFC blowing agents) does not need an interior side vapor retarder tighter than standard interior latex paint on gypsum board for dew point control at the ZIP even with with 5.5" of rock wool (R23-ish) in 2x6 stud bays, let alone the R15 you would have with 3.5 " in 2x4 walls. For a 2x4 wall you could get away with half that much exterior foam, from a moisture control point of view, but it would not meet IRC 2015 code minimums on thermal performance at anything below R9 (with R15 in the stud bays).
But some sort of AIR barrier needs to go between the rock wool and the interior side t & g. Something rigid such as wallboard is more reliable and rugged than flexible membranes. If going with flexible sheet goods use something more vapor permeable than 6 mil polyethylene, which would create a moisture trap between the exterior foil-faced foam and the interior- moisture that gets in never leaves. A "smart" vapor retarder such as Intello or MemBrain could be used if detailed as an air barrier, but neither is as rugged as good old sheet rock with a coat of latex primer.
Without the air barrier the air convection through the rock wool to the leaky plank interior will move an order of magnitude more moisture to the sheathing in winter than you would get from vapor diffusion alone, and it would take more exterior-R to keep the peak moisture content of the ZIP well bounded.
XPS is blown with climate-damaging HFC blowing agents. EPS and polyisocyanurate are blown with much more benign hydrocarbons, usually a variant of pentane. The performance edge XPS has over EPS is only temporary, due to the HFCs, but as the dissipate out over the decades it's performance approaches that of EPS of similar density. In your stackup polyiso will perform as well or better on a seasonal average basis as XPS at any given thickness- even roofing polyiso (which has a lower R/inch than the foil faced goods.)
Bruce,
Dana gave you good advice. Here are a few points to remember:
1. Green builders try to avoid the use of XPS, since XPS is manufactured with a blowing agent that has a high global warming potential. Instead, consider using EPS or polyisocyanurate. For more information, see "Choosing Rigid Foam."
2. For more information on installing rigid foam on the exterior side of your wall sheathing, see this article: "How to Install Rigid Foam Sheathing."
3. Airtightness always matters. For your exterior air barrier, use Zip System tape at the Zip sheathing seams. For your interior air barrier, taped gypsum drywall is usually the easiest way to go. If you like the look of pine boards, you can install them on the interior side of the gypsum drywall if you want.
Thanks everyone for the excellent and detailed advice! I will dig into the linked articles further in the coming days.
One question that I still have relates to using taped plywood or something similar inside instead of using taped gypsum board. Given that the existing structure is a 100 year old seasonal camp, it still has some weaknesses in its construction, and we thought that perhaps using sheet wood behind the Tongue-and-Groove panelling would provide a stronger assembly with improved shear strength, one that could also be sealed and painted with latex paint for a suitable air barrier. The desire to improve shear strength is to reduce the impact of any settling of the existing structure onto the new helical piers or potential frost heave.
Any thoughts on this, or is some moisture and mold resistant drywall the way to go?
Thanks again for all the great advice!
-Bruce
Bruce,
If you want to add interior plywood for racking resistance and improved structural integrity, there is no building science reason (or moisture-related reason) why you shouldn't do that.
Another issue that I am curious about relates to moisture, heating and mold growth. Currently, mold can be smelled and seen in many places throughout the camp, as it is close to the soil (~1' under much of the house), isn't heated through the damp summer, and will only be heated by wood stove in the shoulder seasons and for a few weekends through the winter.
As we attack the wall rebuild, we plan on spraying bleach or some other mold killer in the stud cavities and replacing everything but the studs (i.e. interior panelling and exterior cladding). Further, we plan to dig out around the camp and install a french drain system to get the moisture away from the structure.
Is this wall assembly a sufficient defense against mold growth given the limited and non-continuous heating that we aim to use? Should we be adding some other defense in the form of covering the ground underneath or is near constant heat and dehumidification necessary?
Best,
-Bruce
Actually interior side plywood is BETTER than air-tight gypsum: Plywood or OSB is a "smart" vapor retarder, which limits the moisture flow in either direction when dry, but becomes more vapor-open than latex paint on gypsum board when subjected to high humidity. Even though you have more than adequate exterior R for dew point control, this characteristic of plywood is still a desirable feature.
It is also more rugged than gypsum board, and provides a nailer layer for the t & g, which would have to be long-nailed into the studs if using gypsum.
Thanks for the wonderful guidance. We are about to begin the deconstruction and rebuilding process, but it looks like we won't have time to complete the cladding before winter and thus either the Zip sheathing or poly-iso will likely be exposed to the harsh winter.
Given this, would be better/worse to reverse the exterior assembly, i.e. two layers of taped foam against the exterior stud and taped zip sheathing being most external for now, and next spring having 1x3 lathing and siding put on?
Thanks again!
Foam between studs and external sheathing interferes with the structural performance. But in many areas it isn't critical (I know of homes with only foam). It also means that you don't have "warm sheathing" and the resulting moisture benefits.
Once you have good air sealing, it won't cost much to dehumidify to eliminate most mold issues.
Bleach is very temporary - I wouldn't bother.
Jon R is right- sheathing is structural, and has nowhere near the structural rigidity when placed on the exterior with a moment-arm of 3" of screw penetrating the foam. One medium sized nor'easter with high wind gusts could take the whole thing down.
ZIP sheathing has a factory applied weather resistant barrier, and should be able to handle a winter without siding to protect it. If you've already taken delivery on it, put the polyiso up indoors out of the rain/snow, or worst case, up on pallets with a stout well anchored tarp on it.
Good to know. I guess I was thinking along the lines of a DIY version of Zip-R sheathing, which looks to have the Zip sheathing external to the backed rigid foam insulation.
What are your thoughts then on just using Zip-R as opposed to regular Zip and external poly-iso? The materials cost might be higher, though the labor savings when doing it ourselves might offset this issue and help us get more of it up before the snow flies.