Is this the right way to clean an American Standard evaporator coil?
EcoTempHVAC
| Posted in Expert Exchange Q&A on
Cleaning the evaporator coil of an American Standard air conditioning system is essential for optimal performance and extended lifespan. Follow this detailed guide to ensure a thorough and safe cleaning process.
Tools and Supplies Required
- Screwdrivers (both Phillips and flathead)
- A soft-bristle brush
- Coil cleaner (preferably a no-rinse or foaming type)
- Garden sprayer or spray bottle
- Protective gloves
- Safety goggles
- Shop vacuum (optional)
- Towels or drop cloths
Safety First
- Power Off: Before you begin, switch off the power to your HVAC unit. Locate the circuit breaker and turn it off to avoid any electrical hazards.
- Protective Gear: Wear gloves and safety goggles to protect yourself from dust, debris, and potentially harmful cleaning chemicals.
Step-by-Step Cleaning Instructions
1. Accessing the Evaporator Coil
- Find the Coil: The evaporator coil is generally located within the air handler or furnace unit, often situated in the attic, basement, or a dedicated utility closet.
- Remove the Access Panel: Use a screwdriver to take out the screws holding the access panel. Carefully remove the panel to reveal the evaporator coil.
2. Preliminary Cleaning
- Inspect the Coil: Look over the coil’s condition. If it’s just dusty, a light cleaning will suffice. For heavy dirt or biological growth, a more intensive cleaning is needed.
- Brush Away Loose Dirt: Gently use a soft-bristle brush to remove any loose dust and debris. Take care not to bend or damage the delicate fins.
3. Applying the Coil Cleaner
- Select an Appropriate Cleaner: For minor dirt, a no-rinse coil cleaner is ideal. For significant buildup, opt for a foaming coil cleaner.
- Spray the Cleaner: Evenly spray the cleaner over the coil’s surface. Ensure full coverage. Follow the product instructions for the correct application and dwell time.
4. Let the Cleaner Work
- Allow Time to Dwell: Let the cleaner sit for the recommended time to break down dirt and grime effectively.
- Rinse if Necessary: If you’re using a foaming cleaner, you may need to rinse the coil afterward. Use a garden sprayer or spray bottle to gently wash away the cleaner.
5. Drying and Reassembly
- Dry the Coil: Allow the coil to air dry completely. If you rinsed it, ensure there’s no residual moisture to prevent mold growth.
- Reattach the Access Panel: Once the coil is dry, replace the access panel and secure it with screws.
6. Final Checks
- Restore Power: Turn the power back on at the circuit breaker.
- Test the System: Switch on your HVAC system to ensure everything is functioning correctly. Listen for any unusual sounds or issues.
Additional Advice
- Routine Maintenance: Clean your evaporator coil annually to keep your system running efficiently.
- Professional Assistance: If you’re unsure about performing this task or if the coil is significantly dirty, consider hiring a professional HVAC technician.
- Leak Inspection: While you have access to the coil, check for any signs of refrigerant leaks or other damage.
For comprehensive HVAC maintenance and air conditioning repair, visit EcoTemp HVAC’s website. This guide will help you maintain your American Standard evaporator coil, ensuring it stays clean and efficient, which is key to the overall performance and longevity of your HVAC system.
GBA Detail Library
A collection of one thousand construction details organized by climate and house part
Search and download construction details


Replies
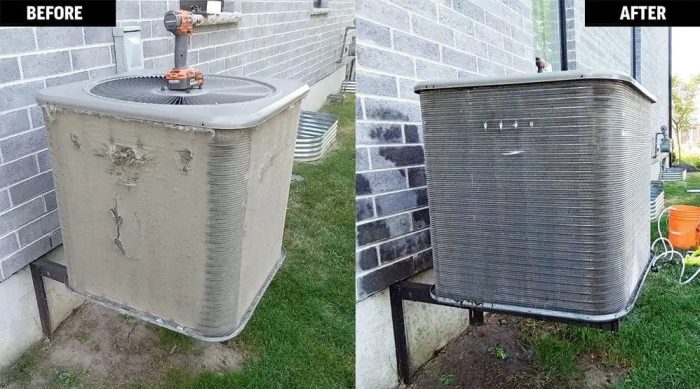
Note the instruction you posted are for cleaning the indoor evaporator coil and the photos show an outdoor condenser coil.
To my eye the before and after photos of the condenser coil look staged. The dirt on the coil appears dusty and light in weight material. The style of coil generally will self clean in the rain. Have not seen coils that look like the photo outdoors. Rheem coils have lovers that prevent the rain from self cleaning.
I do not like to use chemical cleaners. I feel they can only damage the very thin metal the coils are made from. Any cleaner that claims to “brighten” your coils has damaged them.
I use a shop vac with a soft brush to remove the cottonwood seeds from my coil and rinse with water on my Rheem units outdoor coil.
I do not think indoor coils operated with quality filters in place will need cleaning.
Studies have shown that coils that look dirty actually transfer more heat and use less energy until they don’t and the system stops working.
Walta
It's spam.