Kerf channel and thermal bridge
I am working through a shed roof design for a small shop and I have always liked protruding rafter tails. Obviously, I know these days they have been entirely eliminated due to the thermal bridging.
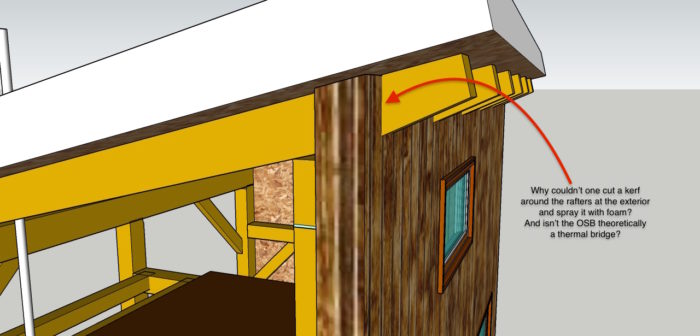
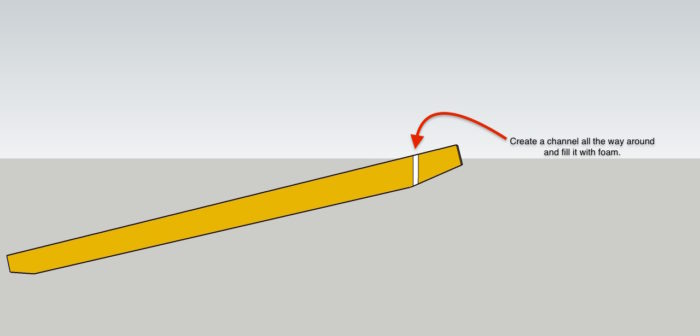
I will ask one question though and show a couple drawings. What if one were to cut a deep enough channel or kerf (may not be the right term) along the exterior face of the envelope (in my case, a SIP)? And then, if that channel (all the way around BTW) were filled with a foam of some kind.
I guess what I never understood about thermal bridging is what about the skins of a SIP that protrude on an overhang? I definitely agree that thermal bridges should be eliminated but I wonder if there might be a way to reduce it so that one could achieve an architectural aesthetic (exposed rafters). Also, don’t factor in the labor required to do this… I think it would require a few jigs and a router to achieve the result. Structurally, the SIP can hold its own and I am less interested in using the fake exposed rafters.
Here are the drawings. I know there are a lot of innovative pro’s here so I figured I would throw out the idea.
GBA Detail Library
A collection of one thousand construction details organized by climate and house part


Replies
How is this an improvement in any way over what you call 'fake exposed rafters'? It seems you are better off ending your rafter at your structural wall and then applying a rafter tail at the exterior. This could be described as 'fake' but it could also be described as prudent.
Good question. I think it would be an improvement over the fake exposed rafters in that the rafter/timber would still intact predominantly and lending support to the overhang. I do see your point though.
John,
Apart from the thermal bridges, the exposed rafter tails also represent an air sealing problem. If you hog out enough material to significantly reduced the thermal bridging, the rafters aren't really going to be much use in supporting the overhang. It's an awful lot of gymnastics to avoid the rafter tails being seen as fake.
John,
The main problem with attempts to air seal these joints is that rafters change size and location with changes in humidity and temperature. The rafters swell, shrink, and twist on a regular basis, getting bigger and smaller, many times per year. As a result of these regular movements, joints that were formerly tight open up, creating air leaks.
For the thermal bridging question, you can always back-of-the-envelope calculate the annual cost of the thermal bridge of those rafters something like this:
First figure out the U value:
U = 1 / (R/in * thickness in inches)
For the thickness, just use the thickness of the wall, as that's the part of the rafter you care about. This will be an approximation, but I believe close enough.
U = Btu / (ft^2 * F * hr)
So, the BTU lost in the heating season is:
Qheat = A * U * HDD * 24 hr/day
And cooling:
Qcool = A * U * CDD * 24 hr/day
Where
Qheat and Qcool = heat gain/loss in BTU
A = area in square feet of thermal bridge (add up all the rafters where they penetrate the wall)
U = U value of the rafter
HDD and CDD = Heating or Cooling Degree Days (you should be able to look this up for your location). Multiply by 24 hr/day to convert to heating or cooling degree hours, to match the units in U.
Multiply by your heating efficiency and energy cost, and you have a really rough ballpack of how much these thermal bridges will cost you. You might find the extra energy use is an acceptable cost for the aesthetic. Or if the cost is too high, then it might be worth pursuing this kerf/foam/thermal break idea.
All that said, I think Martin's concern about air-sealing is a much bigger issue and is a pretty strong argument for considering either the applied rafter tails, or, if the fakeness of the applied decoration bothers you, consider embracing the simplicity of the SIPS and going without any rafter tails at all.
You're building with fancy high-tech panels made of of foam, wood-chips, and glue. You don't need no stinkin' rafter tails! You're building a high-tech super shed! Your eaves support themselves! If you want rafter tails, you better get your froe out and start hand-splitting cedar shakes too ;)
(I also think rafter tails are very pretty, so I totally get why you want them.)
On a related note, if you do these calculations, you'll see why people don't fuss too much about the thermal bridge caused by the skin of the SIP. It's technically a thermal bridge, but the amount of energy lost will be very small due to it being wood and it having a pretty small area.
Lots of good counterpoints here. I definitely agree the twisting and shrinkage of the timbers are both relevant points (even if I went with a high grade and low moisture content material). I think the disadvantages are fairly compelling. I always appreciate the collective mind-share of the pro's here.
You did not say what climate zone you are in. I suggest you should be worried about more than a thermal break.
In sunny CA, I several times deconstructed rafter tails and beams that support porches, and witnessed the rot that results from failed flashing. Repair includes removing a lot of siding.
Suggest you put the siding on the house to provide continuous protection, paint it, and only then add the beams. Caulk the back end, align them with the interior, and no one will notice they are not the same beam. Be sure the eave fascia provides an effective drip edge, and put several coats of paint on the end grain of the beams because this exposed end grain is at critical risk, especially pointing uphill as you have drawn it. Look closely after a heavy downpour to ensure your house is protected. Water traveling downhill along the beams means that it is not, and this is what I would expect from looking at your drawing.