Leveling joists for subfloor – plane joists or remove support from below
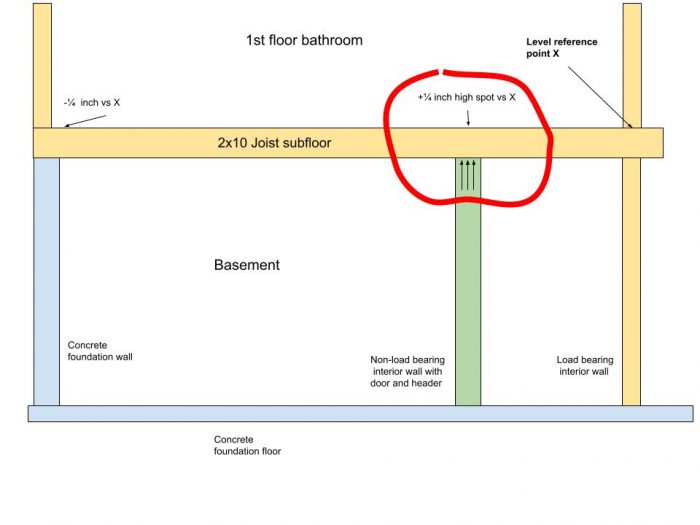
Hello, I’m leveling joists in a bathroom floor in preparation for a new subfloor and tile. The bathroom is on the 1st floor with a full height basement below. Two of the joists have a 1/4 inch high spot and I see that they are resting on a door frame header in the basement below where the high spot is. I attached a diagram and a couple of pictures. You can see the ceiling curve down above the door in the door picture – the joists directly above that door header are the raised ones.
Is the right approach to trim the header on that door below which is pushing these joists up or to just plane the high spots on the joists.
If I trim the door header below, do I need to gradually lower the temporary support I would add to do the trimming over time or can I do it in one shot? Also, how much time would it take for the now less supported joists to settle to its final shape/location? Thanks.
-Mark


GBA Detail Library
A collection of one thousand construction details organized by climate and house part


Replies
I'm not a fan of hacking joists. But joists that have been bent for a while might not come unbent. Can you shim the rest of the floor? Cut strips of 1/4" plywood and put them over the straight joists. Then shim the bent ones with wood shingles under the subfloor on 16" centers.
Thanks for responding. The diagram I showed only really represented the couple of joists which were bowing upwards over that problem door. The rest of them more or less sag in the middle, unevenly, it's never a simple slope. So I definitely will need to shim everywhere to make things level, there aren't any straight joists. It's 7/8" between the lowest and highest points .
Because the joists are so wavy, so I was going to try to scribe the joist profile onto a level 2x4 and then cut it down to a shim with a jig on a table saw. Hold in place with screws and glue. I'll see how that works out.
I do have a question about what you said about shimming the bent ones. You suggested using wood shingles, is that material strong enough for this purpose? If so I might use it elsewhere on this floor, especially with the smaller gaps instead of trying to cut 2x4s into tiny strips.
If the joists are really wavy they might be undersized, you may want to check a joist span table before proceeding
The idea in leveling is to find the high spot and bring everything else up. The subfloor can span 16 inches so you only need to shim every 16 inches. I like to make shims about 3" so I can put two nails in without splitting the wood.
One approach is to use two pieces of wood shingle with the narrow ends together and push them together until you get the exact thickness you want. Another is to cut blocks of plywood of various thicknesses. What's easiest depends on how your working.
FHB had an article recently about shimming old walls to get them plumb. A tip they had was to use drywall screw to establish the desired plane. Set them every 48 inches with the flat of the head at the plane. With a hand screwdriver you can make very precise adjustments to depth. Then run a straight edge across two screws and shim in between.
As to strength: it's common for residential floors to be rated at 40 pounds per square foot. A 16" square would then hold 90 pounds. If you have a 1.5"x 3" shim the shim would have 20 pounds per square inch. The crushing strength of wood is around 2,000 pounds per square inch.
Thank you for the math, this is useful to know! Also by "wavy" i meant that the joists weren't cut completely straight, the same joist can be 9" in one spot and then 9 1/2" in another. They seem sufficient for the span (16"OC, 11 or 13ft between the supports depending on the joist).
1/4" isn't a whole lot, you could probably do it in one shot, but I'd probably split it into 2-3 "pieces" using some shims. Note that large steel washers are easier to get in and out than wood shims for something like this that is temporary.
You're probably OK planing the top of the joist, but you'd have to shim the bottom. If trimming that header is doable, I'd do that first since it's a more elegant solution.
Bill
Bill, thanks for the advice on how to drop that joist and the steel washers suggestion really useful! Unfortunately, I didn't understand what you said about having to shim the bottom of the joist if I plane the top of it... could you elaborate? Thanks.
If the joist is bowed upward, then the ceiling underneath will be bowed up too. That means "plane the top", but "shim the bottom" (to fill in the void and level out the ceiling).
I kinda like Walter's suggestion to sister some 2x4s to the side to get a flat top though. If you do that, use structural screws (likely easier to attach that way than nails), and use construction adhesive (I like the PL line) to bond the 2x4 to the joist. You don't want anything that can wiggle when you walk and make for a squeeky floor -- the construction adhesive will solve that.
BTW, no one on here is going to be a fan of shaving a joist unless you have absolutely no other option. Whenever you remove material from a joist, you weaken it. You should really look at that as a last resort.
Bill
Ah now i get it, yes there will definitely be some "shim the bottom" action in my future. Thanks.
Trimming the door frame may not work as the joists would likely hold their current position for some time and move later once loaded.
Consider sistering the joists with 2x4s screwed to the side of the joists giving you a level plane.
I am also not a fan of slashing away at the framing but would I shave away 1/8 of an inch yes. Would I shave away 3/8 at center span unsupported NO. ¼ inch directly over support I would likely plane it down but would not be happy doing it.
Walta
I would do like Walter suggested and install new straight 2x4's as sister joists along-side your crooked ones. To reduce squeaks and to help strengthen your existing joists I would use a combination of construction adhesive and structural screws to hold them together to reduce future squeaking.
Marks77,
I can't be sure from the photos, but it looks like an older home that got remodeled. It also looks like the long axis of the floor area is about 12'. If the floor joists are 2x6 not 2x8, I would suggest upping the sistered on elements to be 2x6 not 2x4. More glue and screw area and it will help you keep the screws further from the top edge of the existing floor joist. I would also invest in a good quality right angle driver, you have much misery ahead. Torx head deck screws are more money but set more easily.
Use the best subfloor stock. Cheaping out will only cause you misery later. Tile subfloor specs often call for 1/2 to 3/4 additional subflooring to make a floor rigid enough to not crack the tile. In a perfect remodeling world that is fine. In real life, you are going to be facing an annoying disconnect of floor heights and more annoying issues trying to figure out transom pieces. If you didn't peel out a full mortar bed floor job, then start by checking the hall floor height and working backwards. to see if you can raise the side sleepers to cover the existing 1/4" bump AND still get a 7/8 subfloor sheet to work with your chosen tile thickness. Make a decision now about how you will transition between flooring in bath and hall. Better not choose Saltillo!
If you are pressed for height, set the sleepers to flush out lowest level point found and glue and screw thoroughly. Use clamps as you go along, don't trust the screws to pull you tight. Check for nail bits and power plane down to the new sleeper tops. You will now have the near equivalent of 3x6 floor joists. Glue and screw the new subfloor. Add 1/4" hardiboard if there is room. IF not, well, fudge is what you say while you fudge the next step. Schluter Ditra sheet will make the water protection for the subfloor pretty bullet proof and give you a forgiving isolation base. Using SuperFlex or equal thinset for setting the tile will give you a little more forgiveness. Using a small tile size over large will give you grace against potential cracking on what may still be a slightly bouncy floor. Don't forget that a full bath tub weighs hundreds of pounds plus yourself.
This is ugly advice, subject to much derision, but having faced a number of very skippy bathroom floors, I can say that it will still be better than many of the ones I had to tear out. Your biggest problem will be dropping in the sister pieces from the top. If you can get the ends supported both by a sill plate and over a central floor support you will be in a much better place. If not, then try to extend the sleepers as close to the wall on both ends. DON'T patch on little pieces, it is not the same when trying to get stiffness in a floor. And welcome to the world of older homes and dealing with other peoples earlier choices.
Thank you everyone for the incredibly useful advice! I ended up not trimming the door frame because of time constraints a - I would not be able to wait for it to "settle" into its final shape and also it did not seem clear how much it would help so I ended up planing up to 1/4 inch in the high spots.
I decided I wanted to have shims along the entire length of the joists to minimize the chance of putting screws into voids from above when affixing the subfloor. I tried a few different approaches but found the easiest way to make the shims for me was to cut 4ft long strips of fixed thickness (anywhere from 1/8" to almost 3/4" for me) on a table saw from 2x4s, glue and screw them in place, then remove the screws the next day and plane to level. Having a laser level made this relatively easy.
I did add blocking on the perimeter as needed so the subfloor is properly supported and also in between the joist thinking of joists sharing loads better although I'm not sure that will do much.
Once the shims were in place I put down 3/4" Advantech using glue and deck screws. The subfloor seems very solid (and finally level!) but I guess only time will tell. Now onto framing the walls, ditra and tile. Thanks again!