Metal Box Over Recessed Lights
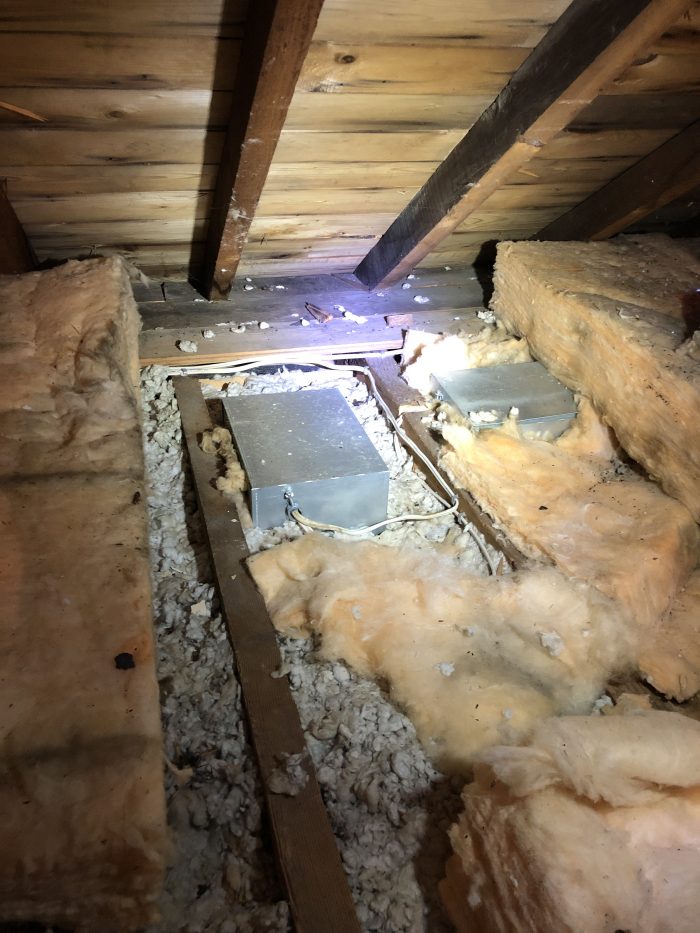
I went exploring in my attic this morning to find my pot lights and see what I can do about air sealing them. I found they are covered with steel boxes (see photo below). These boxes appear intended for this application but are not something I am familiar with… I am not familiar with anything electrical. The boxes have small holes in them, so certainly not air sealing!
1) Does anyone know the purpose of these boxes? (to keep the insulation away from the light??)
2) Do I need to open these boxes to figure out what kind of fixture I have in order to air seal them?
The idea of putting a foam box around a thing that creates heat feels wrong to me (from a fire safety view), so I was thinking of creating a box with gypsum board, or perhaps Densglass for moisture resistance.
Thanks for your thoughts!
GBA Detail Library
A collection of one thousand construction details organized by climate and house part


Replies
James,
I'm sure someone will be along shortly who knows exactly what they are.
From an air-sealing perspective, aren't you most of the way there with the boxes? It seems like it wouldn't take much to make them air-tight, as opposed to building another whole layer you then still have to seal.
Thanks Malcolm.
I could seal the steel boxes, but I was not sure if some of the leakiness of the boxes was intentional to dissipate heat (there are small pre-punched holes on the sides; the air is not just leaking through the seams and where the wires come in).
For what it is worth, the light bulbs were incandescent when we moved in, but now are all LED, which are noticeably less hot.
It looks like it's part of the light assembly. Some fixtures mounted inside secondary enclosures like this, and I think that's what you have. I very rarely see this type of light anymore. I was able to find an example that is somewhat similar to what you have here:
https://www.krelllighting.com/WAC-Lighting-R2R-ADP1-Accessory.HTM
If you were to replace the light with an LED, you'd probably be OK to insulate the box but it would technically be a no-no to do that. The thing that was added to make light fixtures rated for insulation contact (the "IC" rating), was a thermal switch. The purpose of the thermal switch is to shutoff the light if the fixture gets too hot. Burying a fixture in insulation is much more likely to make the fixture run hotter, so that's why those thermal switches are needed. They are a safety feature.
When everyone started to change over to LEDs, the issue of fixtures getting too hot became much less of a concern, since LEDs run a lot cooler than incandesent lights of similar light output. The problem is that you could potentially put an incandescent bulb back in that fixture one day, so that's why you really shouldn't box over a fixture that is not IC rated. The good news is that it looks like you have enough space to be able to replace that fixture if you want to with a new IC-AT (Insulation Contact - Air Tight) fixture. Note that "AT" is optimistic, I like to call them "leak less" fixtures. You still want to box over the AT fixtures for best performance.
If you have to cut a new hole, you can get a holesaw made for the purpose. What I usually do if you have to cut the hole a bit bigger is to use some scrap plywood or 1x stock to make a brace that I can wedge into the existing hole. This gives a rigid spot to hold the pilot drill for the hole saw. Once you have that in place, it's easy to use the hole saw to cut the new, larger hole for the new fixture. It doesn't matter if the temporary brace pops out before you get the hold completely cut -- once you start the hole, the cut edge of the hole will tend to keep the hole saw centered without need for the pilot bit.
Bill
Bill is correct. These were used for older recessed lights that were not IC rated to allow for installation into ceilings with insulation.
I'm pretty sure you are not allowed to seal the box up, but you are allowed to cover it with insulation. In this case your best bet is to make a box for it out of some rigid mineral wool and encapsulate the while thing in spray foam. One of the small 15 foot two part kits should work for this. Before doing anything, find the model number on the box and check with the manufacturer for their details dealing with SPF.
Looking at the work involved, it is probably better to pull out the whole thing out and replace it with modern air tight slim LED pucks.
I just took 5 of those out of my house this past week (and several others in the past). In my case, they were sheet metal boxes built to house the lighting assembly. Before removing, I also updated mine with LED bulbs, yet I this week i replaced them with led recessed lights. Between the light shade/cover and being so recessed in the ceiling, they did not due a great job lighting my rooms. Depending on their dimensions, you might be able to get a recessed light replacement that fits the current hole. Amazon and other places might have square/rectangular replacement. Otherwise, I like the ideas mentioned above.
Thanks for the responses everyone! You make good points and it seems like replacement with IC-AT fixtures seems to be best bet (to limit the chances of burning down our house...), and then building an air tight box over for good measure.
Do you have any examples of the "modern air tight slim LED pucks" you mentiond? We have a good electrician who will install them, but I suspect if I ask him, he will install whatever lights he has in his truck.
Pop off one of the trims and measure the exact cutout size. For these to seal properly, you want the new LEDs to have about the same cutout.
I generally use these:
https://www.liteline.com/20000660-master_slm4
https://www.ovidlighting.com/collections/sulmo/products/sulmo-4
I find the dim to warm is the best option for most lighting, much better light quality when dimmed without any of the green tinge some of the budget units have.
Note that several manufacturers make lights with a switch selectable color temperature. These can be very handy if you're not quite sure what you want right away. I have some made by Sylvania that do a good job, although I wish the gimbal had more travel. The quality of light is very good.
To add to Akos' commont about measuring the cutouts from the old lights: these things can be a lot more of a precision fit than you might think. There isn't a lot of wiggle room in those hole cutouts. I have often found it easier to just get a purpose made holesaw that cuts holes for the next larger size light from whatever I'm replacing, and then to cut the holes rather than trying to get something that "almost" fits to actually fit in the original hole.
Bill