My minisplit stand
raul4817
| Posted in General Questions on
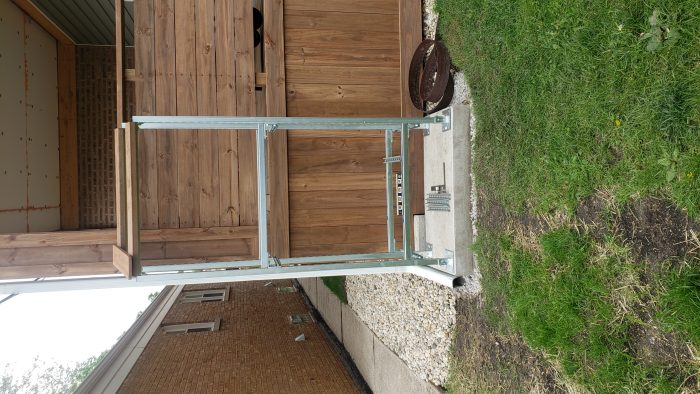
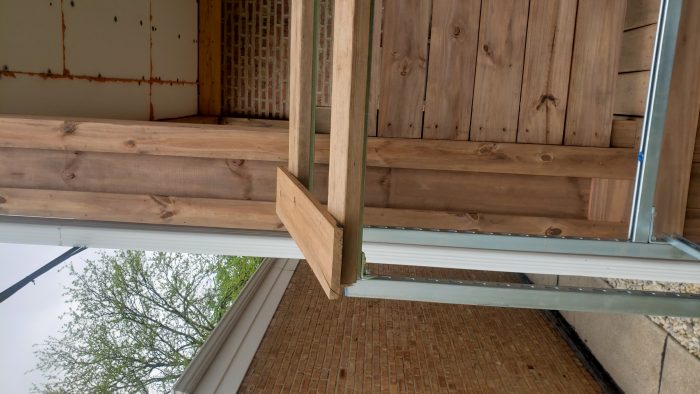
I wanted to share my condensor stand for my minisplits. I decided to stack them. I Looked into some pre made stands but ultimately made it out of home depot’s version of unistrut. Everything stocked locally including the base feet. Open to suggestions and critique on how it could be better? The roof will be some 1×6 pressure treated pine I have leftover. Only concern with the roof is gaps between 1x6s as they dry, but should hold the majority of the snowfall at bay.
Raul


GBA Detail Library
A collection of one thousand construction details organized by climate and house part
Search and download construction details


Replies
Looks high quality and strong.
If you're stacking you need to manage the condensate that occurs in heating mode from the upper unit. You don't want it dribbling down and freezing all over the lower unit.
Is the lower unit above the required snow level for you location?
I would like to see a diagonal bracing on the sides and the back if you can do so without blocking the air flow.
Will the units be at least the manufacturer minimum plus 25% away from the building?
Did you use nylon lock nuts so the vibration will not loosen the nuts?
Will the defrost water from the upper unit land on the lower unit?
Looks good.
Walta
Thanks Walta,
All good points.
Bottom unit is around 18" off the ground. Haven't seen snowfall like that here since 2011.
I can probably sneak in some bracing diagonally although I Thought about using a small piece of strut with an L to lag to the deck structure. I ordered some anti vibe pads last night for the feet of the units but ordered extra if I decide to brace it with the deck.
I believe manufacturers call for 4" behind unit. I have 8-10"
Did not use locknuts!!! OVERSIGHT on my part. I did torque em down pretty good. But may need to run to menards before it's all said and done and pick some up. Or Maybe some thread lock instead?
The top unit is a fujitsu. It has a plug for attaching drainage hose, although the manual say to omit this is in extreme cold. I will most likely use the plug and hose but monitor it very closely during cold snaps.
Raul
Put some paint on the bolts that will keep the nuts in place.
The X bracing is mostly in tension so it can be very thin and work well.
https://www.homedepot.com/p/Oatey-3-4-in-x-10-ft-Galvanized-Steel-Hanger-Strap-339232/100167964
Walta
You made one error common when people first build with strut: you should be using spring (or cone nuts, which are better) and connecting the angle brackets on the open side of the channel and not the slotted back side. It sounds counterintuitive, but strut is stronger with the spring/cone nut strap piece clamping the channel closed. I would build your shelves with the open side of the strut down, and the angle brackets underneath. I would clamp all the angle brackets — including those on the vertical pieces — into the open side of the channel using the spring/cone nuts. In the strut world, the slots in the back are used primarily to hang things with threaded rod. Nearly all structural fasteners are used on the open side of the channel, and this is how all the load ratings are worked out if you go through the load tables in the strut catalog. This also avoids the need to hold a nut inside the channel while you’re tightening a bolt, and you’ve probably noticed how a socket can’t quite fit through the open side of the channel to grab a nut.
Use a split lockwasher under the head of each bolt. This is backwards from what you’d think, but since the spring/cone nut is a clamp piece and not a nut, it can’t rotate.
If the top pieces of strut are exposed and have been cut, you can get plastic caps or just give them a quick coat of cold galvanizing spray or an exterior paint. If you paint them right after you’ve cut them (so that they’re a bit warm), the paint will adhere and cure a bit better and faster.
Home Depot carriers thomas and Betts brand strut, which goes by their name “superstrut”. Regular “unistrut” is it’s own company. I usually use Bline strut because that’s what my electrical supply house carries. They are all interchangeable with each other, but sometimes one company makes a really nifty piece (unistrut makes a little trolley that runs inside the channel, for example) that you’ll want to use.
While duct tape holds the residential world together, strut holds the commercial world together. I’ve probably ordered enough steel in strut form through the years to be able to build an office building by now :-)
Bill
I was not entirely sure that the cone nut would stay without sliding so I used the slotted side thinking it was not going anywhere with the 1/2 bolt sitting right on the slot. But from what your telling me I could have and should have used the channel side with no concern. That would have made life easier for me. This is all superstrut stuff from the homedepot. Mostly went this route since they stock the base feet that I really liked. Good thing is I can pull it apart and reconnect since dimension wont change. Kicking myself now. First time using it or building with it other that for hanging my meter socket when I upgraded to 200 amp
Raul
If you look at the cone nut, you’ll see some teeth cast into the grooves on either side. Those grooves line up with the inside of the “U” shapes on either side of the open side of the channel, and the teeth bite into the edges. They won’t slide.
Download one of the catalogs for strut systems and look at some of the drawings in there to get an idea of how stuff goes together. You’ll also find about 347 bazillion different fittings that you never knew existed too! :-) There are load and span tables for everything so that you can know exactly how strong your structure will be too.
Strut is very handy stuff. I use it frequently even for simple pipe brackets. Green for indoors, galvanized for outdoors. There is also zinc dichromate (gold color) and even stainless steel ($$!!, and usually minimums too).
Bill
Thanks Bill,
I am gonna redo the stand, just flip the channels towards the interior. This makes more sense now in retrospect than trying to get my large fingers in those tight spots to tighten the bolts. Looking at the possibilities now it seems almost endless what can be built out of this stuff.
Raul
Another little tip: self tapping hex head screws are a handy way to attach small things (like electrical boxes and cable/pipe straps) to strut without using heavy duty strut hardware.
You probably won’t need any diagonal bracing with this stand. The shelves and angle brackets will probably be stiff enough by themselves. Just lean on the stand to test it, if you don’t like how much it moves, add a pair of inside 90 brackets at the corners and run an “X” of threaded rod between them to stiffen things up.
Bill
Here is my second go.
Flipped all the channel and used cone nuts with galvanized lock washers on everything. I found an flat L piece that really tightened it up so no horizontal bracing needed.
Tomorrow I will use some wedge anchors at the feet and for good measure I'm going to lag screw it to the deck header with a 2x2 anti vibration pad between the metal and wood.
Thanks everyone for the tips and Bill for strut channel lesson, it is super sturdy and about at solid as can be.
Raul
Nice work!
Use redhead anchors, which might be what you mean by “wedge anchors”. For whatever reason many anchors have various names depending on who you talk to :-)
If you are in an area with freezing winters, a bit of silicone in the hole before the anchor goes in can help to keep water out and prevent spalling of the concrete.
Don’t use lead anchors here.
Bill
I've only ever used the galvanized redhead anchors for all things outside. Used them mostly for fastening simpson post bases to footers. Oddly enough It has been getting harder to find the galvanized variety locally. Everything around here seems to be zinc plated now.
I usually have good luck at menards, but galvanized will only come in a 10pack. I find myself going through them sooner than later so I splurge for the 10pack.
Raul
Behold the wonders of McMaster-Carr if you need small quantities of unusual fasteners. They have just about everything, so they’re a good resource to have.
Bill
What do you figure your materials cost is for this?
Thanks, Bill
Strut usually runs around $17-25/stick depending on where you get it. Fittings add up, but aren’t too bad. I’d guess this is about a $150-250 project depending on exactly how much went into it.
Note that commercial electrical and mechanical supply houses have WAY more stuff stuff in stock than the box stores.
Bill
Bill,
As bill said strut was around 19$ a 10' stick.
I used 6 sticks plus 1 stick of the small depth. I used 10 angle brackets @ 4$ each and 8 flat L's at about 4$ it was a shade over 200 with all the cone nuts and hex bolts.
Everything came from home depot and I had a coupon so that helped a little.
I wouldn't hesitate to build it again. I feel that the ability to customize it to your specific unit/units was worth the effort.
I did look at the double quick sling that I believe is from rectorseal. That rack was priced close to 400 at least at the online retailers I found.
Raul
Note that standard strut dimensions for the “thin” (I always call it “pancake strut”) is 7/8” in the small (depth of channel) dimension. Regular strut is 1-5/8” square.
The supply houses have it both with and without slots too. There is also a long, narrow version of the slotted stuff that is better with smaller (up to about 3/8”) hardware.
Bill