Insulating Walls Without Sheathing
Hello everyone. I have an insulation challenge that I could use guidance on. I am located in the Midwest zone 6 and converting a 22’x25′ 1950 detached garage with a concrete floor into a heated workshop.
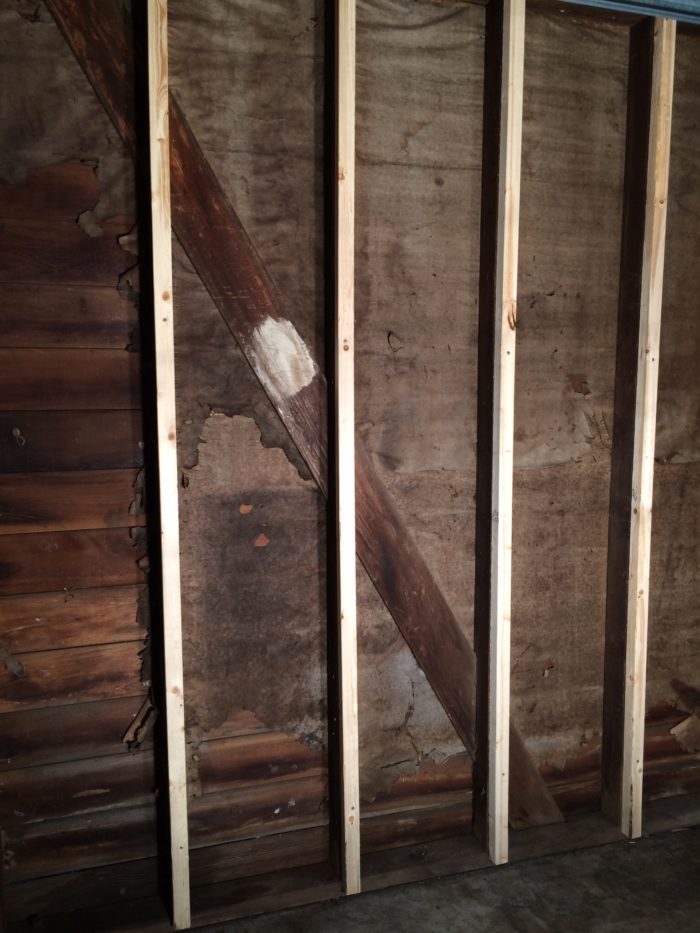
The exterior is ship lapped redwood siding nailed directly onto the studs that are 16″ on center 2×4’s. There is NO sheathing. Black roofing felt was applied between the studs and siding but what is left is hanging in shreds. Although the siding is in very good shape with no rot it is possible to see daylight thru some of the lower siding boards. I’m certain that a small amount of rain does seep in because of visible water stains. The interior of the siding has never been painted.
The ceiling is 16″ on center 2×6’s with a newly shingled roof that has a ridge vent and soffit vents. I plan to maintain the open cathedral area as it is only 4′ above the rafters.
I will not keep the workshop heated continually yet plan to use electrical heat and a winter working temp of 60 degrees would be optimal. Finished surfaces will probably be drywall.
I am unsure as to how to continue in regards to insulating. I have already applied new 2×2’s to the interior studs to gain depth for thicker insulation. Vapor barrier, airflow, type of insulation and stack-up are a mystery.
My question is how do I properly insulate from the inside and prevent a mold or rot issue?
I thank you in advance as I await your reply.
GBA Detail Library
A collection of one thousand construction details organized by climate and house part


Replies
Ell,
Your walls lack a water-resistive barrier (WRB).
One way to fix the problem is to remove the siding and install plywood or OSB wall sheathing, followed by a WRB like asphalt felt or housewrap. Once this work is done, you can install the siding of your choice, with or without furring strips to create a rainscreen.
If you don't want to remove the siding, you have two choices:
1. Install a strip of asphalt felt in each rafter bay. If your studs are 16 inches on center, you would cut long strips of asphalt felt that are about 18 inches wide. Fold the edges to make tabs; these tabs are stapled to the sides of the studs, so that the asphalt felt is up against the back of your siding.
The main disadvantage of this method is that asphalt felt makes a lousy air barrier.
2. Install 1" x 1" vertical sticks in the corners of each rafter bay, up against the back of the siding, followed by rectangles of rigid foam that are about 14 inches wide. The rigid foam is your WRB and air barrier, and the 1" x 1" sticks create an air gap between the rigid foam and the back of the siding to encourage drying. You should seal around the perimeter of each piece of rigid foam with caulk, canned spray foam, or high-quality European tape to create an air barrier.
Martin, can you not use the shiplap as sheathing, do the housewrap, and put up a new siding (like vinyl)? Why did you recommend removing the shiplap and installing plywood/osb? Thanks!
Good morning Martin and thank you for your reply.
I'm encouraged that I have options. The siding removal is not feasible in this circumstance yet the other two options are doable.
I have questions regarding both as they vary in labor and materials cost.
Asphalt felt technique- with this being the easiest solution it sounds great yet I'm not sure what you mean by it being a poor air barrier.
1. Is there anything additional I could do to make this technique more robust?
Sticks and Foam technique-
1. Can the 1"x 1" sticks be cut into chunks as spacers or do they need to go floor to ceiling?
2. What thickness of rigid foam is needed and is there a specific type that I should use. The options are plentiful yet the budget is not.
I really appreciate your guidance and will move forward as you advise. Thank you so much.
"My question is how do I properly insulate from the inside and prevent a mold or rot issue?"
"I will not keep the workshop heated continually"
If you do not manage your moisture and maintain the interior temperature, temperature fluctuations alone (between cold to comfortable to cold) will contribute to condensation leading to mold. Considering this is a garage/shop and not living space I would not put to much energy into trying to create a living space as shown in the many fancy homes discussed on this blog. Unless you have the budget, the cure outweighs any real benefit.
My personal suggestion is to install mineral wool insulation and install Intello Smart vapor retarder for use with batt insulation.
http://foursevenfive.com/product-category/air-sealing-system/
This link will help you understand vapor diffusion..
http://www.roxul.com/files/RX-NA_EN/pdf/Technical%20Bulletins_Guides/Residential/10393_ROXUL_ComfortBoard_Tech_Doc_Eng_July2.pdf
Here's a previous discussion on GBA relating to vapor barriers..
https://www.greenbuildingadvisor.com/blogs/dept/musings/vapor-retarders-and-vapor-barriers
Ell,
Q. "Can the 1"x 1" sticks be cut into chunks as spacers or do they need to go floor to ceiling?"
A. "Chunks as spacers" should work fine.
Q. " What thickness of rigid foam is needed and is there a specific type that I should use?"
A. Almost any type of foam will work, as long as it is at least 3/4 inch thick, and as long as it isn't too fragile. EPS is a little more fragile than other options like polyiso and XPS; some brands of 3/4-inch EPS might break when the stud bay is stuffed with insulation.
Thank you Martin and Richard,
Martin I appreciate the follow-up as I understand the rigid foam requirements now.
Richard thank you for your response and I will study the links that you have provided.
Ell Aire,
I forgot to respond to one of your comments.
Q. "I'm not sure what you mean by asphalt felt being a poor air barrier."
A. If you install fluffy (air-permeable) insulation like fiberglass, mineral wool, or cellulose, the insulation won't perform very well unless it is enclosed on the interior and the exterior by an air barrier. Asphalt felt makes a poor air barrier because it is easily torn, and because you can't easily seal the seams with tape.
For more information on air barriers, see Questions and Answers About Air Barriers.
Hello. As my project is evolving I would be grateful for additional guidance. I've had 2 closed cell foam contractors on site. I've reviewed with them my intention to "cut and cobble" my unsheathed garage walls. Both contractors have stated that they are confident in applying the closed cell foam directly to the backside of the unsheathed wood siding. This would create the needed air tight seal and vapor barrier. The suggestion is a 1 inch thick application and then I would follow up with the more budget friendly fiberglass bating. If it's legitimate to allow them to apply the closed cell foam directly to the siding it saves me a tremendous amount of labor that the "cut and cobble" brings.
My questions are as follows....
1. Is "flash and bat" applicable on unsheathed shiplap woodsided detached garage walls?
2. Is the 1 inch application enough to satisfy the dew point requirement? If not, what is the minimum that you would suggest for a workshop that will be heated only when in use.
Addendum to my initial situation: After reading your informative article, How to Build an Insulated Cathedral Ceiling I decided to cancel the ridge vent and soffit vent installation and maintain an unvented roof assembly.
I thank you in advance.
1: If you put the cc foam on the back side of the redwood siding the exterior-side wetting will saturate the wood, and the uneven drying (99.99% toward the exterior, 0.01% into the foam) will cause it to warp & split. If the siding is painted, the paint will fail very quickly. folks recommending that you put ccSPF directly onto the ship-lap are way off base on this. The primary moisture drive affecting the siding is from the EXTERIOR, not the interior, and sealing all drying capacity toward the interior .
You only need 1/8" to get pretty reasonable back-venting/drying of the siding (3/8" would be better in temperate rainy areas, such as the coastal regions from northern CA to the British Columbia coasts), but 0" is not a viable option. Even clapboards nailed to #15 felt clad sheathing has some air gap over at least half the surface area, which behaves as a capillary break and weak (but way better than nothing) drying path toward the exterior. If the clapboards aren't painted on the backside, they too will be at high risk for paint failure, warping and splitting over time. Deep roof overhangs can mitigate this a lot, but not completely.
If you put housewrap on the exterior of the ship-lap and added a layer of siding it would work though.
2: 1" of closed cell in the cavity with 2.5' of fiber would be sufficient for dew point control on walls in zone 6. For 2x6 rafters 1" of close cell and 4.5" of fiber would not. In zone 6 it takes about 1/3 of the total center-cavity R for adequate dew point control in walls (with the presumption that there is at least some drying toward the exterior), and about 50% of the center-cavity R in unvented roofs (since there is effecively zero drying toward the exterior.)
http://publicecodes.cyberregs.com/icod/irc/2012/icod_irc_2012_7_sec002_par025.htm
http://publicecodes.cyberregs.com/icod/irc/2012/icod_irc_2012_8_sec006.htm
Thank you Dana for your thorough response. I'm very grateful for the knowledge that is shared on this website. I now have the confidence to move forward with my project. Cheers.