New build, framers stopped zip sheathing at the rim joist?
There’s a lot of text below. The short version of my question is, how do I fix the WRB at my rim joist of my new building (pictured) and air seal at the sill plate?
I’m in western NY (climate zone 5a) and am having a 30×40 conditioned workshop with a basement built with zip sheathing. I was going to use the zip sheathing as the WRB, use 2″ EPS for exterior insulation, and use 1×4 furring strips creating a rain screen behind the LP lap siding. I will be putting up the exterior foam, furring strips, and air sealing. Inside the walls I was planning on using dense packed cellulose, if I can find someone to do it.
I have a couple issues with what the framers have done so far.
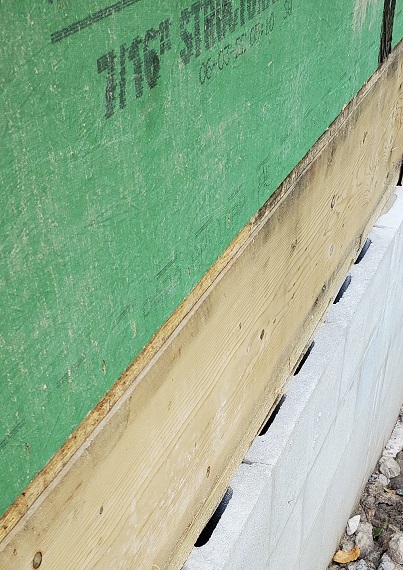
1a. The framers have put the walls up, and they stopped the zip sheathing above the rim joist. They also made the sheathing flush with the rim joist. When asked about this they said the rim joist would be okay and would be protected by the foam and siding. I didn’t really think it was adequate and hoping for suggestions on how to protect the rim joists, that didn’t involve too much demolition.
My leading thoughts are to A) use a self adhesive WRB like blueskin VP100 (as it is available in 12″ rolls which would cover the 2×12 rim joist) and B) put 16″-ish strips of zip sheathing over the rim joist and lower several inches of existing zip sheathing. This would create a little step and I’d be relying on the zip tape at that joint. Id also have to compress the EPS foam here to account for the extra thickness from the new layer of zip sheathing.
1b. There’s are gaps between the lower edge of the bottom plate, 1st floor subfloor, and rim joist (that would normally be covered by the zip sheathing covered the rim joist). Should I seal these with something like big stretch, or just rely on the solution from 1a?
2. Another issue I have is at the sill plate. The framers were supposed to leave the sill plate flush with the outside of the CMU and recess the rim joist 2″ for the foam. Instead, they recessed both rim joist and sill plate and exposed the hollows of the CMU. In order to air seal this, the GC was going to bend some aluminum z flashing and cover the exposed top of the foundation. I’m not sure what adhesive/sealant he was going to use with the flashing. This seemed like an okay solution?
Thanks for the suggestions
GBA Detail Library
A collection of one thousand construction details organized by climate and house part


Replies
That's not OK. As an aside, it's amazing how many people in the building trades don't have a grasp on the concept of a building envelope.
As shown your rim joist is susceptible to rotting. It has no weather protection on the exterior. You need to assume the siding and insulation contribute nothing to the weather-proofing. There's no flashing where it changes plane intersecting with the CMU. Water that runs down the wall can travel horizontally and get under the rim. It would have been best to run the sheathing over the rim and over the CMU so the edge of the sheathing was hanging over the side of the CMU. I think you'll be OK if you put metal flashing over the CMU and then self-adhesive flashing over the rim joist. Since it's a change of plane it needs to be well-flashed.
Check the installation instructions for the LP siding, I think there needs to be an air gap above a horizontal surface.
What's the unfinished edge sticking out between the sheathing and the rim joist? Is that the sub-floor? You definitely want that covered with something waterproof.
Thanks for confirming that.
Yes I think the LP siding needs something like 6" of gap between its bottom and the ground. The LP siding will be over the edge of the foundation, as the sheathing/rim joist is set back 2" and there will be 2" of foam and 3/4" of furring strip on the sheathing, then the siding.
Yes, the unfinished edge is the advantech subfloor. Something will be protecting that when I fix this.
It's actually not that bad. If the sheathing had gone over the CMU you still would have needed something covering the bottom of the insulation and the furring strip to keep creatures out. So it kind of works out the same. Does it sit so that the foam is flush with the CMU? I'm thinking the flashing protects the bottom of the foam, and then some sort of screen protects the furring gap but lets water drain if necessary.
The bottom of the exterior insulation should sit on the flashing on the top of the CMU, and the face of the insulation would be flush with the face of the CMU. We were going to put a bug screen in the gap between furring strips
You can pick any self adhesive WRB that you want, and cut it down to width by running a utility knife around the roll. You'll have to use flashing tape to transition the top edge of the SA WRB with the zip surface, etc. If your plan is to stick (sorry) to using only tapes and membranes, Siga Fentrim tape will airseal the connection to the CMU vertical surface. Or can use liquid flashing for that concrete connection.
Given your starting point, you could horizontally extend the sill with a ripped piece of PT 2X to cover the CMU cells, screwed to the edge of the sill. That would at least give a surface that is easier to air seal to everything, and would still give a ledger for the foam. Probably want to flash it with a piece of Z metal, to protect/divert water from the top surface, similar to window/door head flashing.
As an alternative, you could use liquid flashing products to airseal and waterproof everything if you wanted; the sheathing/subfloor/rim connection, the rim to sill extension connection, the extension to concrete connection, and also the exposed rim. One of the brushable/roll-able liquid WRB products could be used to coat the exposed rim, just to make it easier to apply to a large area instead of using a heavier viscosity flashing product. No different than coating bare OSB/plywood/gypsum sheathing. Not a cheap solution, but a different method than using flashing tapes and self-adhered WRB products.
Could also apply liquid flash to the CMU top edge and the rim face, and bed a piece of Z metal into the liquid flashing, then apply more liquid flash over the transitions. That may be the method that the GC was going to use, if the air sealing was important.
I like the idea of a 2x rip to close up the tops of the CMU.
We haven't talked yet about how air sealing is happening. If the Advantech is the air barrier for the floor then I think you're in pretty good shape. If there's a basement or conditioned crawl space and the mud sill needs to be air sealed then that detail is going to give you trouble. The 2x rip helps but there's no down pressure on it to hold it tight against the CMU.
The lack of vertical pressure is why I'm envisioning the 2X rip as a good solution; you shouldn't need vertical pressure to perform the sealing. You can liquid flash or tape flash the 2X rip to the sill/rim, and then use liquid flash or Fentrim to seal the 2X rip to the vertical plane of the CMU, (like a vertical sheathing-to-foundation transition). The 2X rip just adds material as a gap filler and sealing surface.
I'm probably oversimplifying what is involved in actually accomplishing that.
Chris,
"I'm probably oversimplifying what is involved in actually accomplishing that"
Maybe, but it sounds like a good solution, and I'm not coming up with much that is simpler.
Chris' suggestion is spot on, it is what I would do, including the ripped 2x to extend the bottom plate.
With exterior rigid foam, I don't think all that much water (if any) will make it to the WRB. Making sure the WRB is continuous out to the outside surface of the CMU is all that is really need. The Z flashing doesn't hurt, make sure you don't create an air barrier discontinuity around it. Should go something like this (from bottom up):
-CMU
-Fentrim/lquid flash to sill extension up 6" on rim joist
-Z flashing
-VP100 over top edge of Z and edge of fentrim up to ZIP
-ZIP tape.
The important detail here is air sealing which Chris has covered.
There is a basement so the sill plate/foundation junction needs to be air sealed. The GC was going to bed Z flashing (in something, I can see what he was planning on using) to adhere it to the CMU and sill plate for air sealing.
I don't think that will stay sealed. Metal flashing expands contracts a fair bit with temperature once you get to 10' length, the CMU not so much. A caulk joint between the two will most likely separate over time.
You want flex tape rated for adhering to both wood and masonry to air seal with the Z flashing above to protect it. Make sure to check the product literature, lot of flex tapes require a primer for masonry.
Doesn't structural sheathing need to tie into the rim and mudsill?
maine_tyler,
It depends where you are. In high wind or seismic zones the sheathing should form a continuous diaphragm from the foundation to the roof structure. But there are places where sheathing isn't even used, and the only force they compensate for is the horizontal shear.
So the only thing holding the walls to the floor is gravity and nails in-line with gravity? Or is there some other connection made that resists uplift?
Usually the sill plate is bolted to the top of the masonry, but not always, especially in older homes. Remember that "gravity" in this place is working with what is likely tens of thousands of pounds of force from the weight of the house above, so it's not like a gently breeze is going to push your house off of the foundation.
Ideally, structural sheating would be nailed into the top plate and the lowest horizontal framing member too (sill plate, etc.), so those nails would be perpindicular to the force of gravity, and would be in shear so they wouldn't easily pull out. Sheathing installed this way locks the wall together and prevents racking, but also makes the entire assembly much more robust.
Bill
maine_tyler,
Yes, and not just the walls, roofs too. Until quite recently code attachment for both rafters and trusses were three toe-nailed 3 1/2" commons per member.
There was a recent blog on GBA by (I think) Fernando Pages Ruiz on the connections necessary to do a good job of framing without sheathing, but I can't find it now.
Per my general contractor, not overlapping the rim joist is how it's commonly done in the area as the extra strength from tying in with the rim joist isn't necessary here (no hurricanes or earthquakes). I still would have preferred having it overlap the rim joist, I had assumed they would and wasn't home when the framers were doing the walls.
dyne,
I don't like it, but leaving the rim-joists unsheathed is still a pretty common practice. The problem you have stems from the Zip being the WRB, rather than the more common sheet ones like Tyvek.
In addition to the WRB issue, you also have some gaps around the rim joist with no air barrier. Self adhered or liquid applied WRB products would probably be helpful here as they could address both issues. Rim joists are notorious areas for air leaks, and your pic shows 5 air leak locations in this area:
1- between bottom of the Zip and the top of the floor OSB
2- between the bottom side of the floor OSB and the top of the rim joist
3 - between the rim joist and sill plate
4- between the bottom of the sill plate and top of the masonry
5- (this is related to #4), every hole in the masonry blocks is an air baypass to the interior spaces
You want to seal all of those areas. The easiest way is probably to put up the ripped 2x as previously mentioned, then seal everything together with a suitable product on the exterior. I'd pay particular attention to the holes in the blocks as an air bypass if you won't have a secondary air barrier on the interior side that will do the job.
Bill
This was my first reaction as well, as soon as I saw the photo. And clearly none of it is tied into the foundation, as the cells are not filled. How is this even code compliant?
After you get a solution acceptable to you and the builder has fixed it, i would also have a long talk for builder to explain what measures are being taken to ensure their subs follow the required scope going forward. Doing their own thing without consulting with you is not acceptable.
User ...022,
You can see one cell filled at the corner. I suspect they filled the cells wherever there were anchor bolts.
Deleted
I cannot think of any good reason why the sheathing would not be carried down over the rim joist, except it is marginally easier to stand walls if the sheathing is flush with the bottom plate. I like the sheathing to overhang the foundation, and then the cladding to overhang the sheathing.
plumb_bob,
Another reason production framers like to keep the sheathing flush with the bottom plate is that two sheets equals the height of walls using pre-cut studs.
Right, good point.