Insulating a Balloon-Framed House
Hi all
I have read many articles on this website but none that reflects my exact situation I feel… or maybe iIhaven’t read the right one yet?
I’ll keep on reading but your advice would be of great help!
So here it is…
We just bought a house in Sutton, Qc (just north of the Vermont border), in climate zone 6 (for now).
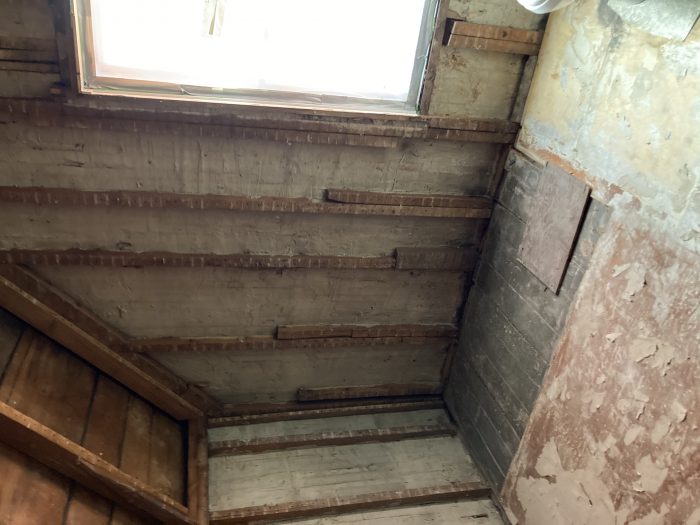
It’s an old 19th century home with balloon frame structure and lath-and-plaster walls.
On the outside of the walls, the studs are covered of 2 crossed layers of hemlock planks, then clapboard siding and finally a vinyl covering. No air gap or weather barrier behind the clapboard.
We plan on leaving the vinyl for now and focus on insulating from the interior…
but since our budget is limited, we planned on renovating the upper floor first and doing the rest in a year or two.
We demolished all lath and plaster on walls and ceiling of the second floor and got rid of the old loose wool insulation in the attic. We now see the interior side of the hemlock planks of the roof but the walls have a second layer of lath-and-plaster in between the studs (probably to create a double air gap “insulation”).
We plan on removing this additional lath-and-plaster layer since it is falling apart on certain walls.
(picture of the inside of exterior walls attached)
We then plan on building a new stud wall on the inside, with a 1/2″ gap between the old and the new studs in order to reduce thermal bridging. This new cavity would then be filled with cellulose. My main concern now (as evevrybody who is insulating an old house) is condensation inside the cavity.
My contractor suggests to install a smart vapor barrier on the inside and fill the wall cavity with cellulose. Though i like the simplicity of it, would that be enough to allow the humidity to dry to the inside since there is no weather barrier on the outside and no air gap between the hemlock planks and the clapboard?
I was thinking of using a variation of the method described in this article: https://www.greenbuildingadvisor.com/article/insulating-walls-in-an-old-house-with-no-sheathing
By recreating the existing air chamber behind the hemlock planks with 3/4″ spacers nailed to the studs and then fasten a layer of insul sheathing to the spacers. We would do this ourselves because cutting and fitting and sealing the insul sheathing boards inside the stud bays will be time consuming.
The contractor would then insulate the remaining “double stud” wall cavity with cellulose and finally add a layer of EPS rigid foam with aluminum foil vapor barrier on the inside. A double layer of crossed furring strips on the warm side of the aluminum foil would then allow the electrician and plumber to do their job without having to cut any holes in the vapor barrier.
This “new” air gap behind the hemlock planks would then allow the whole outside cladding assembly to dry if necessary, and the insul sheathing would now serve as “weather barrier” if humidity gets in from the outside and also allow the insulated cavity to dry to the outside.
Same approach would be used on the first floor in a year or two when we renovate the rest of the house.
So am I being too cautious here by recreating this air gap?
Will the Smart Vapor Barrier be enough to allow condensation to dry on the inside?
(Wall assembly options attached)
Any other wall composition idea would be appreciated but what’s for sure is that we will not insulate from the outside for now and we do not want to use spray foam and as little rigid foam as possible.
Thank you in advance for your help on this!
Felix & Melody
GBA Detail Library
A collection of one thousand construction details organized by climate and house part


Replies
From a fire safety point of view if a balloon wall is ever opened you would be require to add fire blocking in every stud bay every 6 to 8 feet. Even if no one is inspecting and enforcing this requirement it is a very good idea to add the blocking.
Walta
That's a really good idea, those old houses were firetraps. What's a pain is that typically the studs are true 2x4's so you need blocking that is 4" actual, which means you have to rip each piece from 2x6. And stud spacing wasn't as regular back then so you have to fit each block individually.
Thank you DCContrarian
About the blockings, is wood the best material? Or is there other options? Also, since cellulose is treated with Borax and it is dense packed, would it be sufficient to reduce the air exchange within the wall and therefore the chimney effect that usually occur in the empty stud bays? I will add blockings but i'm just curious...
The blocking is to meet modern fire code. Without blocking the stud bays act as conduits that allow fire to spread very quickly in the house. The blocking can be any airtight and fire-stopping material. Drywall is sometimes used.
Dense pack cellulose has the practical effect of preventing airflow and making stud bays much safer in a fire, but it is not fire-rated.
Very clear, thank you!
I don't know how dense-pack all-borate cellulose at the moisture levels you find in a typical wall is *rated* in a fire, but I know that tests I've seen show it's among the most fireproof materials available, along with rockwool.
EPS, XPS, and fiberglass end up melting rapidly & posing no barrier, but barely burn. Open-cell spray foam burns enthusiastically with intense black smoke. Closed-cell spray foam burns reluctantly with intense black smoke. You can keep a blowtorch up against cellulose and rockwool for minutes with no ignition and no punch-through.
Thank you Walta for your answer
I believe there is some sort of blocking underneath the floor level, at least i can feel what seems to be a wood blocking when i put my hand in the stud bays where the lath and plaster was decomposing. Will pursue my investigation and let you know. What's for certain is that there is an upper plate (double 2x4) on top of the studs to hold the rafters and no visible connection in basement since the space between the joists on top of the foundation wall was filled with rocks and mortar.
I would be tempted to cross strap out the wall with 2x3/2x4 on edge (ie https://www.builditsolar.com/Projects/Conservation/MooneyWall/MooneyWall.htm ) and dense pack it. Leave the plaster in the middle of the wall and call the cavity outside of that a "rain screen". This air gap is always a good idea when you don't have a WRB as it allows for drying of the sheathing and siding.
A smart VB never hurts but not really needed if the you have a decent airgap on the other side. Standard ploy would work as well. Install an air tight drywall over that (make sure to go with air tight electrical boxes) and you should be good.
You can take out the plaster, but you might create more issues if you fully fill the stud bay with insulation.
With balloon frames, an important item to seal off is your floor and ceiling joists from the wall cavity. These are huge air leak paths in these older houses. Spray foamed in blocking works well for this.
Also check that your interior walls have top and bottom plates. Lot of times the stud buys are open from the basement to the attic creating a nice chimney for your house heat to escape through.
Thank you Akos for your advice
The MooneyWall approach seems great, though i'd rather cut completely the thermal bridging (except on floor and ceiling connections) by building a new stud wall in front of the existing one.
If you look at the wall composition i propose (seen from above or plan view), the two walls are 1/2" apart and the studs are in a staggered arrangement so there is no connection between them. We add the vapor barrier and then two crossed rows of furring strips for plumbing and electrical services. This allows us to make sure there are no piercings nor holes of any kind in the vapor barrier and the enveloppe is sealed more quickly and efficiently. Electrician and plumber can then work easily from the inside in a tempered space. Of course i will lose more space than with the MooneyWall but i will gain efficiency (i hope).
About the air gap, when you write "A smart VB never hurts but not really needed if you have a decent airgap on the other side", what size would you recommend for the airgap? I was thinking of removing the plaster but recreating the air gap with spacers and insul sheathing... would a 3/4" airgap be enough you think?
I will make sure to pay attention to the sealing details...
Thanks again for your help!
I don't remember the exact values, but it was in the neighborhood of 5% less R value for a cross strapped wall VS staggered stud. In zone6 an R20 assembly is more than good enough, going much more above that (especially if it adds costs) is generally not worth it as the ROI is very long. It is nice to aim for R40 walls, but not realistic for a retrofit.
Try to keep your assembly simple. Unless you are doing it yourself, what you describe will be very expensive. Full wall service chases are generally never worth it.
You are dealing with an old house, no matter what it will never be as air tight as a new build. Getting hung up on not making any holes in your air barrier is moot when you already have a couple dozen floor and ceiling joist poking through it. Just do your best to air seal. Vapor barriers can have holes in them as still function well, it is air barriers that you don't want holes in.
Take a look a the article here about air gap behind siding:
https://www.greenbuildingadvisor.com/article/insulating-walls-in-an-old-house-with-no-sheathing
Make sure whatever you put in there can hold up to dense pack pressures. Also make sure to find somebody willing to dense pack your assembly.
Another question for you Akos
Would you build the same MooneyWall assembly on the roof rafts in order to create an insulated cathedral ceiling?
Very interesting Akos
The article you posted was the one that helped me understand the "airgap solution" before insulating the cavity.
I agree with you with trying to simplify my assembly, especially in an old house. My main concern for now is allowing the wall to dry if there's any condensation in the cavity or on the hemlock planks.
I will do much of the renovation myself but the cellulose and VB installation will be done by a contractor. I might use the MooneyWall if it saves me time and money though... i'll look into it more precisely.
Thank you
Looking at the pictures, looks like you have some pretty shallow rafters. If you want to insulate from the inside, your option is either enough SPF for condensation control+batts or creating a vented assembly with batts only. Provided your roof in simple, generally the vented assembly is the cheapest, but sometimes dealing with complicated roofs in old houses, the SPF approach is the simplest.
If you can vent your roof (soffit to ridge vents), than a mooney wall type of assembly makes sense. If you have the insulation contractor out, dense packing the extra square footage does not add much to the insulation costs.
If you want to stick with batts only, provided you have true 2x4 rafters, one method I found is to install a vent channel, use 3" mineral wool batts in the rafters (sold for sound proofing) to get a 1" gap. Cover the rafters with poly tied into your wall VB followed by a layer of rigid insulation. You can than attach your drywall directly over the rigid with long drywall screws. These area available from commercial drywall suppliers.
I have remodeled a few houses with interior foil faced foam here in NH and they all have had problems with insect infestation and decay.
Do not use foil faced insulation on the interior. Recently heard Chrissy from Building Science Corp talk about how you shouldn't use vapor impermeable materials on the interior especially in cold climates ie. foil faced insulation and poly vapor barrier. Your assembly will only be able to dry to the exterior. Having the smallest drying potential to the interior is enough to save a wall assembly from catastrophic failure.
The idea to leave an air gap in the wall assembly is a terrible idea. Fill the whole thing with cellulose. Not having an WRB on the exterior doesn't matter. Moisture can move through your wall assembly just fine to allow drying.
I would not use SPF on the roof. If/when there is a leak you will no know until it's too late. You want to allow for drying within the roof assembly. Pack it all with cellulose or use a mineral wool.
You have to be careful with dense packing ceilings in cold climates:
https://www.buildingscience.com/documents/insights/bsi-043-dont-be-dense
I agree that fully filling walls can work provided you keep liquid water out of it. Sometimes without a WRB that is hard to do, thus the air gap is the safest.
I'm in the land of warm side vapor barriers, coming up to probably three decades worth of new builds with it. Wall failures are always related to exterior water leaks, bad WRB details behind siding or very large air leaks. You can also mix in there the occasional duct in the exterior wall.
I've yet to see a wall fail because of a warm side VB here. Some with interior foil faced polyiso. Part of my ceiling at home has polyiso on the interior under a vented roof assembly.
It definitely never hurts to have some extra drying capacity, more important item to focus on is a well sealed wall with good WRB details and rain screen.
Felix, your first priority should be water management. Are you installing a new roof? What is you roofing material? What will you use to heat the place? Moisture largely comes from 2 sources: leaks and air. Dense packing will limit moisture movement through air. With 2 layers of siding over board sheathing rain driven water is not going to be making its way into that wall cavity.
I'm very familiar with that article and I must disagree to some extent with his findings. You can find other articles on GBA, FHB, and JLC that support what I'm arguing and there are plenty of real world examples for evidence. There are thousands of old homes in New England that have dense packed roofs and they are doing just fine. My current project house is an 1879 New Englander with cellulose in the walls and rafter bays in one cathedral ceiling probably done when the house was last remodeled in the 50s. That's about 70 years ago. Have yet to uncover a single issue from moisture damage anywhere in the house and this place is far from air tight. In fact the second floor full bath was just gutted last week and the exterior sheathing is in mint condition. There was no mold anywhere in the wall cavity including on the insulation and back side of plaster. Some of the stud bays had been missed and many of them were not so "dense" packed. A vented roof assembly is more foolproof but you can certainly design a non-vented that is safe assuming the roof is not leaking.
William,
There is a big difference between an assembly mostly working and always working. Unvented roofs with batts/celluose are common enough near me on older houses. Generally they hold up well until somebody shotguns the ceiling with pot lights. However the do occasionally fail.
A vented dense packed roof is guaranteed to work. I personally would not want to be the guy that has to tear everything out again and fix a rotted roof even if is a low probability.
P.S. The one area where you are OK to dense pack directly against the roof deck is the sloped section of 1 1/2 story houses provided the mini attic and knee wall is vented. This way moisture that makes it into the dense packed sloped roof section can easily diffuse through the insulation and be vented out.
https://youtu.be/XfiRYQBU4_M
do not use vapor closed materials from the back side of ext. sheathing to anywhere in the interior @ 44 min.