PERSIST technique
With this design (Persist) combined with a cathedral ceiling with exposed rafters & exposed bottom roof deck. I don’t have spacing of rafters yet but lets say they are spaced at 36″ or 48″ on center with the exposed rafters being 3″X 8″ x 17′ in size.
My question is what options do I have for attaching both the insulation & the furring strips on the roof
being rafters are spaced so wide.
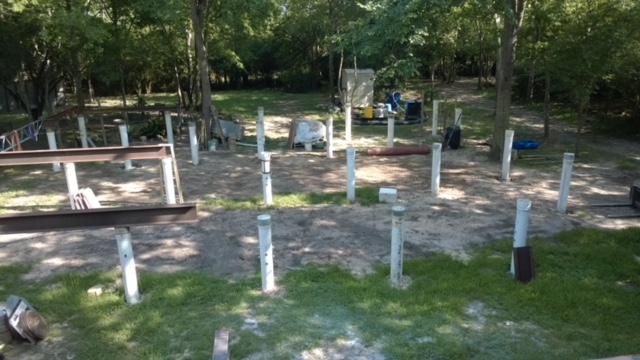
A short recap,of progress for those who asked to see this house. Poured last piling on 6/2/2018
THANK GOD that step is finished handled to many 80 pounds bags of concrete by myself. twice.
right at 40,000 pounds. Built in a FLOODWAY where we were told by our county engineer quote(You can’t build in a Floodway) yet he signed off on our permit after our engineer got involved. Guess it’s an engineer to engineer thing ?
Our engineer specified 18″ diameter holes, I went 20″ shafts, belled out the bottom to 36″ diameter, so basically doubled his recommendation. Same cost to dig holes, a few dollars more for concrete. Total weight of concrete in foundation is right at 67,600 pounds.
Cost to date is approximately
$1400.00 Dig holes
$2300.00 Concrete
$ 500.00 Rebar
$ 600.00 Reclaimed 8″ fiberglass filtration pipe
$ 200.00 1/2″ steel plates to cap off top of fiberglass pipes & attach steel beams in next step
$ Priceless Sweat 1 bucket you pick the size.
GBA Detail Library
A collection of one thousand construction details organized by climate and house part


Replies
User 6976 etc,
What are you thinking of using for the roof deck? With a spacing of 48" you are probably looking at something like 2"x6" t&g. If so you can fasten the insulation and furring to that.
Why did you end up having to hand-batch you concrete? Is the site inaccessible? I'm also curious as to why you went with steel beams?
@ Malcolm
By the way my name is Mark
Location west side of Houston
Correct about not being able to get a truck in here, made an concrete hopper out of an old propane tank that worked pretty well, the sliding door could have been thicker but it worked to drop 1 load in each hole from the truck for the footers, then my helpers really messed me over by not dropping the rebar cages & upright bars close together in the bottom of the hole so they stood straight up, from that point it turned into a one man show to get the elevation as lever as possible, I used a transit, & water level & string lines to double check myself as I went from hole to hole.
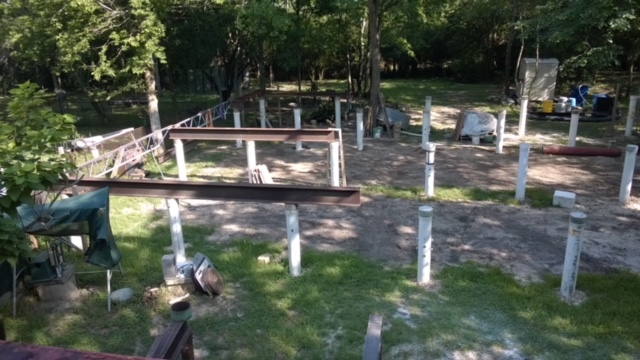
Steel beams, (CHEAP) well that's a long story but I go to some auctions and buy some of the stupidest things beams being one of the items, plus the company where my wife works had 15,000 pounds of steel they wanted off their property so I bought it all for $300.00 dollars, the blue bar joists came from the Dallas / Fort Worth area (craigslist) the white upright poles serve as my sonotubes (craigslist) these also set inside 12" diameter black plastic driveway culverts, I didn't know how long it would take me to get all the concrete in place so I went plastic instead of cardboard, & 8" inside diameter fiberglass instead of 4" metal poles, which should take care of any rusting issues.
Our GREAT engineer worked with us from a list of metal laying around and came up with a plan to
use what was on hand, he teases us when the storm comes he's coming to our house because it's
wayyyyyyy over built, his concern was how am I going to attach the metal to the fiberglass poles, I told him give me a few days and I'll come up with a plan. This is the next stage I am working on, I'll post some pictures of what I am doing shortly. as I keep up the search for more stuff.
Main concern with permitting was volume displacement of pilings from ground level up to about 18", FEMA, Waller County says I can not raise water level when it floods out here, and it does flood.
I thing you hit the nail on the head about the decking choice, that is exactly what I was thinking of, just wanted some opinions from the professionals view point. might just use flat lumber like the older houses were built with, buy rough cut lumber and run it through another (craigslist) buy, an older
25" Woodmaster planer to take off the roughness, maybe the Grace peel & stick will adhere better to
a smoother texture.
ALWAYS looking for something at the auctions, Craigslist, or just driving back country roads to reuse/ recycle, just found an old farmhouse double sink with drainboards on each side, need to be redone, wife agrees it needs work, as she rolls her eyes at me. I would rather find old junk and restore it then buying all this new crap made in china chit.
Mark,
It's a fascinating build. Great to see all the re-used materials - even if it did mean a back-breaking foundation pour.
When the supports (beams? joists?) are that far apart, typically the roof deck is either metal or 2"x material. Q decking works but leaves exposed screw-heads on the ceiling, which aren't much fun in a finished house. So probably 2"x is your best choice, unless someone can think of another alternative.
Good luck with your build!
Rough sawn 2x material can always be an economical choice, especially so if you have your own planer. Does the planer have a molding head? You really want to mold a tongue and groove detail to interlock the roof planks if you can. You probably don't have to go planer-smooth on the top side, but knocking off the fuzz like you say is a good idea.
Also, the wood should be cured to as low a moisture content as possible. Lots of rough-sawn is still pretty wet. Around 8%is best for interior use. If the wood is very wet, it will shrink and warp as it dries, and that might mess up your self-adhesive layer on top. You can buy simple pin-type moisture meters for less than $100, or, of course find a used one on Craig's list for less.
I'm not sure if there's been any follow-up, but there have been some comments posted here about possible odors associated with peel&stick asphalt exposed to the interior. Those potential issues would probably increase with T&G sheathing because of the increased seam area over sheet goods. If you plan to have finished ceilings on the interior, this risk would be decreased, but not eliminated. You could also choose to install one of your ERV exhaust air vents in the attic.