Pick this outie window detail idea apart
stephen_murdoch
| Posted in Green Building Techniques on
We’re planning a build with 3″ of Comfortboard to the exterior. of the sheathing. The great debate of how to detail the windows has reared its ugly head. Innie? Outie? where’s the WRB? I’m in Canada (ZONE 6), so there’s also the default assumption of 6mil poly.
Windows have already been ordered and will have nailing fins.
I’ve read all the posts on here regarding innie/outie, where should the WRB go, etc., but it’s a lot to ingest – this prelim detail was a suggestions from the architect for how to solve the problem.
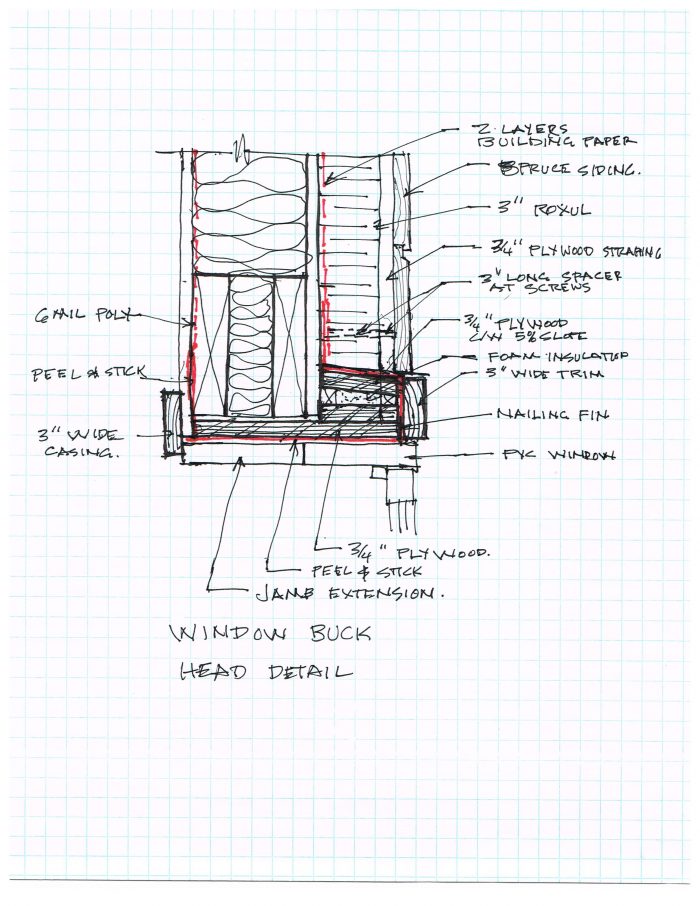
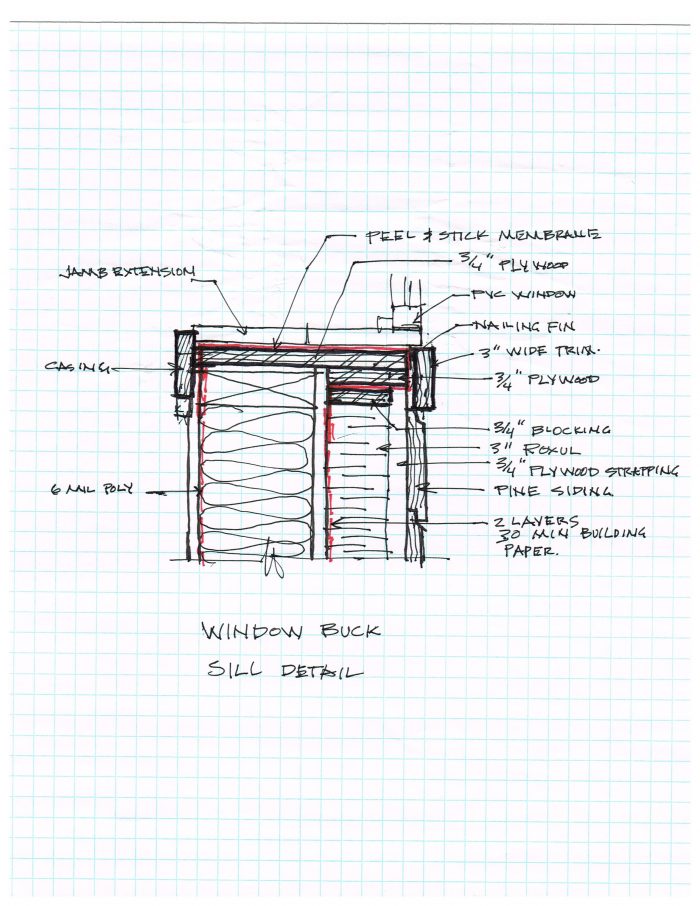
Hoping to get some feedback on a proposed window buck for outie windows. Tell me what you think.
GBA Detail Library
A collection of one thousand construction details organized by climate and house part
Search and download construction details


Replies
Stephen - A few thoughts:
At the Head
- It's a bit unclear what's happening above the plywood buck. There should be a metal flashing that extends from the WRB out to the top of the head-trim. It should be sloped and have a drip-edge, and end-dams.
- Sloping the plywood isn't necessary if the head-flashing is sloped - and I couldn't build that detail. I don't know to assemble or fasten the two layers of plywood and tiny shims. I'd be inclined instead to surround the plywood buck with a cut down 2"x4" as backing, which you could slope at the head if you thought it necessary.
- What are the "spacers" called out at each screw?
At the Sill
- The sill under the window frame needs to be sloped so that the membrane acts as a sill-pan, and detailed so it can drain moisture into the rain-screen cavity.
- What's the 3/4" plywood blocking over the Roxul for?
@Malcolm Taylor - Thanks for having a look. I really appreciate how everyone is willing to share their knowledge on here.
Head:
- Metal flashing: I asked the architect about this, they questioned the need. I'll insist.
- Slope: Is the slope overkill, since bulk water at this location is highly unlikely?
- Spacers: The architect is skeptical of Comfortboard's ability to maintain shape without compressing under the strapping. I don't share the same skepticism and will happily install without the spacers.
Sill:
- Slope/sill-pan: I also brought this up, and will insist that we install with a slope under the P&S. I'm assuming that the reason behind this is due to the eventuality that the window itself WILL leak and allow bulk water to end up on the wrong side of the nailing fin? If that's the case, would it not be prudent to leave some means for water to escape between the bottom nailing fin and the P&S?
- Re: The bottom blocking: Again, that's in place due to architect's skepticism of Comfortboard's ability to maintain shape without compressing under the strapping. I don't share the same skepticism and will happily install without the blocking.
Stephen,
I think Malcolm gave you good advice. The two concerns I would have with this install are the lack of metal flashing above the window and a sloped sill or backdam below.
The metal head flashing above the window should extend beyond the head trim, getting water completely out of the assembly. I like the slope created with plywood blocking in this assembly, but right now your peel-and-stick lets water stay behind the head trim.
Below the window, it makes no sense to leave the bottom flange un-taped without a sloped sill or at least a back dam. The idea is for water to be able to get out at the bottom of the window, not to let it in.
I think the spacers are an interesting idea. Regardless of how different types of foam does or doesn't compress on different jobs, the plywood strapping always need to be adjusted and shimmed to create an even plane for siding. I wonder if the spacers, cut to exact lengths, will either eliminate the need for, or at least reduce the amount of work it takes to do that. Please report back on how that goes.
Stephen,
There no p0int in providing a rain-screen if you aren't going to direct the water to the exterior. As Brian said, letting it follow the membrane behind the window-head is a bad idea.
I asked about the spacers because I've never heard of them, and can't figure out how you would install them. Once one screw and spacer was installed on a piece of furring, how would you get the rest in?
I'm not sure where you are building, but I'd check your code to see whether both the head-flashing and sloped-sill are even something you have a choice of installing. They aren't optional here in coastal B.C.
Good luck with your project!
@Malcolm Taylor:
If you read my response to your post carefully, you'll notice that I'm in agreement with the addition of both these details. (Head flashing and sloped sill)
Stephen,
Sorry - yes I realized we were on the same page. It was more of a response for your architect. Hopefully they will re-think how they detail these important areas. You shouldn't have to be pointing out good practices to them.
With regards to the comfort board my experience was that it was compressed by the strapping when screwed in to hold it in place. Like most I ended up using Heco Topix screws which worked well. http://www.smallplanetsupply.us/heco-topix-therm-insulation-screw-4-7-to-17-75-inches/ . The thread at head helps prevent the compression of the strapping.
The spacers sound like a pain to use vs. just screwing the strapping in.
I'd like to hear more about the Heco Topix screws and Comfortboard installation. Is this recommended above a HeadLok screw? The problem for me so far is that their selection of screw lengths are either too long or too short.
If CB80 strapping compression is a problem with typical fasteners, could the stiffer Comfortboard 110 be another solution, at least in certain areas of the assembly where greater compressive strength is required? I realize there is a separate GBA thread on this, but this issue is related to this post and use of spacers.
Richard, I can only speak to my experience fastening Comfort board IS DIY. I used headlok screws to install the comfort board using 1x4 strapping on one wall, and had a difficult time ensuring the strapping stayed in one plane. For the second wall I used the heco topix screws and found that they where much less likely to cause problems. Using a level or setting up string lines, I'm sure you can get the headlok screws to work, but it will take longer. I agree with Akos about the value of the Comfort board, for the total R value I am looking at, it's not worth the cost and effort vs using the roxul comfort batts. For the rest of my house I will be site making Larsen trusses and using Roxul comfort batts.
I'm also building a similar assembly (3" Comfortboard), and went back and forth on innie vs. outie windows, but decided to go with innies due to several reasons, including simpler integration of window flashing with WRB. If you are doing it yourself or are really on top of the window installers, this integration may be possible to get right, but my experience talking with several window companies is that this type of installation is not routine and therefore could be done incorrectly despite the best plans. Also, I was not comfortable with the cantilevered position of the outie windows, particularly for very large windows, although I've not seen any negative comments on that structural aspect. The flip side is that it requires custom work on brickmould and exterior trim details, as the availability of pre-fabricated products is practically zero in my area. But all window companies seemed to have plenty of experience dealing with bending aluminum to trim out windows, as opposed to complex flashing details of non-mainstream-type installations.
@Richard Stern
Care to share details of your innie window with 3" comfortboard?
Stephen,
I'm a big fan of outie windows, the deeper window sills look much more substantial and a great spot for plants.
For sloped pieces, the easiest is to get a piece of cedar bevel siding and nail it over your window bucks.
Unless you are in a wild fire area, the exterior rigid mineral wool just costs a lot in materials and labour. Getting the strapping flat with it is a lot of work as the rigid wool is still somewhat flexbible and more important unevenly so (some panels will have softer spots on them, so you pretty much end up having to tweak every screw).
3" of CB has the same amount of mineral wool as 12" of batts, so you are paying for R48 of materials but getting only R12 of insulation.
Going for 3" of polyiso would simplify install and WRB. You can run the WRB over the foam and treat is a "standard" nail flange over sheathing type setup. It would also bump up your exterior insulation to around R18.
If you really want mineral wool, it would be much simpler to cross strap your walls with 2x3 on edge over 1/2" spacers and use either 3" AFB or 3" Safe and sound. This would be only slightly less R value than your setup but much cheaper in materials and labour. With this setup you can also go with 24" OC on your studs but strap out your rain screen to 12" or 16" OC for your siding install.
Akos,
Given all the information available at GBA and links on the pros and cons of mineral wool and rigid foam insulation, I really don’t think you should be advising this person against using mineral wool in preference to rigid foam. There are many factors that can go into such a decision, especially climate and the type of construction project, i.e., new vs. retrofit. For example, if you are retrofitting an old house which is already fairly leaky but which has been happy drying to the outside for decades, installing impermeable rigid foam requires additional considerations, and possibly expense and time, about the appropriate ways to avoid potential problems with the dew point. Mineral wool does not require such considerations, and in that regard is an overall simpler solution.
Your statement that one should only consider mineral wool if you live in a fire zone is ridiculous. If my neighbor’s house that is 12 feet away (typical of inner urban settings) is on fire for whatever reason, I would be thankful to have Roxul as the exterior insulation, so this is not just an issue for fire-prone rural sites.
And I need not tell GBA readers that those lofty R values in rigid foam are not the long-term aged values, which all end up being essentially the same (ca. R4/in) once the blowing agents diffuse out and are replaced by air, so can we please not overplay the differences in R values between these products.
Furthermore, you offer a ‘much simpler’ solution to install mineral wool , firstly using the less-dense forms of it, and secondly employing strapping as spacers. Surely if this was a viable and tested solution to exterior insulation I would have read about it, and Roxul would include it in their installation documents. I have to believe that we are not in the business at GBA of tossing out half-baked ideas with no evidence of their effectiveness for something so important as exterior installation methods. Who would possibly act on such advice even if it were a ‘great’ idea? Most home owners are not in the business of experimenting with something as big as this, the costs are too large to try something offered ad hoc on a blog. If you are going to offer advice, either present your credentials as a building engineering expert who has worked on this problem, or point to the scientific and technical background information, or prove it through your own real-world experience with this problem.
Richard,
I give the advice based on my personal experience and knowledge. I've installed rigid mineral wool and it was not cheap or easy.
I've done the cross strapping (was with notched (for drianage) 2x4s but some idea) for an over roof with batts, no problems.
Living in a city, my neighbor is 1.5' away from me. I have 2.5" of rigid polyiso on my home over the proper fire rated assembly and cladding. One can always make a house more fire resistant but at a cost for minor improvements. Experience has shown that rigid foam in residential construction is a small risk. This is unlike asphalt shingles, which are a real fire risk, yet people still install them.
Akos,
Regardless of your experience and knowledge, I didn't ask whether Comfortboard was the right solution. I asked for feedback on a proposed outie window detail using Comfortboard.
But thank you for your feedback regarding the addition of cedar bevel siding at the sill.
PS - if you read the original post, you'd notice that I said 6mil poly as vapour barrier is a given - which in my opinion rules out the use of Polyiso, since you'd have a wood framed wall sandwiched between two impermeable layers. The fact that there are lots of buildings here constructed that way does not make it a good idea.
Good point. I normally try to stick to the question asked, my goal was trying to help to simplify the design, lot of times we tend to over-engineer solutions, I'm definitely guilty of that.
P.S. The OBC does not require 6 mil poly, the vapour barrier can also be the warm side of the exterior insulation provided you have the right ratio (section 9.25.5.2 has a table to follow),
If you have concerns about 3" of Comfortboard compressing (and perhaps causing wavy siding?) why not use Cascadia clips?
https://www.cascadiawindows.com/products/cascadia-clip
These were designed to keep the siding level and are recommended by Roxul for Comfortboard that has a thickness of 3" or over.
Scott,
If you end up using them on you cabin please come back and relay your experience with them. It's an interesting idea.
One thing to keep in mind with Cascadia Clips and other spacers is that they carry a thermal bridging penalty. This paper [1] (and slide presentation [2]) modeled various assemblies to measure the impact. Many variations were modeled, but to take one representative scenario there was a 15% thermal degradation penalty for fiberglass clips compared to 4% for stainless steel screws (i.e. using furring strips).
[1] https://www.cascadiawindows.com/database/files/product_documents/NAPHC_2014___Thermal_Bridging_Through_Exterior_Insulation___Higgins_Shane_Finch_.pdf
[2] https://www.phius.org/NAPHC2014/shane-colin-Thermal-Bridging-Through-Exterior-Insulation.pdf
I can't seem to reply to Akos' comment directly, so I'll do so here.
Unless I'm reading the OBC incorrectly, it's interesting to note the differences between it and the IRC.
Take Toronto (City Hall) for example. See attached PDF and screen cap.
Assumption: SB-1's "Degree Days Below 18°C" column#6 is the same as Table 9.25.5.2. "Heating Degree Days of Building Location" column#1.
Toronto (City Hall) has 3520 heating days from the chart. That would place it as "up to 4999" per the Table. So 0.20 ratio of outer insulation to inner insulation.
Gross simplification:
2x6 wall w/ 1" XPS meets that (ie. R Total = R19 wall w/ R5 of that externally). It seems they don't derate XPS, but use a whole wall value "internally" behind the XPS.
https://www.greenbuildingadvisor.com/article/calculating-the-minimum-thickness-of-rigid-foam-sheathing
Zone 5 (rough equivalent) has a similar required external R value (7.5), but has the percentage of external at 27%. Ie. whole wall w/ R19 and R7.5 externally.
Canada, traditionally thought of as colder and (perhaps) "greener," has a less robust requirement on external insulation.
Unless I'm missing something? SB-12 also attached for reference.
Sheathing moisture to me falls into the same category as roof venting. The targets are always very squishy. You can get assemblies to work provided you can just have a decent warm side air barrier with some drying capacity.
The higher insulation ratio buys you more margin, allows for mistakes in the build which will inevitably happen. Nothing wrong with targeting more robust assemblies.
"Nothing wrong with targeting more robust assemblies."
Exactly. I get bit worried by the number go high performance assemblies the appear to assume that their component parts will remain unchanged and functional over time. Very few of the buildings I renovate, including those built quite recently, are in that state. A bit of redundancy and ability to still work when holes get poked or parts altered is surely a good thing to think about when designing assemblies.
I wonder whether attaching a fiberglass siding clip (such as the Cascadia clip) would really cause that much of a thermal bridge in your exterior wall but if it worries you then perhaps you could put a 1/2" thick piece of poly-iso rigid insulation between the clip and the sheathing? Just a little piece the size of the clip and then screw through it into the wall?
You could use the 2 1//2" Cascadia clip and add the 1/2" poly-iso piece to make it work for the 3" thick Roxul comfortboard. That would then decrease your thermal bridging area down to just the screw shaft.
1) I don't see that as part of their approved assembly instructions.
2) How much time have you got? On an average sized house, a conventional rain-screen using strapping takes me about a day to install single-handed. It would take y0u a day just to cut up the foam squares. Those clips are very labour intensive to start with.