Please Check My Plumbing Work
TronPlayer
| Posted in General Questions on
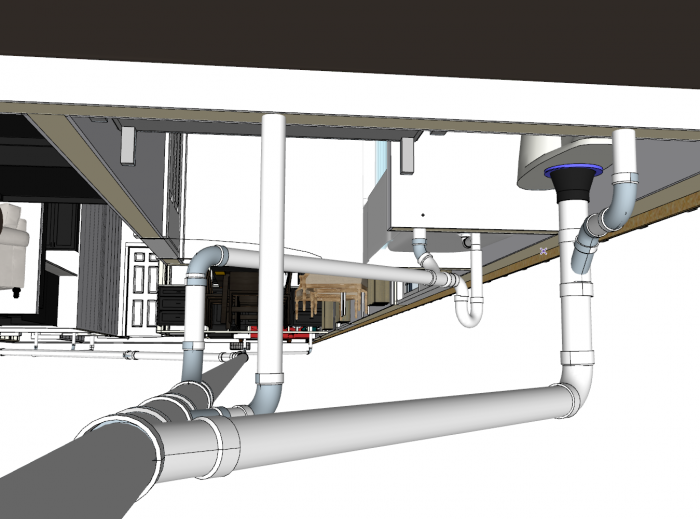
I would like some input on the plumbing design for my tub, toilet & sink before it’s finalized. The vents, Tub and sink drains are 2″, the toilet is 3″, and they feed into the 4″ main. Any tips and suggestions are welcome. The three attached photos are of the same bathroom at different angles.
Thanks!
EDIT: The plumbing will be under a slab.
GBA Detail Library
A collection of one thousand construction details organized by climate and house part
Search and download construction details


Replies
Can you draw in the floor framing too? Normally the biggest issue with running drain pipes is navigating the framing in the floor.
Hi, it will be under a slab.
Clean-outs become very important when the plumbing is encased in concrete. Ensure there are clean-outs at the bottom of SOW stacks and directly outside the foundation. Ensure the drywall installer does not bury them in the wall.
No opportunity to cut into a pipe in the crawl space if something clogs up.
You show a sanitary tee where the drain from the tub drops into the 4" main. That should be a wye and a 45* fitting, not a sanitary tee. The sanitary tee in the drain line near the tub should really be a wye too, although I think there is an exception if that branch is only a vent line. The general rule is that you use sanitary tees when directing flow from a horizontal line into a vertical line, and you use a wye when directing flow from a vertical line into a horizontal line. Sanitary tees are supposed to be installed vertically too, so that flow from the "curvy part" drops into the vertical part.
When you install the system, try to rotate the fittings so that the horizontal branches off of that main are slightly pitched downwards towards the main. Usually you can rotate the fittings enough to get a little bit of pitch, which is much better than having a truly flat, horizontal, pipe run.
I agree with the comment to place a cleanout somewhere. Think about where you will be able to get a snake into the line if there is a clog some day.
Bill
Deleted
I was looking at the venting as well and depending on what is upstream I was thinking this could be circuit vented with the vents eliminated for the lavatory and shower? I would think the lavatory at least could be eliminated since the water closet and shower are vented regardless of what is upstream.
Thanks.
Josh
TronPlayer,
Please use a 4" for the toilet. The few dollars you will save on a 3" vs a 4" will pay for itself if you need a drain cleaning specialist one time or if you have to snake it out yourself. 3" does meet code but it is probably not worth it.
What is going on upstream of this bathroom group? Is this an addition or something?
plumb_bob makes a good point. You'll want to make sure you've got all the required cleanouts. I don't see any that were missed but I don't see all the piping upstream.
I don't see any issues with the selection of fittings, the locations of vents, drains, traps, etc.
Great modeling of the plumbing btw!
Best of luck,
Josh
A couple of thoughts:
There is a limit on how far below the strainer a trap can be, the trap for the shower looks like it might be too far. More usual would be to have the trap up against the floor, the horizontal arm from the trap runs into a vertical tee at the vent, and below that is a sweep elbow. You'll appreciate this when it's time to install the shower. Concrete work isn't super-precise, so normally what you'll do with a shower is build a box out of 2x6's in the approximate location of the drain and stub out the horizontal arm into that box. Once the shower is built and you know the height of the floor and the location of the walls you can place the trap. It's easier to do this if the trap is up at the surface rather than down in a deep hole.
The other tip I have is you really want to reduce the number of fittings that are under the slab and penetrations through the slab as much as you can. One way is to reduce the number of vents. There's no reason why all three fixtures couldn't share one vent. Usually the only reason not to share a vent is the distance, the trap has to be within 48 pipe diameters of the vent. So for 1-1/2" pipe it's 72", 2" is 96" and 3" is 144". So see if there is a spot where you can place your vent that is within that distance of all fixtures, then run your drains under the slab to that spot and then together to the sewer. It's perfectly acceptable to increase your pipe diameter to increase the allowable distance to a vent.
In some circumstances it's OK to use a section of pipe that drains one fixture as a vent for another. This is called "wet venting." Google it.
Great! Thank you, here is an updated photo that should reflect your changes, Bill. How does it look now?
This will work, but I'd echo DC's thoughts that you can simplify things. Where I am, "wet venting" allows a single vent for a bathroom group. As long as your horizontal distances are OK, I'd tee the tub and sink drains into the 4" vertical line below the toilet. The sink vent serves as vent for the whole group, and you'd only have a single 4" tee into the main line.
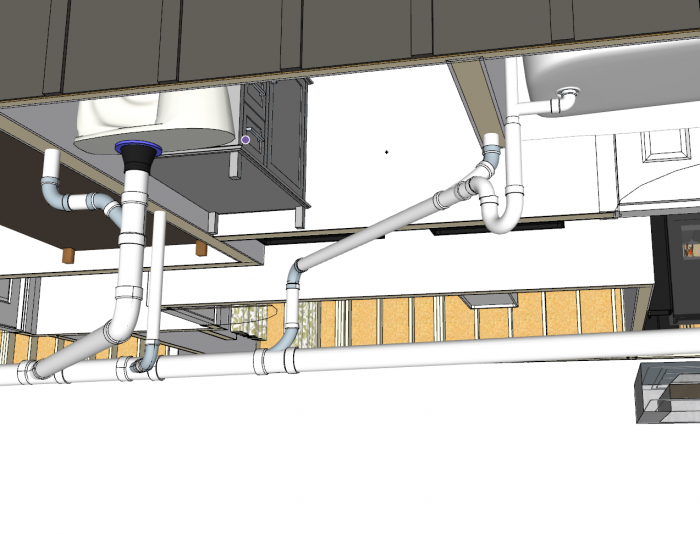
Ok, I'll look into combining those vents on that bathroom. I'm also plumbing in a linear drain for a walk in shower, toilet and sink in a different bathroom. I've attached 2 angles. Does it look satisfactory to you?
Is there any way you can export an image of the entire system only showing the plumbing and plumbing fixtures (no walls, furniture, etc), including the vent piping (Riser Diagram / Isometric Drawing). This might give everyone a better idea of the complete picture to allow for the most efficient design/installation.
Combining the drains into one riser and having one vent for the three fixtures sounds like a good idea to reduce the number of fittings under the slab and vents above the ceiling.
Another note is that the fewer penetrations you can have in the roof the better so combining any vents or reducing the quantity is a good idea to reduce locations for possible leaks in the roof.
Ok, here it is. The first image shows the entire system and the others show each section. I have to stay away from exterior walls. The wife wants a kitchen sink with a window so I plan on using an AAV and running the pex lines through an adjacent wall, under the cabinets. The house is long and narrow, so the 4" main (a little less than 100' long) has a cleanout at both ends, on the exterior of the home. I plan on having the pipes connected in the attic and exiting the roof with 2, 4" stacks. I worked in construction for a few years and a plumber I knew never used wet vents. He said there are issues with clogs and they were noisier. I had planned not to use them, but am not completely against it. Any help and suggestions I would greatly appreciate.
Wet vents are not noisy, not even a little. They do not clog, not even a little (your old plumber friend also encouraged you to use cast iron and molten lead, maybe?) Go with 1.5" vents and vanity drains; no reason to upsize past code. On the other hand, 2" drain for the kitchen sink is a defensible upsize, IMO. Your drawings show all your drains hitting the main line on an angle to match the wyes--you'd use far less pipe if you head over perpendicularly and then use the wye/45 combo.
There was a time that PVC pipe and fittings were cheap, but that time is gone. A single 4x4x2 tee is over $20, 4" pipe can be $8/ft. But reducing the plastic is about more than saving money and using less petrochemicals. It's "workmanlike" to have a clean, simple layout.
Yeah, I didn't catch that but I was taught that the workmanlike thing to do is to have the pipes run parallel or perpendicular to the framing wherever possible.
I see some more sanitary tees used where you should be using wyes. Remember that the general rule is that you use a sanitary tee where a horizontal run is dropping water into a vertical run, and you use a wye where a vertical run is dropping water into a horizontal run. The other general rule is that sanitary tees should only ever be installed vertically, so that the "curvy part" of the branch line sweeps and points downward.
Aside from that, I think you could probably combine a few of those runs and use less material. The comment about not bringing everything in at an angle is a good one too. I do see one big potential materials savings though: can you bring the MAIN HORIZONTAL RUN over closer to the side where most of the connections are? That would shorten the branch runs for all of the bathroom stuff, with the tradeoff of lengthening the kitchen sink. My guess is that you'd save material that way overall, especially if you also "straighten out" the runs and don't come in at an angle for everything.
As has been mentioned, PVC is not nearly as cheap as it once was, unfortunately.
Bill
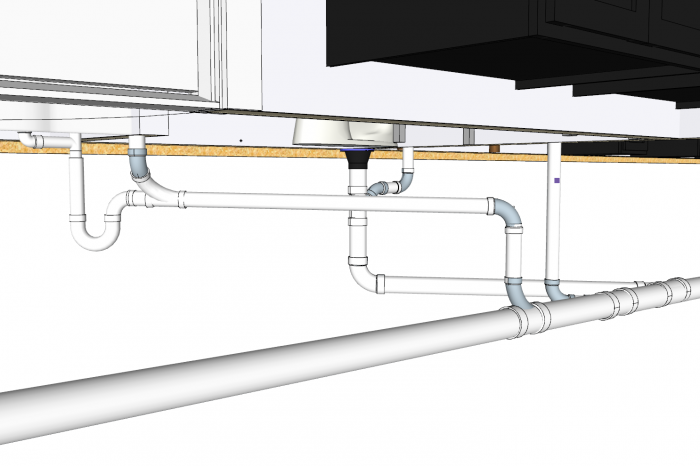
Bill, in the photos in the message you replied to I believe I already took care of the sanitary tee problem and replaced them with wye + (let me know if I am mistaken). I've attached two photos of the complete system with and without walls. It doesn't seem to me moving the horizontal main run would see much benefit. I could shorten the kitchen run by hitting the main at a 90. On the others, it looks like I would save about 20 feet of pipe if I used straight runs, and some digging, but I like hitting the main at 45 and the 20' savings doesn't seem worth it (except the kitchen run). What do you think?
You could try bringing that main branch run that goes off to the bathroom further to the right in your first pic, chaning it to be more direct, less angled. This would mean using a wye and 45* fitting to bring the branch off at more of a right angle, bringing it right under more of the bathroom fixtures. That would cut down on a lot of your runs, but you'd have that sharper bend. Admittedly, the perspective views do sometimes make it difficult to get a good idea of what the tradeoffs are between different run positions.
Regarding sanitary tees, you shouldn't have them installed on any horizontal main runs is all. I think I still saw a few in one of your larger diagrams that showed a larger part of your system.
Bill
TronPlayer,
Those are some really nice drawings. You've obviously done your homework.
I would not use any drain under the slab that is less than a 2" pipe. I would recommend 4" for the water closets and not 3". Just good general practice although code does allow smaller.
I think you can circuit vent up to 10 fixtures so you might consider reducing the quantity of vents to just 3 and using a circuit vent, leaving the vent at the washer, linear shower drain, and water closet near the discharge.
It looks like there is no way to clean out the branch from the washing machine so you might consider adding a wall cleanout or floor cleanout for that branch.
You could possibly eliminate the cleanout at the end of the run and add a cleanout in your vent to the linear shower drain line.
For a system this size (1) 3" vent is likely sufficient.
I'll try to take another look here in a bit when I have a minute. I'd be interested to hear the plumbers opinions of some of these options since I mostly work in design and sometimes installation and design don't quite line up.
Cheers.
Josh
Josh, Thank you so much for you input. All the drains under the slab are 2" and I changed the water closets to 4" as you suggested.
I had planned to individually vent all fixtures, connect them in the attic - connected to a 4" vent stack. I'll probably wet vent the middle bathroom. Is this acceptable?
I will definitely add a wall cleanout behind the washing machine. Are there any other cleanouts that would be needed? I would add a cleanout at the linear shower vent but it will be tiled on that wall.
I've been working on this for a while and when getting advice, or take a different direction, it gets slammed by one side or another. I'm fairly happy with this general design unless you think it's way off base. It seems logical to me but what do I know. Thanks for your input.
TronPlayer,
Everything you have drawn appears to be correct. The venting appears correct and it doesn't hurt to have too much venting but if you don't have enough then you'll have problems, lol. You have enough venting.
If you don't have a cleanout at the linear shower drain that is not an issue. It could be a benefit but will be fine without it.
Your design is good. You've done your homework and of course there are always slightly better ways to do many things but I wouldn't worry too much.
I've been thinking about what you said about getting rid of the first exterior cleanout by the linear shower drain. In the attached photo, could I do that by adding a 2" wall cleanout to the vent behind the fridge on the other side of the wall?
I didn't realize that was for a fridge. Yes. That is one location you could add a cleanout if you wanted to eliminate the end of line cleanout. Depending on the code in your area the end of line cleanout may be required so you might double check that before removing it. Extra cleanouts never hurt. Also, often a p-trap that can be disassembled can act as a cleanout location as well, like under a kitchen sink. How will you connect to the fridge? I didn't think most fridges had drain lines.
That vent is for the linear drain, its on the opposite wall as the fridge. The book said a 4" drain pipe requires 1x 4" cleanout if the run is less than 100'. Since it's close to 100' I'll probably go ahead with adding both exterior cleanouts at each end. Thank you for your help!!
I suggest you take a look at other similar projects and see how they are done. This can give you an idea of what works and what doesn't.
Also, if you need some professional help, you can check out https://maplumbingandheating.com/ . They have experienced professionals who can help you with your project.
As for your specific question, adding a 2"" wall cleanout to the vent behind the fridge could be a possible solution. However, it's always best to consult with a professional plumber to ensure that the solution you choose is safe and meets local plumbing codes.
Hi! I'm a new member here and learning a lot from everyone.
I know I'm late to the party, but can you share what software you used to create those diagrams?