Hi,
I am going back and forth whether to do a rainscreen or not. I have a frame house built in 1987 on the beach in Clearwater, FL (zone 2). So we get 40” of rain a year and I have had water intrusion issues due to poor installation of the previous replacement windows. I also have high humidity levels in the house (mid 60s is common at 74 degrees). We tried removing the trim boards around them and resealing them and given I have 45 windows in the house, we got most of them, but not all. Part of the difficulty was in removing the trim boards around the windows, it damaged the old tar paper. We tried to lap it properly and seal, but again, we were not 100% effective. It is hard to maintain the house in the sense it is an elevated house 10’ that has two stories above it that are 10’ each. So the soffit is at 30’. I would hope we could address the humidity issue while doing this, but I am guessing at the source of it.
So my plan is to strip the cedar siding and tar paper. Seal and tape all the plywood seams to try to address some of the inward vapor that may be contributing to the humidity issue. Then use a peal and stick Vycor 15 perm WRB. Then seal that properly.
I am a little concerned about the rain screen as I can’t find any siding company that does rainscreens around here (Tampa/Clearwater) and I am wondering why? Is there something I am missing in a hurricane zone? If anyone knows a contractor that does them in the area, please let me know their info.
Anyway, I was considering using plywood strapping. I have read on some sites to use non-treated and then others to use treated. So which is right as I don’t want it to damage the WRB like soap or unprimed cedar can do (we will be priming all 6 sides of the cedar channel siding).
Next is the thickness of the strapping. I have seen where 3/8” to ¾” is suggested. FEMA suggests ¾” as we are directly on the Gulf of Mexico in a high wind zone. That said, I am sure if you are familiar with PE John Straube as he has some of the testing for Dorken, but here is his take on it for my area below. But I would like to maybe hear from someone who has done it in hurricane zones. But I obviously respect his knowledge, just a little concerned it conflicts with FEMA’s as I don’t want my siding ripping off in a hurricane more easily than it would fully against the house.
“Gap. The gap size is driven by the desire to allow unrestricted drainage and good airflow for DRYING of the cladding from the backside. A small gap actually improves pressure equalization response, as it means less air needs to move and so can move more quickly. I think 3/8” is a fine choice, and solves some problems for you (deeper embedment into the wood framing as discussed above). 3/4” is a common choice because it is the size of nominal 1” boards. 3/4” also allows for sufficient nail withdrawal in NON-HURRICANE regions, that the siding nails dont have to go through to the framing. In your case, nails will go to framing, and so no real benefit to thicker gap, in fact there is a dis benefit.
I dont know if you chose to using Cor-Vent for furring material… it is OK as a choice. I would also consider 3/8” pressure treated plywood cut into 2.5” wide strips.”
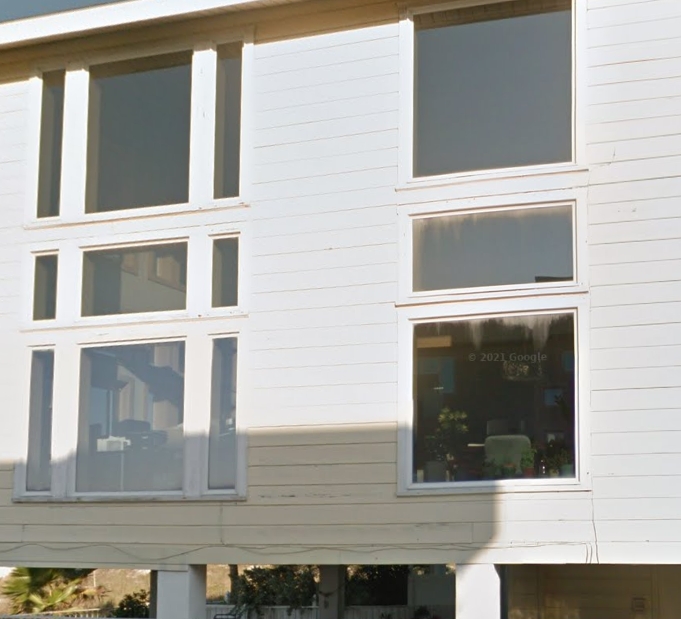
So we are looking following roughly a AAMA flashing detail for the windows and incorporate a drip cap. The one challenge I have to a certain extent is if you look at the attached picture, I have triple stacked windows, so the space between them with air gaps might be a little tricky. Any suggestions from experience on gotchas in a detail like this?
I am thinking if I go with 3/8 strapping and adhere the 3/4″ cedar channel over that, we may go with custom 1.25” or 1.5” window trim installed direct to the substrate (one way I saw a widow detail) and terminate the cedar into the side of it. Another way I saw a window detail was to use the same 3/8” strapping and then use 5/4” trim boards over top of that and still terminate the channel siding into it. Pros? Cons? I think the first way makes more sense, but I could be missing something.
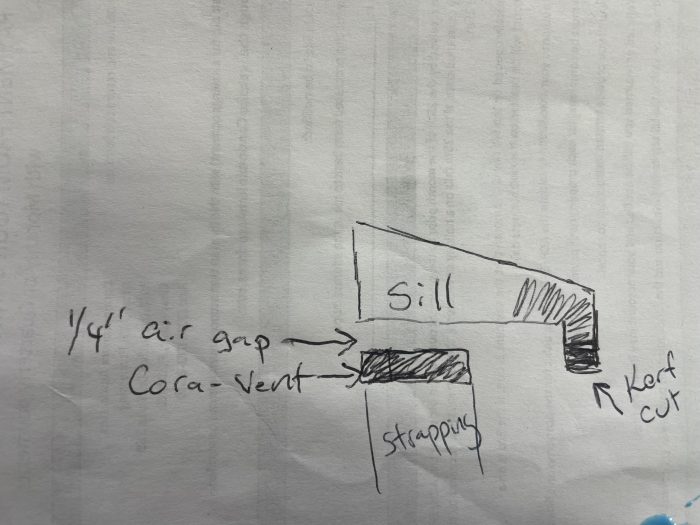
Also to prevent any wind driven rain into the 40+ air gaps below the windows, I am thinking about doing a sill that will cover the air gap as best as possible as shown in the attachment. Any suggestions are welcomed.
That said, I still am not 100% sure how I try to minimize the wind driven rain going into the air gap over the window. I would assume it will hit the head flashing and in wind driven conditions be pushed to the right or left of the head flashing and then it will fall down the wall cavity behind the siding. I am just trying to figure out how to minimize any rain intrusion.
Since the house is elevated, do you suggest some sort of flashing at the bottom of the wall assembly where the Cor-a-Vent may be to kick water away from rolling back?
Any other suggestions are welcomed as I am concerned with the number of windows if the window detail is not solid, we could have a pretty major issues which is making me lean toward an installation with no rain screen.
Thanks,
Bob


Replies
Bob,
Let me take a stab at a few of those:
- A rain-screen is always worthwhile in marine environments. That's probably also true of every climate I can think of with perhaps the exception of hot, dry ones.
- Untreated plywood battens are fine. At worst they will deteriorate at the same pace as the cladding they support, and will need replacing at the same time.
- I don't know enough to comment on the difference of furring thicknesses in hurricane zones. The one weakness of shallow cavities is that the tar paper or house-wrap can wrinkle and bridge the gap, defeating the capillary break, and impeding air-flow. If you are using a peel & stick WRB those won't be concerns.
- I would eliminate the top venting of the cavities - or at the least those under (or between) all the windows. A cavity that is vented only at the bottom has almost all the beneficial attributes that a rain-screen provides. The lack of a good air-path is more than offset by eliminating much of the risk of bulk water intrusion through this vent in windy conditions. To compensate, keep your battens down a bit at the sill to allow some horizontal air movement.
- At the window head keep the trim up 1/8" to allow any water to drain. Provide end dams on the flashing to stop it moving horizontally into the cavity. Here is a link to forming end dams: https://hammerandhand.com/best-practices/manual/1-flashing/1-2-head-flashing/
- I would install an L flashing with a hemmed drip-edge at the base of the walls, with a 3/8" gap between it and the cladding above, to deflect both wind and rain.
Malcolm,
Thanks for the reply! A few questions on your comments...
I should have mentioned, I am looking to use the Vycor Env-S WRB so it is a self adhered, 15 perm product.
If I eliminate the top vent between the windows, my concern is if we get hurricane winds, could that cause a balloon effect and be detrimental to the siding staying on if the wind gets stuck there as it would have no where to go? Or am I overthinking that? When it is "normal" outside, I can see how that suggestion would work just fine.
Thanks for the suggestion on the head jambs. For some reason I had a brain freeze and I was not thinking about going over the entire top trim board and that should stop the lateral movement.
Thanks again!
Bob
Bob,
- With the self-adhered WRB 3/8" seems an appropriate gap.
I should say again I don't know much about high winds, but I'd be very surprised if the lack of a vent at the top of the cavity had much affect of the pressure behind the wall. To me it's not like air-movement in usual conditions, which will typically be entering at the bottom, and exiting at the top. In high winds both top and bottom vents on the windward building face would be introducing pressure to the cavity, and both would be reducing it on the leeward side. I don't see much reason it would enter one, while exiting the other.
Malcom,
Thanks for the reply!
That is helpful. I will be asking one other question in regards to the need for taping/sealing plywood seams if we are using a self adhesive WRB. But I am going to open another thread with an appropriate subject line. I hope you will provide your input.
Thanks,
Bob
Bob,
I wouldn't say there is consensus. My feeling is a well detailed primary air-barrier is enough, but many here on GBA argue a secondary one provides useful redundancy.
Bob,
The hesitation on John Straube's recommendation on 3/4" furring strips in hurricane areas is a good one, or there should at least be some recommendation for deformed shank nails instead of smooth shank nails. It's not so much that high winds suck the siding off, but peel it off once the first link in the chain fails.
This report (https://icc-es.org/report-listing/esr-2290/) shows the testing for James Hardi plank with several different attachment methods. If you look at pages 13-17, they have roofing nails that are 1 1/8" long blind nailed (a common installation method) in wood frame construction at 16" OC, and it shows the maximum wind speed for the three different exposure categories. for four different building heights.
As a preview, the way you would read this is as follows.
Look for the product on the left, and then the thickness, and then the width, then the fastener type, attachment method, construction type, and stud spacing. The immediate four rows of data following are for four different elevation heights, and each row after is organized by two different code standards. the first three are exposure categories B,C,D for the 2012 IRC, and the second set of three are for the 2021 IRC.
The way you should read this is "Given this product, attached by this method, into this construction type, and my building height, I can withstand X wind speed in each exposure category".
The screenshot below shows a quick example. The fact that 1 1/8" - 5/16" is nearly 3/4" shows that it's possible, but I'd still use ring shank nails. You can get stainless steel coiled ring shank roofing nails in 1 1/4". It makes the installation pretty quick. I've used them in a roofing nailer to make quick work of fiber cement siding before. Removing a nail was practically impossible without a lot of work.
If you need stronger attachment for your code, it has alternatives, like face nailing through the overlap, screws, etc.. It's a good report.
Kyle,
Thanks for the reply. I will share a little more that Mr. Straube was kind enough to share with me regarding what you highlighted. I did not include it above as I did not want to make it a novel. I did not have a chance yet to review what you sent and I will do it after this. But does this kind of line up with your experience and what you were refer above. But here goes....
Pressure equalized rain screens are one type, drained and ventilated are another. Your real issue is to avoid having siding wrapped off in the passing hurricanes. Practical experience with failures and the latest serious research (a couple of PhD studies in the last 5 years) tell us NOT to rely on pressure equalization for load reduction. There is some load reduction on the screen (siding) but it is modest and hard to get reliably.
Strong recommendation #1, design the siding to take the full wind load as per ASCE7. Your PEs will know that loading.
That means the nail fastenings need to be well embedded into wood to prevent nail head pull over and, in your case, that the siding is able to resist pulling the nail head through the wood. For 135 MPH zones, that is not always easy. I have designed fibre cement systems for New Orleans in the 140 MPH zone, and James Hardie has test data to support the nail head pull over and could work easily with one nail every 6” vertically (5” exposure) and 16” horizontally. A bigger issue was getting good nail embedment. 3/4” furring strips may not be thick enough. In my case, we needed to use 3/4” plywood strips (better nail withdrawal) because the furring was installed over exterior insulation and hence the nails only got purchase in the furring.
In your case, I assume you will install furring over the studs directly as per your issue #2.. This means that the nails will go through the siding, through the furring, through the 1/2” sheathing and into the studs. Specify minimum 2” long nails, or even 2.5” and you will have great embedment and great withdrawal resistance.
In your situation, I would only worry about the head pull-over of cedar (which is softish as far as wood goes) as I dont have data at my fingertips about how good nail heads are in it.
Recommendation #2. If you use two 6d nails per 8” cedar plank (7” exposure) with proper head size (eg dont try to use smaller than standard), with a good 1.5” long embedment in the studs and plywood that should get you there easily. A PE should be able to check the nail attachment and pullthrough as this is normal.
From what I think I know (and remember, we are using 3/4" cedar with a 9.25" reveal, not hardiboard) we need to face nail 2 nails 16" o.c. I am probably going to go overkill and two 3" just to be safe even though he said 2.5" would be good.. That would give us the 3/8" strapping embedment, the 1/2" plywood embedment and then 1 3/8" into the studs. The reason I am doing that is above he is a little unclear if he considers the strapping as part of the embedment as he only mentioned having a 1.5" into the plywood and studs. This would give us 1 7/8" into the studs and plywood whereas a 2.5" nail would only give us 1 3/8" which is just below the 1.5" he targeted it. So I think I rather be safe then sorry. Thoughts?
Bob
Bob,
I'm not sure how I thought it was fiber cement, I must have just glanced at cedar and thought cement. Good catch!
The embedment is usually the last material you come into contact with - IE the studs in this case. after 1.5" there doesn't seem to be a huge increase in withdrawal resistance, from what I've read in prior FPL papers. Any benefit from the plywood embedment is a bonus, and I wouldn't consider anything from the 3/8" strapping.
Be careful on the 3" nails. They're larger diameter than the 2.X inch nails, typically, and might run the risk of splitting the studs, which is weaker than a smaller nail with less penetration.
Kyle,
I think you are underestimating the holding power the plywood can add. Our code allows us to attach the furring strips without hitting studs as long as the sheathing is 1/2" or thicker. 1/2" strips nailed to 1/2" plywood with ring shank nails are almost impossible to get off.
Malcolm,
Thanks for the input. That is sort of how I read the Florida Building Code and what Mr. Straube wrote above. Either way, I will take Mr. Straube's advice of the 2.5" ring shanks to be safe and I feel a lot better about moving in this direction now.
I appreciate everyone's feedback.
Bob
Malcom,
I'll admit to never having tried that myself. One part being the high cost / low quality of plywoods that I've noticed, compared to osb around here. The high quality / high cost plywood just doesn't ever seem to fit in with what I'm doing. Have you ever noticed cases where the plywood had delaminated or had voids in that situation?
On a side not, I started wondering, and I'm not sure I've ever come across nails that were that short. What are you using in that case? 1/ 1/4" ring shank roofing nails?
Kyle,
Thanks for the feedback. I was wondering about the 3" nails possibly causing splitting. So I will probably then go with the 2.5" ring shanks.
Thanks again for taking the time to provide feedback.
Have a great day!
Bob
Bob,
I am a bit further south than you in St. Pete. I'm looking to replace windows and siding on an elevated house similar to yours in the near future. My question is if you ever found a siding contractor that has even heard of the concept of a rain screen detail? I've had more than one tell me I was wrong as they had been installing siding for 20 years and had never even heard of a rain screen...sigh. I'm having a lot of difficulty finding contractors that are at all up to date with best practice.
Any info you can share would be great.
Thanks
Jamey