Risinger suggestion for siding removal work-around
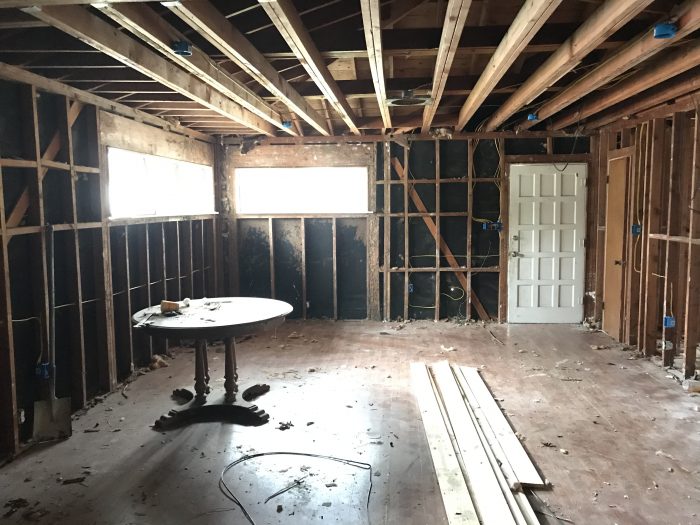
I’m invested in a 1960s renovation that has been taking down to the studs on the inside. The majority of the old felt barrier is in place, but the old “dutch lap” and board & batten siding is directly fastened to the studs on top of the felt. I remembered a Build Show video that featured a house reno with the same old build materials (https://www.youtube.com/watch?v=jhoQ_f9ZnzQ) where Matt suggested a very detailed method to ensure the siding had proper ventilation when removing the exterior siding was not an option.
I would like to leave the siding as well and do an open cell layer on the inside sufficient for the R-13 code requirement. With the majority of felt in good shape, would the wood siding ventilation details still be suggested or can I spray directly onto the back of the felt and get a 3.5″ cavity full of foam?
I’m a little concerned of the effective R-value with all of the additional blocking for supporting the board & batten, but that encompasses only the front side (east facing) of the house with a majority of it having limestone cladding on the lower half (with “insulated” particleboard sheathing).
Thanks to this site, I’m also looking at doing closed cell on the underside of the roof decking (shiplap) and under the subfloor (1×6 plank) in the crawlspace. I’m assuming since he didn’t mention doing his method on the attic application of spray foam that creating a continuous vent under the roof deck is necessary?
Any comments or suggestions are appreciated!
GBA Detail Library
A collection of one thousand construction details organized by climate and house part


Replies
>"I’m also looking at doing closed cell on the underside of the roof decking (shiplap) and under the subfloor (1×6 plank) in the crawlspace. I’m assuming since he didn’t mention doing his method on the attic application of spray foam that creating a continuous vent under the roof deck is necessary?"
Per the IRC's prescriptives, in climate zones 1-3 with as little as an inch of closed cell foam (R5 minimum) directly on the underside of the roof deck NO venting is necessary, and the remaining R value can be filled in with (MUCH greener) fiber insulation.
Closed cell spray foam is one of the most expensive (financially and environmentally) insulation materials going, and using the least amount necessary for moisture control is usually the "right" thing to do. One of my only criticisms of Matt Risinger's generally pretty good methods is the over use of closed cell spray polyurethane foam. An R13 closed cell studwall is far more environmentally damaging and lower thermal performance than an R13 cellulose or fiberglass solution due to the higher thermal bridging through 2" of framing rather than 3.5", and far more environmentally damaging. Do the math:
https://www.finehomebuilding.com/2017/07/10/closed-cell-foam-studs-waste
Even HFO blown closed cell has twice the carbon footprint per R of mid-density fiberglass, whereas cellulose (as sequestered carbon) has a negative carbon footprint:
https://materialspalette.org/wp-content/uploads/2018/08/CSMP-Insulation_090919-01.png
If using open cell foam creating a 1" minimum vent space and soffit-to-ridge venting works, but on low-pitched hipped roofs like yours soffit to hip vention doesn't really work very well, due to the extremely limited stack effect pressures with such limited vertical height differences.
With the Risinger's dimple mat venting (yes, still necessary for board & batten over #15 felt) a 1" round bugscreened vent at the top & bottom of each stud bay to vent the dimple mat to the exterior works. The #15 felt alone isn't going to cut it as a drying path for the back side of the board & batten. Installing open cell foam directly on the felt is almost guaranteed to cause shaded or north facing sections of siding to develop rot issues over time.
Dana,
Thank you for the input. I had issues loading GBA until I cleared my cookies for some reason so a little delayed in my response. I do understand the high carbon footprint of CCSPF and in that regard, I will look into some of the alternatives you provided, however, I would be curious if there are places to do modeling of fixed/manufacturing carbon vs reoccurring carbon pollution throughout the "life" of the home compared to alternative insulations/air sealing. I liken it to EVs vs ICE. EVs are high in carbon pollution during the manufacturing of the batteries, but over the life of the vehicle the reduced reliance on fossil fuels keeps the reoccurring carbon pollution low compared to ICE vehicles. Closed cell can be a one-step air sealing/insulating barrier that allows lower energy usage (lower operating carbon footprint) thus offsetting the high footprint from installation. I have seen alternative methods to obtaining an air barrier along-side an insulating layer, but are the multiple products respective and collective manufacturing processes any greener than CCSPF? I do appreciate the feedback you are providing so if you do have information on the carbon footprint costs of various methods of getting an airtight enclosure then I would be intrigued to see the research.
Back onto the initial question of venting -- Again, I planned on doing open cell in the walls because of the article on closed cell & bridging, but if I have to do venting, then I would be losing an 1"-1.5" to the dimple, leaving only 2" for insulation in a 2x4 cavity. To get R-13 in 2" I'm looking at CCSPF or Polyiso right? Even then I would still have an issue with thermal bridging due to the uninsulated 1"-1.5" of vented cavity correct? Almost sounds like I need continuous insulation on the inside of the studs before the sheetrock goes up -- if that's even allowed by code. This definitely takes more forethought and time than just throwing in batts of pink stuff!
>" I would be curious if there are places to do modeling of fixed/manufacturing carbon vs reoccurring carbon pollution throughout the "life" of the home compared to alternative insulations/air sealing."
Any such modeling has a high risk of a garbage-in == garbage out problem. An all electric house on a green grid has very VERY low lifetime operating carbon emissions. For the world to dig out of the climate change hole the grid has to become extremely low carb well within the lifecycle of a house, and going with heat pumps for space heating is already lower-carb and cost-competitive with oil or propane in most markets, cost competitive with condensing natural gas in others.
So an input assumption that it'll be heated with fossil burners and cooled with fossil burning grid over the lifecycle of the house would yield a fairly substantial (but most likely very wrong) lifecycle carbon figure.
In my state it's possible for residential ratepayers to buy 100% green electricity at a price that's cost-competitive with the standard grid-mix right now.
>". I have seen alternative methods to obtaining an air barrier along-side an insulating layer, but are the multiple products respective and collective manufacturing processes any greener than CCSPF?"
HELL yes!
A fully adhered vapor permeable housewrap can be used to air seal the plank sheathing/siding. Cut the rolls 4" wide the stud bays to be able make flaps sealing it to the framing (cut it 4" tall too) still, works and some cellulose would still come in carbon-negative, but won't quite hit R13 if there's an air space.
Open cell foam has about half the carbon footprint per R of HFO blown closed cell foam.
Dimple mat is also usually an air barrier and a weather resistant barrier, and can be air-sealed to the framing with narrower versions of EPDM flashing tape.
>"Again, I planned on doing open cell in the walls because of the article on closed cell & bridging, but if I have to do venting, then I would be losing an 1"-1.5" to the dimple, leaving only 2" for insulation in a 2x4 cavity."
Dimple mat that's vented through the siding to the exterior (rather than the top & bottom plates, as in Matt Risinger's video) creates it's own venting which will be adequate if only the dimples are in contact with the sheathing/siding. The Delta-Dry that Risinger used is only 0.42" thick. That leaves a hair over 3" for insulation. )Note that Risinger also placed the dimple mat tight to the old tarpaper, with no additional gap.)
https://www.dorken.com/media/docs/products/Product-Details/Brochure_DELTA-DRY.pdf
Polyurethane caulk or purpose-made low-rise sealants used for sealing stud bays (ProPink, EcoSeal, et al) would adequately air seal the dimple mat to the framing to make it suitable for insulating with fiber insulation. If that looks too iffy, 2" wide sheating sealing tapes could be used, as long as it fully covers the first row of dimples.
Having eaten up less than a half inch of stud depth with the dimple mat it can now get there using high density batts. Compressing an R15 rock wool or fiberglass batt a full half inch down to 3.0" yields ~R13:
https://s3.amazonaws.com/greenbuildingadvisor.s3.tauntoncloud.com/app/uploads/2018/08/08074629/Compressing%20fiberglass_0-700x310.jpg
>"To get R-13 in 2" I'm looking at CCSPF or Polyiso right? Even then I would still have an issue with thermal bridging due to the uninsulated 1"-1.5" of vented cavity correct?"
That's right- it's the same miserable performance hit from the thermal bridging whether applied the exterior side, interior side or anything in between.
Even though there's additional labor and environment cost to air-sealing the dimple mat to the framing it'll probably be no more expensive to go with compressed R15 fiberglass than it would be to go with 2" of HFO blown closed cell foam.
Skipping the sealants and going with 0.7lb density open cell foam would also come in a bit shy of R13 @ 3.0" if it also fills the dimples, but would be at least a solid R12 even without filling the dimples, and might come in cheaper than a high density fiber + sealant solution.
>" Almost sounds like I need continuous insulation on the inside of the studs before the sheetrock goes up -- if that's even allowed by code."
That's allowed by code, but with vapor-impermeable dimple mat on the exterior side, the insulation on the interior side needs to be at least semi-permeable. UNFACED EPS would still be sufficiently vapor permeable, about 3 perms at 0.75-1", adding R3-R4 to the whole-wall R (nearly doubling the R-value of the framing fraction.) Plastic or foil faced foam, not so much.
An alternative would be to cut 1.5" strips of 0.5" -1" foil faced polyiso and cap-nail or glue it to the framing edges, fill the stud bays with fiber insulation and long-nail/screw the wallboard up. With a straight edge and a steel wallboard taping knife that has been sharpened on the edges cutting clean 1.5" strips of foil face foam board is pretty quick. See:
https://www.finehomebuilding.com/2009/01/29/theres-a-better-way-cutting-rigid-insulation
With foam only at the stud edges the drying rate of the assembly toward the interior is determined by the vapor permeance of the interior finish. (Standard interior latex on wallboard is 3-5 perms.)
Dana,
Looking for some reasoning as to why CCSPF shouldn't go directly against the backside of cladding, I found this article from Martin back in 2016:
https://www.finehomebuilding.com/2016/05/17/insulating-walls-no-sheathing
He stated in option 2 felt can be used to create an air gap. Building science is changing all the time, so it's almost ignorant to assume previous recommendations still are pertinent, but I'm still curious as to why it can go directly against the underside of roof decking, but not against cladding. Is it simply because of probable differences in exposure to sunlight thus drying capability?
Dana,
Regardless if I go with the DeltaDry or Polyiso spaced away from the siding should I remove the remaining felt first? Will there be much use for it after putting in an air gap other than potentially holding onto more moisture against the siding?
Also, I tried to research possible issues with putting the polyiso strips over the studs and fastening the drywall directly on top. I found these this article by Martin (https://www.greenbuildingadvisor.com/article/walls-with-interior-rigid-foam) talking about screw-pops, missed studs during screwing/nailing, and issues with homeowner hanging items on wall. Then I found in the comments reference to another method coined "Bonfiglioli strapping", where 1x3 was attached to the rigid foam then sandwiched onto the studs to give a solid material directly against the drywall for anchoring. Is this overkill or insurance?
I was unable to find references to someone furring out with only rigid foam and drywalling over, so have you seen this method first hand?
Dana thank you for all of this information. I like the 0.7lb OC sans sealant route, but even so, the more that I think about the labor involved and the thermal bridging, with all of the horizontal framing that allows the board & batten something to nail to, am I fighting a losing battle? Not only that, but the diagonal bracing will be one additional thing to work the dimple mat around...Is there a way to get around the labor intensive dimple mat/venting install?
Since the closed cell can go directly against the roof decking could it not also go directly against the cladding -- or felt and fiberboard in this case? Could I not do 1" of CC, 1" strips of EPS over the framing on the interior (bringing cavity back to 3.5") and throw some batts of Rockwool or Fiber to bring up the Rvalue? I'm already getting Energy Vanguard working on my load calcs based on a fully foamed "tight" enclosure. Understanding that CC/EPS is more harmful that other alternatives -- and I would like to try and be as green as feasible -- I also see that there are just some cases where it has advantages. This is my first mid-century remodel and I would love to do this the right way, but I'm not sure how far down the rabbit hole I can realistically go.
>"Since the closed cell can go directly against the roof decking could it not also go directly against the cladding -- or felt and fiberboard in this case?"
The roof decking has a weather resistant barrier on the exterior as well as a layer of roofing, the board & batten cladding only has paint. The direct wetting of the paint will wick moisture around to the sides and back of the boards, and without the air gap to dry into it'll start to rot from the back side out. Asphalted Ffelt isn't the best drying path even when it's NOT directly in contact with foam on one side, siding on the other. With no air gaps for drying the felt gets just as soaked as the wood. You'll know the boards are hitting rot-potential moisture content levels with the paint begins to massively blister & peel, which takes only a matter of months, not years.
With a WRB on the exterior of the board & batten along with new siding over that it would be fine to foam right up against the board & batten or the interior side felt without much risk.
A project I've been consulting on recently has only board & batten directly on the framing and mid-density batts in most of the stud bays. If it weren't so air leaky the siding would have been toast by now, but it dries just fine to the exterior through the air leaks an none-too air retardent batts. The plan going forward is to strip the battens, install a vapor permeable fully-adhered housewrap (in this case Henry Blueskin VP100) over the boards as part of air-sealing detail, followed by 1/4" Obdyke Rainslicker Plus rainscreen mesh, and cedar shingles. That all would have happened in November were it not for the discovery of brick nogging in some of the studwalls and other gaps in the wall insulation. The homeowner is waiting for better weather before doing the partial demolition necessary to get rid of the nogging, then dense-packing those areas and other known gaps with cellulose before addressing the WRB & siding. (At this point it looks like that might not be until April or May.)
>"The roof decking has a weather resistant barrier on the exterior as well as a layer of roofing, the board & batten cladding only has paint. The direct wetting of the paint will wick moisture around to the sides and back of the boards, and without the air gap to dry into it'll start to rot from the back side out. Asphalted Ffelt isn't the best drying path even when it's NOT directly in contact with foam on one side, siding on the other. With no air gaps for drying the felt gets just as soaked as the wood."
I can't find the article on here now, but when I was researching closed vs open for attics, I read that if you do closed cell under decking that you should have a vapor-permeable barrier for shingle underlayment that way when moisture gets into the decking it atleast has some direction that it can dry towards. So I went with #15 felt vs the synthetic barriers...was this a bad move since you said it stays just as wet as the wood?
Also, going back to something you said earlier about attic insulation..."Per the IRC's prescriptives, in climate zones 1-3 with as little as an inch of closed cell foam (R5 minimum) directly on the underside of the roof deck NO venting is necessary, and the remaining R value can be filled in with (MUCH greener) fiber insulation."
Wouldn't going with something that's vapor permeable run into the moisture problem that open cell does when applied under the roof deck? Even if there is sufficient close cell against the decking isn't there still enough moisture coming up from the living space to cause issues?
>"With a WRB on the exterior of the board & batten along with new siding over that it would be fine to foam right up against the board & batten or the interior side felt without much risk."
Unfortunately doing anything on the exterior brings on its own set of complications. This would solve the problem with the board & batten, but with the brick lower cladding I can't effectively get a WRB between it and the asphalt fiberboard. Pricing out what would need to be done for this method to work I'm probably looking at a good $5-$10k for that process and still have to deal with the issue with the brick.
So with the studs exposed on the inside I think that dealing with the interior is the more approachable option. When I built the house out in Sketchup I ran actual measurements of stud locations in the house, including all bracing, so I was able to calculate the area of the framing compared to the wall cavity and I'm about 27.5% framing in the wall assembly. Not too much off the 25% estimate, but I would like to insulate the interior of the studs as there is no thermal break between the cladding and framing. Here are a handful of options I built out and put a rough estimate on...I'm really liking the Polyiso option for creating the air gap and thermal break. Atleast based on my estimates from installers, I can get a full envelope Aerobarrier seal done and still be cheaper, better performing, and greener than the highest closed cell option.
>"So I went with #15 felt vs the synthetic barriers...was this a bad move since you said it stays just as wet as the wood?"
It stays about as wet as the wood if there is no exterior side air gap, but even with asphalt shingles there is a tiny amount of drying toward the exterior. Don't sweat it.
>"Wouldn't going with something that's vapor permeable run into the moisture problem that open cell does when applied under the roof deck? Even if there is sufficient close cell against the decking isn't there still enough moisture coming up from the living space to cause issues?"
There is about an order of magnitude difference in vapor retardency between open cell foam and closed cell foam. At 1" most closed cell foam is between 0.8-1.2 perms. At 5.5" most half pound open cell foam is around 6-7 perms, at 3.5" it's ~9-10 perms. So the amount of wintertime moisture uptake the roof deck sees in just one week with 5.5" of open cell foam takes half the winter to accumulate through a single inch of closed cell foam, and the entire winter through 2" of closed cell foam. Yet it's still sufficiently vapor open that it can still dry (slowly) to the interior the other 35-40 weeks out of the year, and the peak moisture content never reaches high rot-risk levels.
Regional /local climate, total R-value, and the solar reflective index of the roofing affects the drying/adsorption rates too, but in most locations 2" of closed cell is more than sufficient protection for the roof deck, and in many 1" of closed cell is good enough.
You may find this a useful read:
https://www.buildingscience.com/sites/default/files/migrate/pdf/BA-1001_Moisture_Safe_Unvented_Roofs.pdf
(Skip to Table 3 for the quickie conclusions broken down by climate , roofing types, and insulation types.)
Thank you for the link. Informative read, but looks to be either out-dated or some fallacy of the modeling vs real-world discovery. Table 3 looks like it shows ocSPF will not cause long-term moisture issues in my 2A climate zone, but recently, it's been shown to hold onto moisture from the inside and outside climates enough to cause problem -- don't recall what zone those cases were in however. In fact SPF installers in my area say they only do ccSPF in attic if it is specifically requested and thats very rare, supposedly due to the inability to see leaks with ccSPF. With that said, should I be concerned that the roof deck is simply 1x6 shiplap as there is more potential for water penetration compared to a 4x8 sheet -- and relying on the SPF to provide an infiltration barrier?
However, my previous concern is since the condensation plane will be on the underside of the foam, will there be problematic moisture retention in the batts from the interior climate (e.g. showers, cooking, etc.)?
I apologize for so many questions. I want to try and learn from the trials and tribulations and experiences of others to make sure I'm doing something the proper way...at least as we know it to be for now!
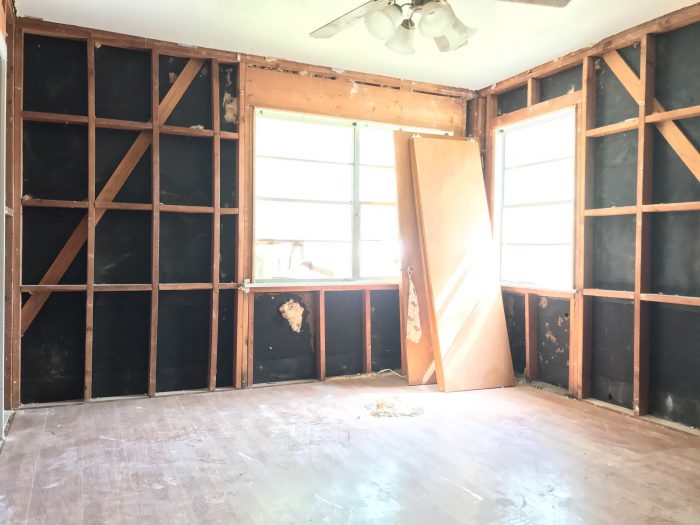
Due to unforeseen circumstances this project had to be put on hold for a few months. Now that we have the ball rolling again I would like to reach out to you guys for advice/suggestions on flashing the windows. The current windows are old aluminum replacement units that don't appear to have any attempts at flashing or sealing, possibly because they sit flush with the cladding. I bought new construction windows with the flange thinking I would have a better opportunity for a good weather barrier, but now I'm not so sure. Some of them appear to be nailed to either a small buck extension or directly on top of the "dutch lap" boards themselves. Where it becomes interesting is in the sheathing -- there is none to apply any WRB products to. Directly behind the cladding is felt and then studs. I'm not sure tape, especially pressure-applied, will give me the bond I need to adhere to the felt and will be problematic to try and install over the uneven siding. My thought is to try a fluid-applied like ZIP Liquid Flash, Prosoco R-Guard, or Polywall Blue Barrier. I would either need to set the windows back over the studs (removing the buck extensions) and apply there and ensuring overlap onto the felt or keep the window placement as is and apply directly over the cladding (to be later covered by the 1x4 trim).
Understanding neither of these is ideal, what possible issues could I face or other methods could I use to obtain a good end result?
1. Remove the windows.
2. Where the siding laps the window framing, trim back the siding so you have something flat to which to apply the flange. You can do this with a skill saw.
3. Flashing/seal windows to flat framing.
None of the above solves the problem of how you are going to create an entire air/vapor barrier around the house. The window will be well sealed, but that does no good if water comes into the wall cavity outside the perimeter of the window flashing system.
You need to think this project through as a whole. So far we know you have demo'd the inside to studs, and you plan to install new windows.
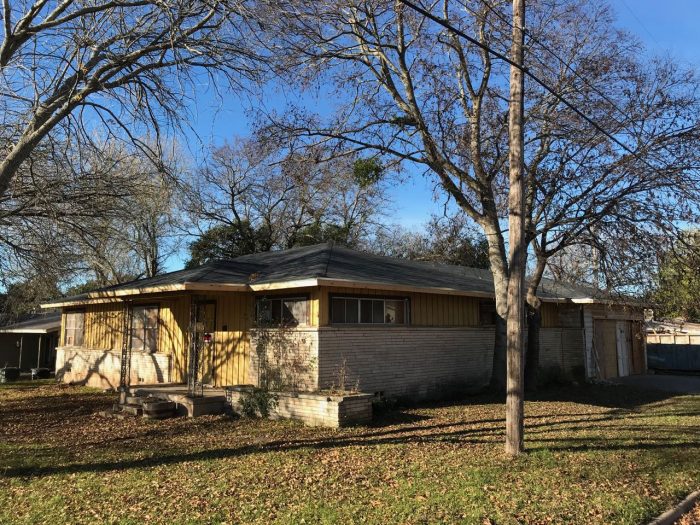
Do you plan to remove and reinstall the wood siding? Presume you plan to keep the brick (looks like beautiful roman brick - very cool)? Do you plan to reroof?
Figure out what the scope is, then develop a complete approach.
The scope was pretty much determined when we purchased the property since it was in such a decrepit state. Only unknown was what state the original wood siding was in since it was covered by aluminum siding. So all of the existing exterior cladding is staying as is — other than getting prepped for paint. The roof has already been stripped down and re-shingled. Delays in the project may prevent me from doing the “best option” insulation method so it may just come down to a quick spray foam job. With that said my moisture is really going to need to be controlled as far to the outside as possible since there is only a thin layer of felt between the wood and whatever insulation I choose.
My confidence in the original felt is not very high as there are some parts that are torn or missing, but I guess if I can repair these portions to ensure proper moisture management then that is my best option without taking off the siding or going with an elaborate interior system like Risinger recommended.
Do you have any experience with tapes (adhesive or pressure applied) vs fluid applied since I may be constrained on space to do proper detailing?