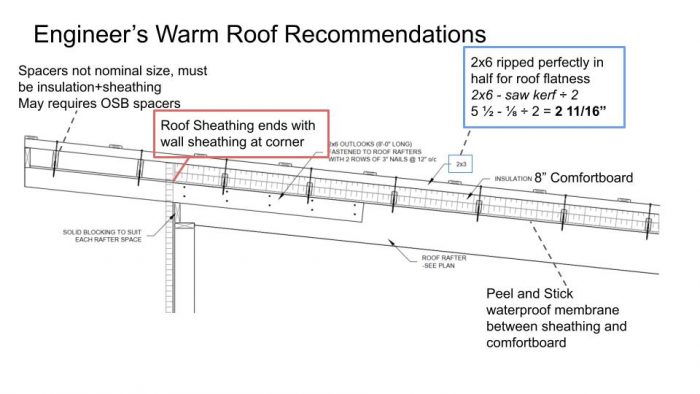
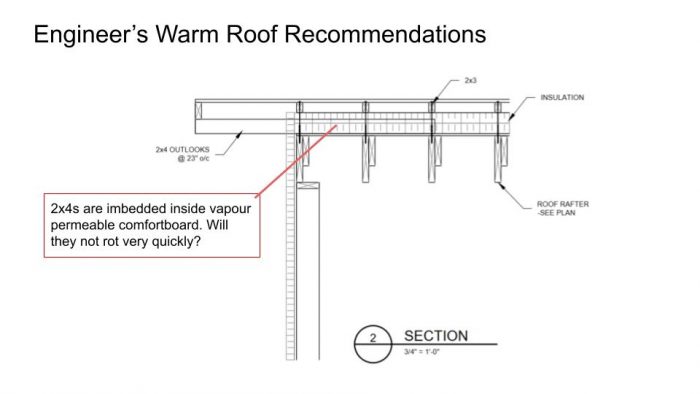
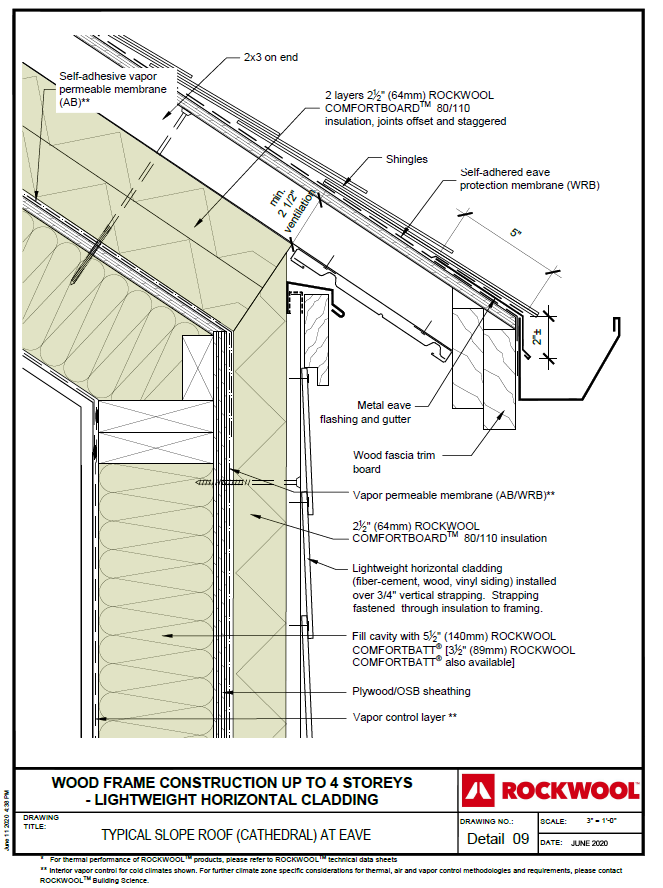
Risk of Rot in Warm Roof Outlooks
We’re building a hybrid warm shed roof (2:12) following to Rockwool’s specifications (attached). 8″ exterior comfortboard, 6″ interior comfortbatt. The engineer revised our original plan to what is currently attached because he was worried the roof wasn’t strong enough. He has embedded 2×4 outlooks inside the vapour permeable Rockwool. When I asked if they would rot he said he didn’t know, that he wasn’t “that type of engineer.”
We live in the PNW temperate rainforest (climate zone 4C, dry summer-wet winter). There is a large 3″ venting gap above the Rockwool and the metal roof, but our winters hover around 80% humidity and we receive 13″ of rain per month Nov-Feb.
1) Do you think those outlooks will rot?
2) If we have stick with this design, what precautionary measure can we take?
Thank you all so much for your thoughts and help!
GBA Detail Library
A collection of one thousand construction details organized by climate and house part


Replies
Assuming that is vent channel above the comfort board and the 2x4 rafter tail is above the peel and stick is pretty much the same thing as rafter tail in a standard vented insulated attic. I can't see any issues with it.
Looking at the amount of wood and complexity of the roof as sketched, I think you would get a much cheaper roof if use standard purlins above the roof deck and insulate with mineral wool batts. Batts are much cheaper and work just as well in this application.
Pick the batt thickness and purlin size to provide the vent space you need above. High density batts such as mineral wool don't suffer from wind washing, so no need for any baffles.
As long as the framing of the over-insulation is perpendicular to the rafters bellow, there is very little thermal bridging, you get very close to the same performance as continuous insulation. This is now pretty close to a standard roof and should be much easier to build and detail. No need for embedding anything, cut the purlins overhanging the walls to the size you want plus you don't need to deal with long screws and trying to hit the rafters bellow through 6" of rigid.
P.S. I'm not sure what kind of carpenters you have down there, but rough framing with 1/16" precision is wishful thinking. Even a decent finish carpenter would have a hard time with that 2 11/16".
Akos, you are brilliant and absolutely correct about the comfortbatt efficiency. How would you affix the purlins OVER the sheathing? I'd still need 10" screws if I am adding 8" of comfortbatt to the roof over the sheathing, no? Would you use metal ties?
The comfortboard is already ordered, so now I have to go through the embarrassing process of cancelling that order... foundation is in and framing starts tomorrow, but your proposal would save over $8,000 on the roof alone.
If you are about to start framing, the ship has sailed on changes. The key to a successful build within budget is no changes! Doesn't take much to burn through that $8k in cost savings updating plans, permit and change order to trades.
In case some else finds this thread down the road, attaching the purlins depends on local wind and seismic codes. I'm not in either so the purlins can be toe nailed to the rafters bellow and anchored with rafter tiedowns at the walls.
You can construct the purlins into an assembly like the framing for a floor, with pieces at the end attached perpendicularly that will keep the purlins from rolling. If your roof is wider than 16' you will have to piece the purlins, where two pieces meet you can put a block to the next purlin that will help the stiffness of the whole assembly. With a stiff assembly like that you don't need much to keep it in place, as Akos notes toe-nailing is probably sufficient. But check with your engineer. Even if more strength is needed a 10" screw probably isn't what you want, probably a steel right angle to screw the purlin to the rafter where they cross. I can't imagine screwing a 10" screw through the edge of a 2x8.
Is there a reason you're going with so much exterior insulation? Eight inches out of 14 total sounds excessive. How deep are your rafters? You might be able to go with smaller purlins too.
Thanks for your input.
To answer your question, we're trying to preserve exposed fir rafter. Code in my area is R40.
Long story short, our original design was a post and beam frame with SIPs. But when that design didn't fit in our budget, we literally reverse engineered the home for stick framing while trying to preserve as many elements and efficiencies as possible, which has led to some tunnel vision.
I really wish I had asked this question a month ago while waiting for the engineer to revise the roof. The exterior purlin would also mean we don't need those 2x6" outlooks penetrating the envelope, which goes completely counter to the original warm roof plan.
I think you are better off without SIP. It is a construction technique that is very demanding, get any of the many details wrong and you can have a lot of damage that is very costly to fix.
If the new design is lower cost, you are definitely further ahead.
No design is ever perfect many things can always be improved. If your builder is onboard with the design as is, I would not sweat it. I have spent more than the $8k you have there just on spray foam because I designed myself into a corner.
Hi,
Does this use of mineral wool batts for exterior insulation also work on steeper roofs, e.g. 5:12? Or would it only be for low slope?
Using the batts like this is no different than a vented attic or cathedral ceiling with batts. The only thing rigid MW gets you is that you can walk on it.
I'm going to give the opposite advice from Akos: I think you should tap the brakes and work out exactly how you want the roof framed before going any further.
My inclination based on what you've said so far would be to build a conventional vented cathedral-ceiling roof with 2x12 rafters and treat the exposed wood beams as non-structural ornamental features.
Thanks to you both for your help and advise. In a stroke of good (bad?) fortune, the wrong sheathing was delivered today. While speaking with the sales desk about getting the right delivery on track, they said that comfortboard 80 that I have backordered is still delayed, but that they have 70 bundles of comfortboard 110 that they'll sell for the same price. Originally I ordered 132 bundles of 2" (no 4" available) to complete the roof. So, with only 70 bundles, I CAN'T make the above plans work!
Rather than delay lock-up until they can get the amount of 2" I need to make the entire 8" of exterior insulation, I can use 6" or 8" comfortBATT with purlins as you both have recommended, with just 1 layer of 2" comfortboard 110 over it.
The next delivery goes out Tuesday, so I have until Monday morning to improve this roof (engineer be damned, I'm in a rural area that does not require municipally approved plans, only a "siting permit", so no red tape on change orders). No more silly supplementary rafters poking out the envelope and no need for 12" screws!
If you've got any more suggestions, I'm all ears! I'll try to sketch up a plan for your critique and upload that, for archival sake if nothing else.
This forum has been a wealth of information for me on this build and I regret not opening an account earlier!
Sounds like a plan. The more you go towards conventional construction the easier it is for the framer and the easier it is to get the necessary materials.
One thing we haven't talked about is that as the design gets more exotic there's a non-trivial chance that the framer doesn't get it and builds it wrong.
I have attached some sketches of an over-roof, drawing heavily on this article:
https://www.jlconline.com/how-to/insulation/why-and-how-to-build-an-insulated-overroof_o
The 3'6" overhang on the south wall for shading has always been a concern. I designed a cantilever into the that portion of the over-roof, and the rest will be perpendicular purlins. I positioned the cantilevered section just off the 2x12" structural rafter below the sheathing so that I could make use of angle bracket tie-downs (but will toe-nail in the field). I also added hurricane ties to said cantilevered overhang (only need 33 to do entire overhang, then could do only every second outlook for the rest of the roof?).
The side walls have a 24" overhang, which I put 2x4 sleepers over to help with cantilever. Those sleepers are also part of the 2x4(sleeper) + 1x4 vent gap. No more ripping 2x6.
Weight is getting to be a concern, so I made 2x4 sleeper spacers 12"OC on the overhang rather than full length 2x4.
Do you think I can just use 2x4 sleeper spacers in the entire field that fall 12"OC, with the 1x4" strapping over those? Might save a lot of weight and dollars.
Thanks for anymore help!
For thermal best performance you want the purlins to be either offset or perpendicular to the rafters bellow to minimize thermal bridging. If the purlins are full length they only need to be fastened at the roof edge same a floor or ceiling. Some clips in the field don't hurt but mostly there to keep the purlins spaced.
The ladder framing for the overhang should come back more. You can treat it as floor cantilever (2 in, 1 out) but lot of times they are brought in one rafter in low snow load areas.
I would skip the 2" rigid over the rafter. You will already have a roof that is hard to walk on, don't make it more difficult. Go for 2x8 with R30 batts instead. 2x4 sleepers for vent space can go right over the purlins and finally strapped out for the metal roof. The 2x4 sleepers should always run with the roof slope even at the overhangs. The framing bellow can be in either direction without issues.
Most metal manufacturers require an underlayment directly under the panels. Maybe the peel and stick under the purlins can serve this purpose just don't know how well it will work as there is not much heat available there to aid in drying. A permeable synthetic underlayment directly under the 2x4 sleepers or a regular non permeable under the panels would be simple to add.
Thanks for all those tips Akos. Yes, we'll def have a breathable underlayment under the 2x4 sleepers, forgot to mark that.
When you say to move the 24" laddered overhangs in to improve cantilever, how do I do that when I've prioritized the cantilever for the 3'6" southern overhang? I tried to strike a balance by running the sleepers along the 24" overhang, but I agree that's bad for venting. Forgive my week knowledge of framing.
I went with 6" batt with board 110 cause I know it's in stock, but definitely assume it being me doing most of the walking on the purlins because I don't expect my carpenters to like this. I'll find out the availability of 8" batt tomorrow. Might be delayed in my area like the board 80 is. If they can get me 8" batt in the next 2 weeks, I'll switch.
The standard way of framing corners is like this:
https://www.renovation-headquarters.com/images20/flat-roof-corner-framing.jpg
This avoids the compromise at the shorter overhang so everything is properly supported.
I would trim or taper the bottom of the purlins once they are past your walls in the overhang area so you facia board is a reasonable size.
For thick mineral wool batts sometimes it is cheaper to get two layers of batts. Two layers of R14/R15 is not much more work than R30 and easier to get. In either case it should be much cheaper than R24 + R8.4 rigid.
The over roof framing is running along the roof slope you can eliminate the 2x4 sleepers for most of the roof. Get 2x10s for the main area and 2x8s for the ladder framing. Over the 2x8 area, run sleepers in the same direction as the main roof over shims to from the vent space and bring it up to the same height as the 2x10s.
Would it change the look unacceptably to have the rafters overhang the side wall so you have a thicker visible roof? That way the over-roof could run perpendicular to the rafters. The overhang on the eave side would be supported by the rafter tails and the overhang on the rake side would be cantilevered by the full length of the purlins (I guess that's what you call the 2x6 framing members of the over-roof).
This would give an overall visible thickness of about 18".
DC, I don't want to add back-in the structural rafter that break through the building envelope, not to mention 18" is a pretty huge roof considering it's a 1200sqft rancher. I am really liking the vented 2x10 over-roof with 8" comfortbatt. 8" was available (and much cheaper than 4" x2 in my area). It sounds simple to build and easiest to walk on. Completely eliminated any board on the over-roof, hell of a cost savings...
I have placed the updated drawings here for archival purposes. Thank you so much for all your continued help, really helped me break through the tunnel vision of stereotypical warm roofs.