Should I use unfaced or faced fiberglass to fill the remaing cavity over cut-and-cobble?
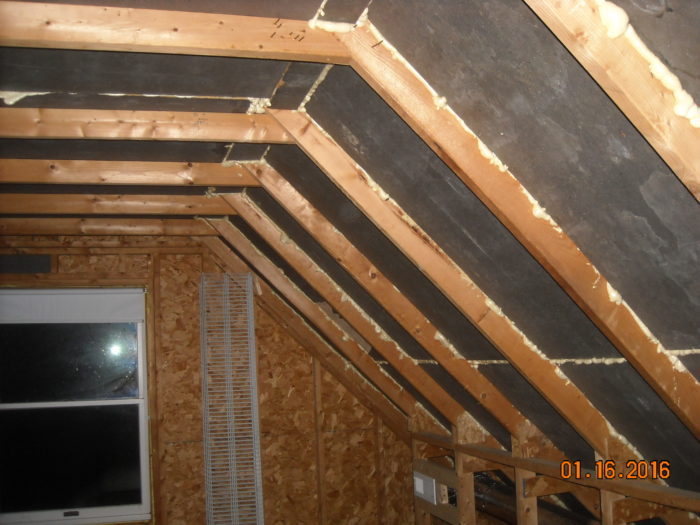
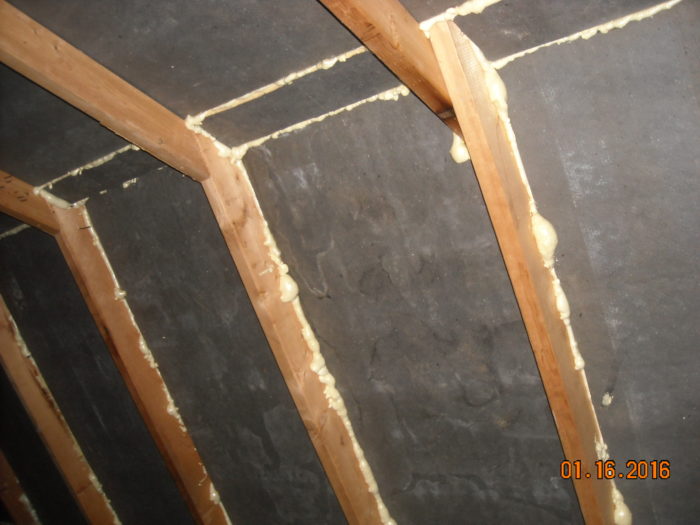
As you can probably see in the pictures i decided to use the cut and cobble method for insulation the second floor of my 1990s cape cod. I have about 4 inches remaining to fill with insulation. I was going to use fiberglass, but i do not know if i should use faced or unfaced. Does it even make a difference? I live in Maryland.
the following is how it is configured
roof sheathing, 1 inch gap, 2.25 polyiso, fiberglass, Sheetrock.
also, would it be a problem to use the cut a cobble for the walls when there is already .5 inch polyiso between the siding and the osb. I am worried about trapping moisture .
it would be vinyl siding, .5 in poly iso (full sheets and taped seems), 7/16 OSB, 2.25 polyiso(cut an cobble), sheetrock.
all thoughts are welcomed
GBA Detail Library
A collection of one thousand construction details organized by climate and house part


Replies
Tim,
Unfaced fiberglass batts would be preferable to kraft-faced batts for your roof assembly, although frankly the use of kraft-faced batts would be unlikely to cause any problems.
It looks like you will end up with something like 4 inches of 5 inches of fiberglass. That puts the R-value of your proposed roof assembly at somewhere between R-28 and R-32. That's less than the code minimum, so you might consider thickening up your framing to make room for more insulation, especially if you can afford to lose the ceiling height.
Q. "Would it be a problem to use the cut-and-cobble [approach] for the walls when there is already .5 inch polyiso between the siding and the OSB? I am worried about trapping moisture."
A. If you want your OSB wall sheathing to be able to dry to the interior -- and I think it would be a good idea if you did that, especially if the polyiso has a foil facing -- then you shouldn't use the cut-and-cobble method for your walls. Just install dense-packed cellulose or carefully installed mineral wool batts or fiberglass batts, so that the OSB can dry inward if necessary.
Thank you for the fast response.
Regarding the R-value
I was shooting for R-30, which I think is code for a cathedral ceiling (please correct me if i am wrong). I figured that is essentially what i am making.
I tossed around the idea of adding full sheets of polyiso under the sheetrock, but I thought this may be overkill considering the state of the insulation on the rest of the second floor. The builder used R19 fiberglass in the 2 completed rooms. I am assuming that was code in 1992.
Would that be a problem to have fiberglass between two layers of polyiso?
the result would be: roof sheathing, 1 inch gap, 2.25 in. polyiso, fiberglass, 2.25 in. polyiso, Sheetrock.
The vapor permeance of asphalted paper faced varies. If you can, get a specification for the product.
In Maryland all but Garrett County is in US climate zone 4A. In 4A you need a minimum of 30% of air-impermeable insulation on the exterior side of the stackup for dew point control at the fiber/foam boundary. With R5.5 per inch 2lb roofing iso you're looking at R12, which would limit you to about R27 on the interior side. With 4" of say, compressed R19 batt you're looking at roughly R14 for the fiber layer, so you'd be good with up to R13 more to the interior side of the fiberglass. So, with R12-ish polyiso on the interior you'd be fine from a dew point control perspective, but if the facers are under 0.5 perms it may be something of a moisture trap.
A safer solution would be to install compressed unfaced R19s in the 4" space, and install 2x4s perpendicular to the rafters with kraft faced R13s (facer toward the interior.) You'd meet the minimum foam-R/total-R ratio for dew point control, and a kraft facer is a smart vapor retarder limiting the rate of moisture accumulation, but it would be reasonably vapor open if the cavities became damp enough to support mold.
That would leave you at about R38-R39 total, which is a more likely minimum code value. IRC 2009 called out R38 for roofs in zone 4A, but IRC 2012 and later specify R49.
https://energycode.pnl.gov/EnergyCodeReqs/?state=Maryland
http://publicecodes.cyberregs.com/icod/irc/2012/icod_irc_2012_11_sec002.htm
If the house is in Garrett County you need the foam to be 40% of the total R for dew point control, so you'd want at most R18 on the interior side of your cut'n'cobbled foam. You could cut some foam rafter edge strips to bring the cavity depth up to 5", compress kraft faced R19s in there and call it a day.