Standing-Seam Roof Installation Detail
I would like to ask a question regarding a detail in the installation of a standing seam roof.
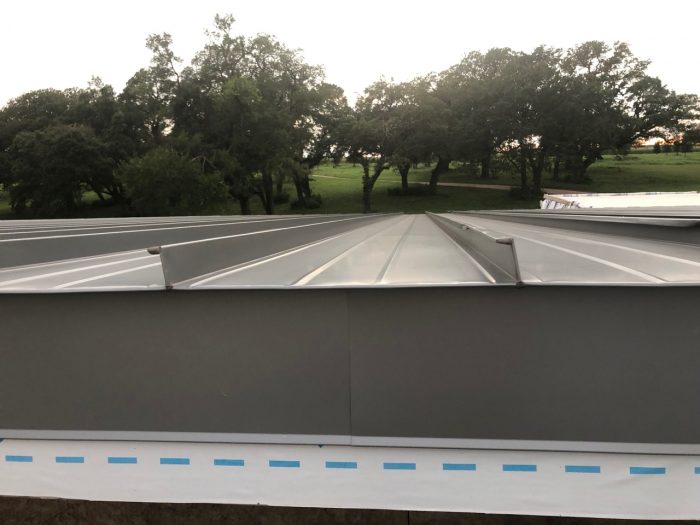
My house roof is a single slope, 1:12 pitch. My roofer installed the metal, which is made up of single fold, standing seam 24 ga panels. These are not seamed with a mechanical seamer yet
At the top edge, he folded the panels over the fascia and then over the previous sheet. He packed some butyl tape in the openings that were left after these folds (please see photo). I have not seen many standing seam roofs, but the ones I have usually have a trim piece covering the top edge of the ribs. I imagine this prevents water entry once the butyl tape degrades due to UV radiation. The roofer said this is not necessary. Can someone please advise me as to what is the correct installation detail here? Thank you.
GBA Detail Library
A collection of one thousand construction details organized by climate and house part


Replies
deerefan,
The top, like any other ridge, gets a peak cap. This catalogue shows them:
https://www.westform.com/application/files/2416/1471/3596/019-2021-General-Flashings-Public.pdf
To expand on my reply:
A mono-pitch or shed roof needs three types of flashing: Eaves, gable, and peak. Examples of each are shown in the catalogue I linked to.
What is the roof manufacturers name?
How tall is the standing seam?
These are Mcelroy Maxima panels, 2" tall rib.
It looks like they used a standard eave detail. Like Malcolm said, you need a ridge cap of some sort. There are other traditional ways of handling it with twin-lock standing seam and a gable roof, basically making a long rib that follows the ridge, but I don't think they would work for you.
Thank you for the responses. Can someone detail how to install a peak trim here to complete the waterproofing? We are aiming to avoid any exposed fasteners to complement the modern look of the home.
How should I deal with the roofing installer. He claims this is the standard way of installation for them and they have not seen problems with water entry.
Thank you.
Does the edge of the roof extend out past the wall?
Is the leading edge of that roof folded down and back towards the wall with the top portion of the wall piece sandwiched in between? If so, that's ok as the bottom edge of that piece along the wall looks like it has a drip edge. Well it should at least.
Anyways here's a detail which may be helpful. Go to this link and scroll down to "High Gable Detail". However as you can see the edge of the roof terminates at the wall rather than extending out over it.
https://westmansteel.com/support/installation-guides/snap-lok-roofing-panel/
John it looks like they labeled it, "high side peak cap" but that's exactly what I would recommend as well. It will have exposed fasteners.
Deerefan, this is the traditional way of making an unvented ridge with standing seam metal: https://www.metalroofing.org.nz/files/standing-seam-ridge. For the fascia side you would use a dripedge similar to what John linked to. You probably don't have enough material length to rework your existing detail, though; your best bet without having to redo the roof is probably to accept a few visible fasteners with the applied cap.
McElroy recommends using a "high side cap" as well: https://info.mcelroymetal.com/hubfs/assets/residential-typical-trim-details.pdf.
Per the photo does the it look like roof edge extends out past the wall below it?
If so how would the OP detail that with a high side cap? Would the bottom portion just hang down in the open or would they have to wrap it back underneath the roof then down the wall?
> Standing-Seam Roof Installation Detail
I'd compare what is being done to the installation manual.
I would like to add another photo to better demonstrate the high edge of the roof. The roof does extend 2' past the wall. The panel edge extends 1.5" past the fascia.
So, as per diagrams posted: should I be adding a z-closure and then adding fasteners both at the top and bottom sides of the eave trim? It seems like that will take a lot of the look out of the standing seam roof with a bunch of fasteners on the fascia?
Also, would it not be better to secure the eave trim to the ribs instead of the flat portion of the sheats - after all the main concern here appears to be water entering the assembly through the partially open face of the ribs. What about fabricating a piece of trim that hooks onto the overhanging sheet and then is screwed into the ribs? Thank you.
For what it's worth, I am not an expert as some here, but have read installation instructions for at least one manufacturer of standing seam metal and whether you single fold or double fold the seam depends on the pitch.
Deerefan, the flashing should go above the ribs. If you're lucky, you might be able to have screws on only one face, either the top or the fascia side. If screwed through the top it's hard to prevent oilcanning but if you're careful it shouldn't be too bad. That's how vented metal gable roofs are capped.
Here is a detail showing how you could avoid fasteners on the fascia. https://www.pac-clad.com/wordpress2017/wp-content/themes/pac2017/e-tools/file-request.php?did=2517
What does the underside of this detail look like?
I dunno but I'm thinking that metal was folded back under and the upper portion of the trim piece was slid inside the fold.
Not a roofer but boy I think it would be hard to get much water in that detail at the top edge of a roof. It appears he has no exposed fasteners and no holes in the surface of the roof.
And those holes in the surface of the roof would be sealed with [most likely] butyl tape subject to the same possible decay. And wind driven rain could routinely load those nails I would think more heavily than the small tips of the roofing.
So what would the consensus opinion of the experts be in my situation?
Should I leave as is, maybe improve the butyl tape as well as possible?
Or add a peak trim with a series of fasteners? If so, should these be placed in the ribs, sheets or fascia?
Haha, consensus... you probably won't find that here ;-) I like the detail Aaron P2 shared above, using hidden clips, if you're up for the challenge--it can be tricky to get everything to align. But it's how pros would do it. (My previous comment was wrong--you wouldn't see fasteners on a standing seam roof, you'd have clips. I was thinking of agricultural-style roofing with exposed fasteners.)
I'd say clips are still the exception for trim on standing seam roofs. It's still more common to see gasketted fasteners at the ridge, gables, hips, side-wall, etc.
While perhaps not ideal, seeing how they finished the peak, I'd be included to leave it as is.
I wonder if it's yet another regional difference? This is the last project I designed with a standing seam roof. If you zoom in you can see that the ridge isn't perfect, which in my memory made me think there were exposed fasteners. But looking now I'm pretty sure they used clips. Same at the valleys under that mountain of snow.
Oh and I just found another one I was CM for, with a roof done by the best metal roofer around. The hips show the narrow, traditional way to finish a ridge, and the ridge cap was done with clips, though it's hard to see here.
Michael,
Nice house!
It may be another one of those regional things, although most websites of the big metal roofing suppliers seem to show exposed fasteners being used.
On the ridge as long as the fasteners are driven into a Z flashing, even if they leaked they would run down the panels. Valleys, being under the panels never have exposed fasteners. I don't know how you would flash chimneys, skylights or plumbing penetrations without them.
I find clips a nightmare to get just right so they are tight but you can still install the flashing and get good joints between pieces and at intersections. To me the big gain g0ing with standing seam is elimination the 3 to 4K fasteners in the field. A few incidental ones doesn't worry me.
I'd agree with Malcom that clipping both ends would probably be more difficult and fasteners on the roof side down into the Z closure would be a viable alternative. That is probably the best compromise of the clean vertical face with simple installation.
While it doesn't look appear that the holes are that large as installed, I'd be wary of relying on a tape or sealant as seen in the photos for a long term solution. Is there manufacturers representative you can reach out to?
I would recommend some sort of cap detail at the ridge. Given where you are now, I think some variation of the detail Aaron_P2 posted would be the most economical. There are various ways to provided a cap at the ridge of a shed roof, I have attached a few. They might exceed your roofer's skill set (and your budget) if the roofer is accustomed to using z bars and occasional exposed fasteners when convenient.
Still have not made up my mind of whether the rib edges should be covered or not. I prefer the aesthetic of the exposed edges but wonder if overtime, this will lead to degradation of the exposed cut metal ends and water entry through the openings currently blocked by butyl tape.
I attached a diagram of the detail I designed. This would include placement of z-closures with 3 screws to hold it in place per panel - so quite a few fasteners. If the ridge cap still seems loose after it snaps in place, I would consider placement of rivets into every other rib.
I would again appreciate everyones input. I want to make sure this is a good idea and indeed needed before I embark on this and make a a whole bunch of screw holes in the panels. Thanks