Stone chimney flashing
Bridgetdee
| Posted in Green Building Techniques on
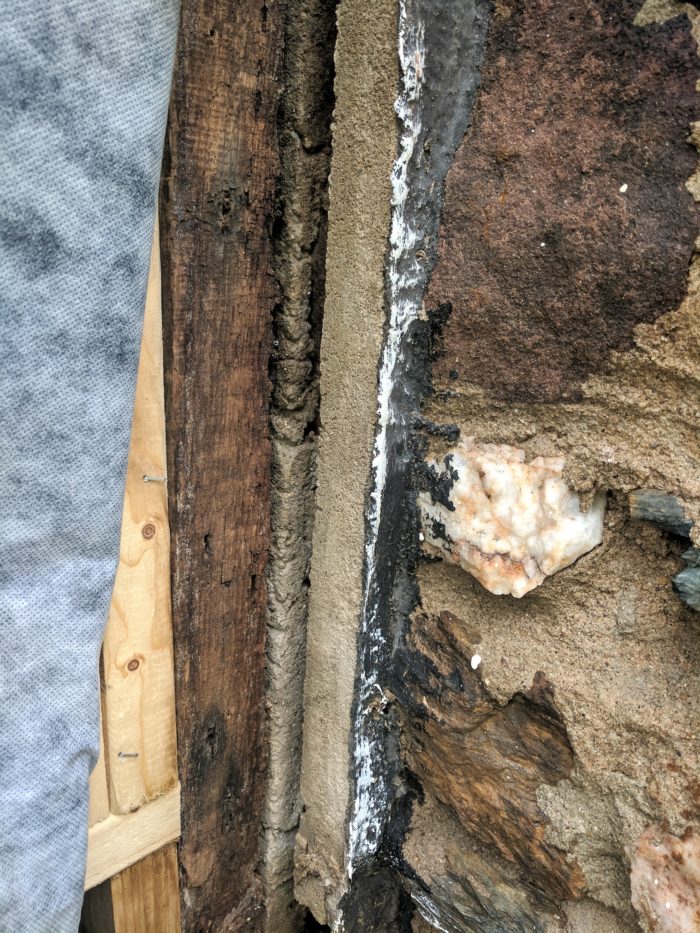
The final hurdle in our residing and insulation projects falls in the realm of how to flash a stone chimney that is up to 5″ in front of the exterior sheathing (at the top). Our wall assembly will be sheathing, mento 1000, 1.5″ roxul comforboard, 3/4″ furring strip then lp smartside lap.
Hopefully the pictures will offer more clarity.
Thanks in advance,
Bridgette

GBA Detail Library
A collection of one thousand construction details organized by climate and house part
Search and download construction details


Replies
Brigette,
I'm sorry -- the photos don't really clarify the issue, and your words are unclear.
You wrote that the chimney "is up to 5 inches in front of the exterior sheathing." I'm not sure what that means.
I'm going to make some guesses, and perhaps you can tell me if my guesses are correct. Here we go:
1. This is an exterior chimney with three sides facing the outdoors.
2. You are interested in a method of air sealing (and perhaps preventing water entry) at the vertical crack between the chimney and the wall sheathing.
3. There may also be a need to provide roof flashing at the intersection of the roofing and the chimney -- but if so, we need more details.
Can you clarify?
Bridgette, that type of chimney is a bit difficult to flash as a retrofit, but the best approach is to cut a vertical slot, called a reglet, a couple of inches from the back of the chimney and at least an inch deep. Insert a Z-shaped piece of metal to connect it to the wall. Use a high-quality masonry sealant to seal the metal to the stone. You can use short or long pieces of metal, but a single, long piece, taped to the Mento WRB, would look the cleanest.
For a better connection, hem the end of the metal being inserted into the stone, and tap in small, V-shaped pieces of metal to open the hem and wedge both sides of the hem to the reglet. Don't use aluminum flashing for this situation, as the masonry will corrode the aluminum.
Michael,
Excellent answer.
Michael,
I have a picture in my head of what you are describing but and getting lost toward the end of your response and can only be sure my guess is correct with a drawing. Would you mind posting a cell pic of a rough sketch? I guess I am a visual learner. Martins clarifications were spot on. Thanks!
Bridgette,
The technique described by Michael -- the "flashing in a reglet" technique -- is more commonly used for the flashing that prevents water entry where a chimney penetrates a roof than it is for a vertical crack like the one you are talking about. But the technique is the same in either case.
Below are some drawings and photos to illustrate reglets and flashing inserted into reglets.
.
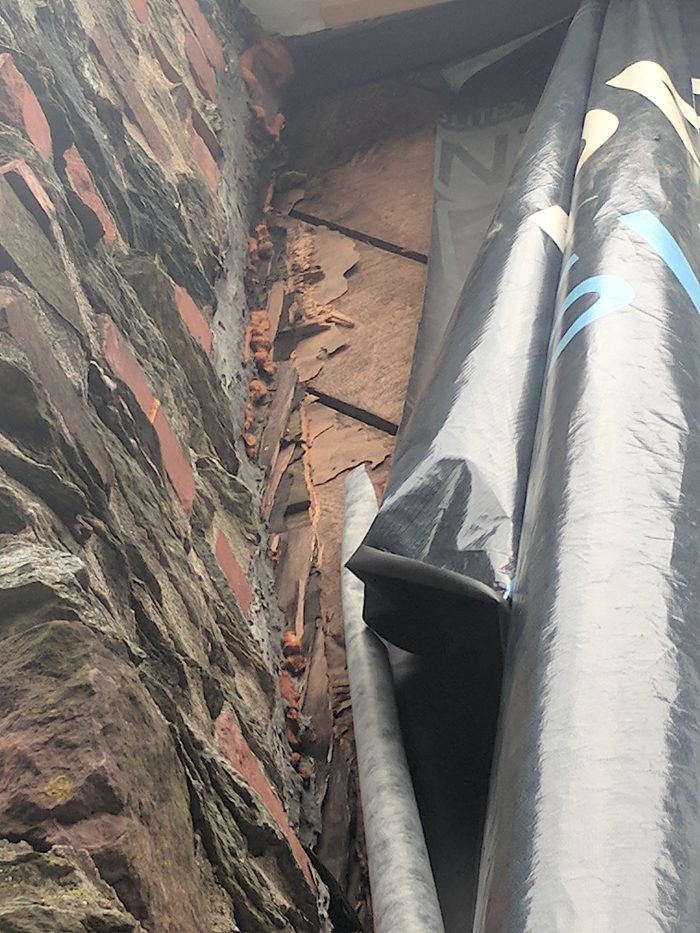
Thanks Martin, that covers it. Bridgette, the concept is the same as what Martin posted, except rotated to vertical of course, and instead of a small kickout where the flashing meets the roof, you would want the flashing to end with a generous flat area so you can tape it to the WRB.
Many thanks! So in order to insert flashing do I have to grind out a kerf (reglet) in the chimney? What depth and thickness? Sounds like a great approach! I will post pics.
Q. "So in order to insert flashing do I have to grind out a kerf (reglet) in the chimney?"
A. Yes.
Q. "What depth and thickness?"
A. About 3/4 inch deep, the thickness of your abrasive masonry blade.
What gauges copper and stainless would be needed? Pros and cons of each?
And to clarify; the Mento goes behind the flashing?
Bridgette,
When I was a roofer, my company always used 16-ounce copper (sometimes called 22 mil copper).
Bridgette, with a surface as rough as your chimney's, I'd add to Martin's comment--the depth should be a minimum of 1/2" to 3/4"; other areas will have to be deeper to create a consistent line for the flashing.
It will be difficult to cut a straight line on such a rough chimney. I would use two pieces of 3/4" lumber to make a long, vertical, "L" shaped guide for a circular saw. Screw one leg of the "L" to the wall, and the other should run out onto the face of the chimney. Put a masonry wheel on a circular saw and carefully run the wheel along the side of the wooden guide. You may want to use an angle grinder instead or in addition to the circular saw.
There are various types of masonry blades. I would use a diamond blade, because it will last a lot longer than the less-expensive, friable type, and it maintains a consistent radius. They are usually pretty thin, though, so you would need at least two passes to create a groove 1/8" to 3/6" wide, whereas the friable type will make an 1/8" groove in one pass. Try not flare the sides of the opening; if anything, create a dovetail-shape so the metal is more inclined to stay in place. If you get a helper to provide a light stream of water while you're cutting, it will keep the blade cool and the dust down.
16 oz. hard copper is always a good choice--it's easy to work with and will last a long time. Stainless steel comes in different grades; the tougher grades would work fine, but stainless is much less commonly seen as flashing, may be more difficult to get and you may or may not like the shiny look. If you don't like the color of copper, you can get it coated with zinc, which is a nice soft gray color. Or you can get solid zinc flashing, which is the most resilient of any metal flashing except marine-grade stainless steel, but it's hard to find.
Michael,
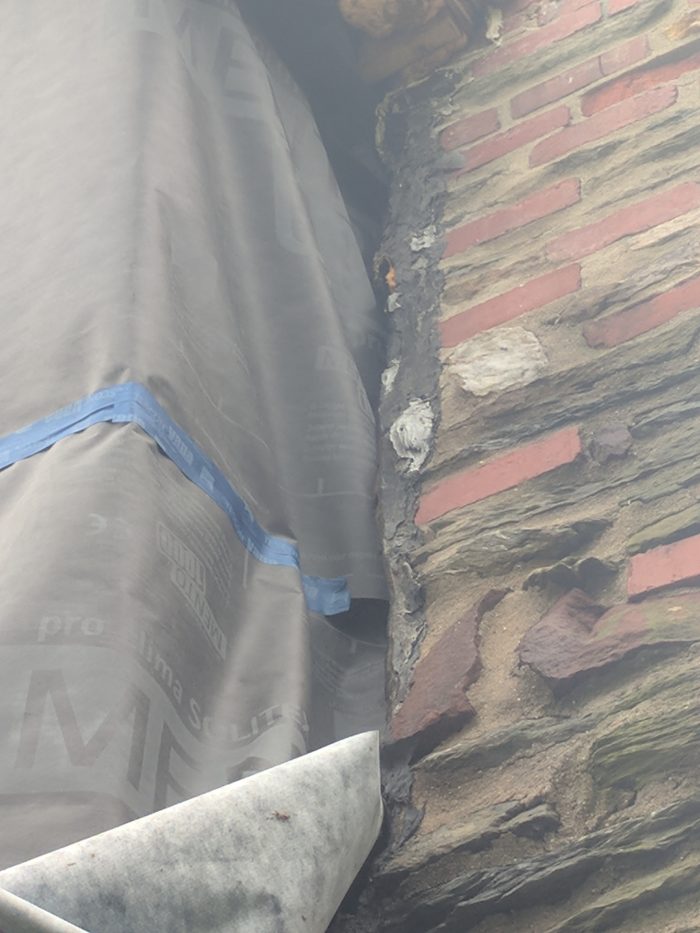
Thanks hugely! This was becoming a huge roadblock for us. I will pass this info along to my contractor. He was pretty concerned about the cut depth. He decided to go with 20 gauge stainless. The copper was a bit too pricey side. We at least have 1.5" roxul and furring strips building the wall out so won't see it as much.
hi again,
we finished half of one and it seemed to go smoothly albeit dusty. Any recs on what to fill the gap in the kerf with?
THanks,
Bridgette
Bridgette,
Gray-colored caulk.
Here are links to give you ideas about available products:
Chimney Masonry Patch
Chimney silicones and repair
I was thinking about this one because it has a metallic tint?
Ge Metal silicone
https://m.lowes.com/pd/GE-Silicone-II-10-1-oz-Gray-Silicone-Caulk/3076677?cm_mmc=SCE_PLA-_-Paint-_-Caulk-_-3076677:GE&CAWELAID=&kpid=3076677&CAGPSPN=pla&store_code=223&k_clickID=4648d6ad-9133-4dc4-b023-435fde4a535b&gclid=CjwKCAjw_IPcBRAjEiwAl44QkQPh8-3XHjF-1k2hu5YN38d1KG_cjcBCdLMjX38IACq7aMyQz1jSjRoCFa4QAvD_BwE
Bridgette, the flashing looks great! Your link didn't work, but usually the caulking matches the mortar, not the flashing. That's not to say you couldn't use metallic caulking if you want to, but it will blend in better if it matches the mortar.
Ok. Good to know. The rest of the work after today shows big gaps. Any idea how to seal these?
Oops.
Bridgette,
Your contractor should be able to handle these details.
Q. "Big gaps: Any idea how to seal these?"
A. Carefully install canned spray foam, taking care to ensure that the expanding foam doesn't mushroom out beyond the flashing edge. When the foam has cured, cover the exposed foam with gray caulk or mortar.