Vented or Unvented Cathedral Roof for Tiny House?
Hi GBA,
I am designing a tiny house and am wondering whether to go ‘Vented’ or ‘Unvented’ with the cathedral roof? I’d like get the best performance possible so a second opinion about my proposed assembly would be great. I’ve attached my current details. I live in climate zone 4, West Kootenays, BC.
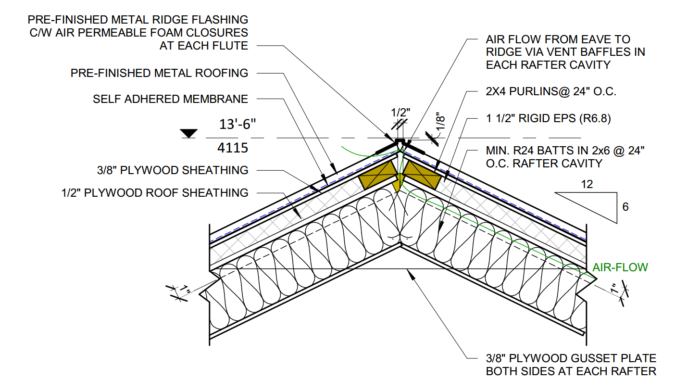
I have 2×6 rafters and was thinking of making vent baffles that would be compressed 1″ against the batt in the cavity to allow eave to ridge venting. I would install a bugscreen closure at the minimal rafter overhang and a breathable ridge vent foam between the flutes of the metal roof. I know compressing batt isn’t great but I did not see a better option to keep the overall height under 13′-6″.
I am also wanting to add a layer of rigid insulation to the roof deck to get a better total R value but therein I wonder if my proposed detailing is better off to go in the direction of an ‘unvented’ roof assembly?
We eventually want to add an HRV as there will likely be air/condensation to take into account.
Many thanks!
Steven
GBA Detail Library
A collection of one thousand construction details organized by climate and house part


Replies
Steven,
Adding rigid foam above the roof sheathing is incompatible with your idea of including a vent channel under the roof sheathing. You have to choose. If you want to install rigid foam above the roof sheathing, the roof assembly has to be unvented.
I think that all of your questions are answered in this article: How to Build an Insulated Cathedral Ceiling.
-- Martin Holladay
Thanks for your response. After reading the article I think will go forth with an 'unvented' approach.
My assembly would delete any venting through the rafters and install an air tight air barrier at the ceiling plane. Will this still dry to the inside? In the article in order to install fluffy (fibre-glass batt) it says to have an air barrier above and below the insulation. For above the insulation would the build-up of sheathing, rigid, sheathing, Self-adhered membrane count as this air-barrier?
Thanks
Steven,
Your plan will provide 22% of the roof assembly's total R-value in the form of rigid foam above the roof sheathing. (The roof assembly's total R-value is R-30.8; the rigid foam has an R-value of R-6.8).
I'm not sure whether your tiny house will be on wheels. But in any case, your approach will work if your tiny house stays in Climate Zones 1-3 or Marine Zone 4. It won't work if the house is located anywhere colder. (For more information on this issue, see Combining Exterior Rigid Foam With Fluffy Insulation.)
Your climate zone in B.C. is somewhat uncertain, since the U.S. Department of Energy doesn't include Canada on its climate zone map. One map shows that British Columbia may be colder than you think. Check out this map: Climate Zone Map Including Canada.
Q. "Will this roof assembly still dry to the inside?"
A. That depends on what type of air barrier material you choose to install on the interior side of the assembly. A vapor-permeable air barrier will allow inward drying, while a vapor-impermeable air barrier won't allow any inward drying.
Your illustration is vague -- it just mentions a "continuous air barrier." Intello Plus is a "smart" vapor retarder and air barrier that will allow drying to the interior. Drywall is vapor-permeable, and drywall works well as an air barrier if detailed properly.
Q. "In the article in order to install fluffy (fibre-glass batt) it says to have an air barrier above and below the insulation. For above the insulation would the build-up of sheathing, rigid [foam], sheathing, and self-adhered membrane count as this air-barrier?"
A. Certainly. The self-adhered membrane (presumably, something like Grace Ice & Water Shield) will be a robust air barrier.
-- Martin Holladay
Hi Martin,
Thanks again for the input. It is a tiny house on wheels. I am using Typar BuildingWrap for air barrier and Soprema Sopraseal Stick 1100 T for self-adhered membrane. It turns out that I am actually in Climate Zone 5 as per the document "Illustrated Guide - energy Efficiency of Houses in BC Zone 5-7A". A colder climate with more restrictive requirements. Per the document Cathedral Ceilings in Zone 5 must meet Effective RSI 4.67 (R-26.5) which is Nominal R28. Right now my assembly with fluffy insulation reaches nominal R30.8 but this doesn't work per the 'Combining Exterior Rigid Foam With Fluffy Insulation' article where it states it is critical that the rigid thickness is appropriate to set the condensing plane/due point of the assembly. Because I'm designing for road height restrictions as well I can't actually grow the rigid further above the roof sheathing.
Q. For this reason i'm wondering if it would be possible to trade the fluffy insulation in the rafter cavity for rigid eps foam? This would be similar to a SIP or Nailboard assembly but would be site built. I have good expanding foam and a gun from an SIP builder that I will use at the edges of each layer during install. I would want to keep the additional layer of eps on top of the sheathing to offset thermal bridging from the rafters. So the assembly and calculations would be:
-Mtl Roofing
-Self-adhered Membrane
-3/8" Plywood Sheathing
-1 1/2" Rigid EPS (R6.8)
-1/2" Roof Sheathing (Plywood or OSB)
-5 1/2" Rigid EPS (R24.93)
-Interior Finish (Drywall or T&G)
Total Nominal R value = R31.73. This total should exceed an 'effective' R value of at least R26.5 as req'd.
Q. Does this proposed all rigid assembly pose any threats regarding my cold climate condensing/due point?
I didn't bother to put an interior air barrier at the ceiling plane because I figure 5 1/2" of rigid eps is pretty airtight but let me know if you think it should be installed.
Thanks again,
Steven
Steven,
I don't particularly like the idea of sandwiching plywood between two layers of rigid foam. But as long as the plywood is dry on the day you do the work, your suggested approach will work.
-- Martin Holladay
Hi Martin,
I see what you mean, at this point the 3/8 plywood layer wouldn't really be required. I would opt to delete it at this point to buy back a little headroom and make for a simpler installation.
Thanks for pointing me in the right direction.
Cheers!
Steven
Steven,
You are choosing to install a layer of rigid foam between the top of your rafters and the roof sheathing. In other words, your roof sheathing is no longer directly attached to the rafters; instead, the roof sheathing is attached to the rafters with long screws that extend through the rigid foam.
There are a couple of issues with this approach. This approach may be fine for a tiny house, but in most cases, you would need to talk to an engineer.
1. The top layer of rigid foam may compress at each rafter under a snow load, since the load isn't being distributed over the sheathing but is concentrated at the rafters.
2. The roof diaphragm isn't as strong, since the sheathing isn't fastened directly to the rafters.
-- Martin Holladay
Hi Martin,
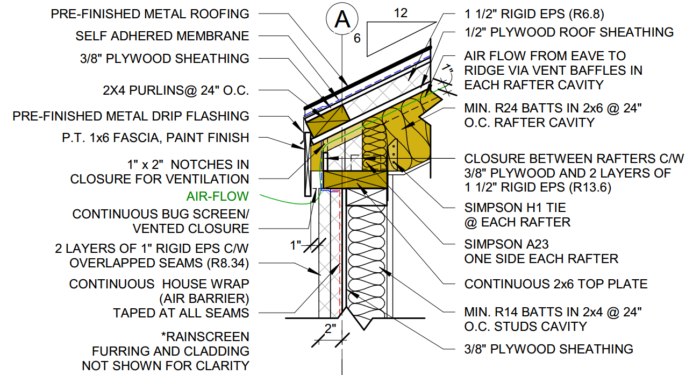
I was planning on actually having a 2x4 on flat purlin layer of framing above the rafters with a mid-point framing member so that the spacing between fasteners running +/- 6" o/c are close to 24" apart. The 1.5" rigid eps above the rafters would sit within this purlin frame and get expanded foam at the perimeters. This would ensure that the primary roof sheathing fasteners would always be biting into wood below and I would presume the purlins at bottom, mid-point and top being spaced at close to 24" apart would support the sheathing enough above the rafter locations to relieve the compression of the foam. Would you agree with this logic? I've attached some images that highlight approach.
I have had the framing reviewed by an engineer and I could have it reviewed again for this approach if necessary. But also I am not opposed to going back to the plywood sandwich.
Please let me know your thoughts.
Regards,
Steven
Steven,
It's probably OK -- but I'm not an engineer.
-- Martin Holladay
Steven,
I am planning an unvented cathedral roof assembly as well. My stack-up has 5/8" Zip above the rafters and then GAF ThermaCal2 nail base on top of that.
Thanks Martin,
I will have it checked by an engineer and let you know what they say.
User756436,
Thanks for sharing your detail. Looks like a nice system using thermacal and zip. Would be nice to use those systems on a project.
Cheers,
Steven
Hi, since this is a house on wheels you need to build a strong plywood box with the plywood directly nailed to the main framing. Moving the house down the road at 55 mph is a significant load on the structure. Attaching the plywood directly to the framing will give it the strength as well as limit deflection. Deflection will show as cracks in your interior finishes. A quick look at the nail base panel literature I did not find any reference to diaphragm design values for the panels. If you attach the panels with screws and expect it to act as diaphragm it will likely flex too much.
What are the design values used for a Tiny House built to be towed on the road? What wind design speed? It seems like you would need to detail the house for the dynamic loads for bouncing, similar to seismic design.
Hi Tim,
Thanks for your comments. I will have to get some engineer input about the road design loads. I'm going to go back to the 1/2" ply on the rafters with the additional 1.5" eps and 3/8" ply/membrane layer on top. This will give a stronger diaphram as noted and more peace of mind when it is in transit. The structural review for the framing specified H1 hurricane ties at every rafter (24" o.c) plus A23/A35 connectors at each rafter to t.o. top plate. The walls are anchored to the trailer frame with 3/8" dia. carriage bolts w/ wide washers through the sole plate through to the steel trailer frame with additional H2.5AZ connectors to attach each stud to the sole plate. The floor panels sit inside angle ledgers and are secured to the trailer frame with GRK RSS lag screws.
Steven
Hi Steve -- Are you still on this website? How did this build turn out for you? Any further thoughts after building? Thank you!