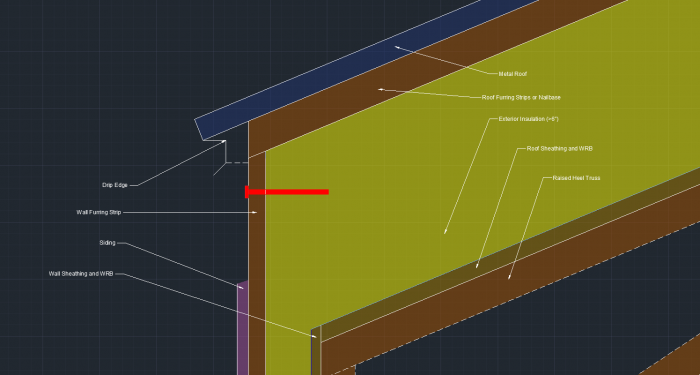
Wall Furring Strip Termination at Roof with Roof Exterior Rigid Insulation
Hello GBA Community,
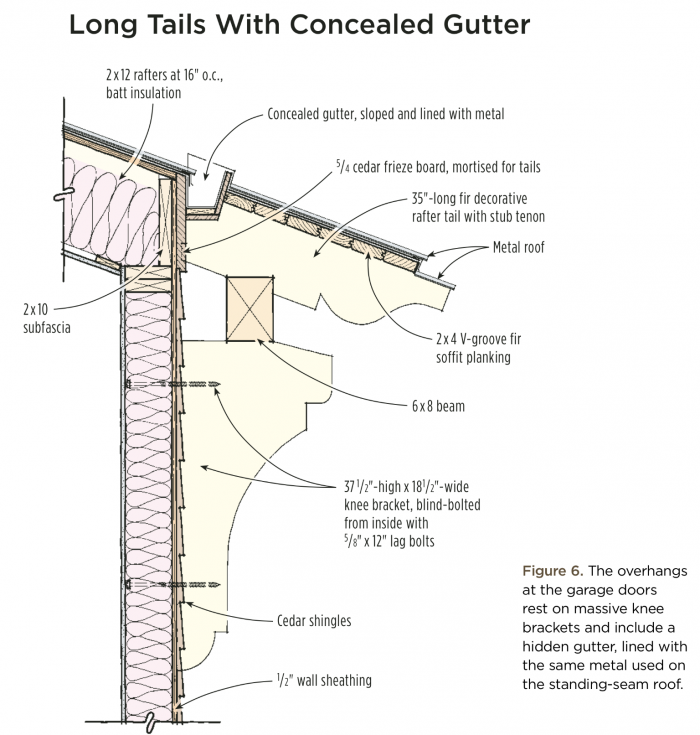
I am curious how people terminate their furring strips at the roof line when the roof itself has a thick amount of exterior rigid foam? See attached diagram. The red shaded screw is the detail I am talking about. Let’s assume you are using a raised heel truss of some kind, without rafter tails (for better air-sealing at the wall-to-roof transition). This would be similar to the “perfect wall” concept where the WRB and exterior insulation can wrap from the wall to the roof uninterrupted. Also, since we are talking about exterior foam on the roof we are obviously dealing with an unvented attic. The plan was to have rafter tails added after-the-fact to create the overhang and a concealed gutter (see second image). Just not sure how to adjust this to account for exterior insulation on the roof, or if it’s even possible.
Normally, the furring strips can be fastened to studs or framing of some kind, but at the very top, depending on your thickness of roof foam, they don’t necessarily have anything to hold onto. The screws would just sink into the bed of foam on top of the roof. You could stop the furring strip at the top of the wall, instead of continuing up to the roof line, but then what do you fill that gap above your siding with? Maybe you can run the furring strip up to the roofline but just leave the uppermost portion unsupported?
I am probably missing something obvious here. Any help would be greatly appreciated!
Thanks,
Matthew – Zone 2
GBA Detail Library
A collection of one thousand construction details organized by climate and house part


Replies
Matthew,
A larger problem is how you are going to provide support for the rafter tails and roof overhang. I suspect once you figure that out a solution to the furring strips will become apparent.
What you are proposing - both deep exterior foam and no continuous structure for the overhang - is probably the most difficult roof assembly I can think of. It might be worth reconsidering whether some compromise might be necessary to make it buildable.
One related thought: I've never seen hidden gutters situated that far in from the eaves. Doesn't that sort of defeat their purpose when you are still going to have water dripping from the outboard portion of the roof?
I've only done a few exterior roof foam retrofits, and I can't find my photos right now. If you need nailers for your wall furring strips, you can embed them in the foam. With long screws (Timberlok or similar) it can be done while still maintaining one continuous layer of foam and embedding the nailers in the outer layer. As Malcolm states, if you are going to be attaching rafter tails, you'll need additional structure; you may need to trade off a small amount of thermal bridging for a simpler, sturdier assembly.
Roofs with exterior foam insulation still need sheathing, sometimes with nailbase (plywood or osb adhered to foam)--manufacturers have recommendations for how to deal with the perimeter using layers of 2x framing. Another common approach that I have used is to fasten the foam using 2x sleepers running vertically above the foam; simply extend the sleepers out to create an overhang. There is a limit to how far you can extend with a flat 2xs but with sheathing on top in tension and applied false rafter tails below in compression it's a pretty solid system.
You really need a cold roof assembly over the top or similar to create the eave line. The other option like a sip panel, needs to be blocked with a 2x to bolt the eave and rake lines to. Attached is a picture of my eave/Rake assembly to create overhangs over the top of sips panels.
Z, is that tan wood (at the slight angle) plywood? What's creating the angle there? Is it covering the edge of the SIP foam?
Its a 2x10. At the edges of the SIP, 1-1/2" of foam is left out or carved out to fit a 2x that is screwed through the top and bottom OSB and creates a structural edge to the SIP. On the rake side I ran the OSB right over the top of the SIP panel for added strength and air sealing. The Eave line the furring strip will go all the way to the top of the Zip sheathing and finish with a J channel at the top.
The concealed gutter makes this detail much more complicated in my opinion. Like Mike and others have said, you are relying on tension members on the top, whether it's 2x's on the flat or a skin (e.g. plywood). If you break that with a gutter, you've lost your tension member.
The answer to your question depends on how you're finishing your overhang. Are you going for exposed tails like in the image? That will also make it tougher than a boxed in overhang.
Your tails will be acting like little beams with the top strapping or skin being a crucial tension component. The lower half of the tails will be in compression against whatever they're butting up against.
So the tail needs to be butting against something solid. It probably involves some 2x material to distribute the load if it's in the region of your roof foam still. Otherwise the inside of your tails will be levering in against your foam on too small a surface area (the end grain of the tail).
If you're using some sort of brace, like in the second picture, this changes things.
Thank you all for the thoughtful responses! This community is such a great source for advice.
I went back to the drawing board and decided to scrap the concealed gutter approach given this feedback. It would probably not be worth the effort. I found some good details from a couple of Matt Risinger videos. These seem to line up with Michael's idea of the sleepers on top of the foam:
1) https://www.youtube.com/watch?v=yTbMVdmnNlw (skip to about 5:06)
2) https://www.youtube.com/watch?v=jjHOqbJ9ZeQ (skip to about 40:35)
I have tried to incorporate his method in this latest iteration of the plan. See attached drawing. This has a traditional flat (perforated) soffit board, and a subfascia with 2x4 blocking providing the flat surface for the soffit to attach to. At the moment I have not added any gutter details but I have seen some pictures of box gutters looking good on the outside of the subfascia, color-matched to the metal roof trim and metal soffit. I think that will look fine.
A couple of quick questions:
1) Does anyone see any potential problems with this setup?
2) I would like the do the 2x4 furring strips above the foam instead of true nailbase/sheet good to allow venting underneath the metal roof. Risinger has a couple of videos where he has done this on 24" o.c. rafter spacing by laying the furring strips diagonally, thus ensuring the metal panels get their required fastening schedule, which is usually less than 24". With this setup, the furring strips would continue from the roof foam directly to the rafter tails. Is this a feasible detail?
Regarding #2, another option I considered was to increase the height of the rafter tails by 3/4", so that 3/4" plywood/OSB could be attached to the rafter tails instead of the furring strips and we could stop the 2x4 furring strips at the edge of the roofline. My only concern doing that would be I am now covering up the air gap needed to ventilate my roof. The second video shows him using OSB above the rafter tails, but he also is not planning to ventilate his roof. Maybe I could leave a big enough gap between the end of the furring strips and the start of the overhang decking to have an air gap, but I'm having trouble visualizing what that would look like in 3D.
Any comments are greatly appreciated!
-Matthew