Wall retrofit in Climate Zone 4a (borders 3A)
We are renovating our home in central North Carolina, built in 1991. Our climate is listed as a 4A (20 min south is climate 3A). Lots of crawlspace vapor issues, we will be sealing the crawlspace as most of the current moisture issues are coming up through cracks in the sub-flooring near AC vents (Ducts are located in the crawlspace).
I have read so many articles, bulletins and scenarios – none of which meet our exact scenario, rendering me unsure how to proceed. So I have a series of questions for the resident experts and the wall retrofit is the first one:
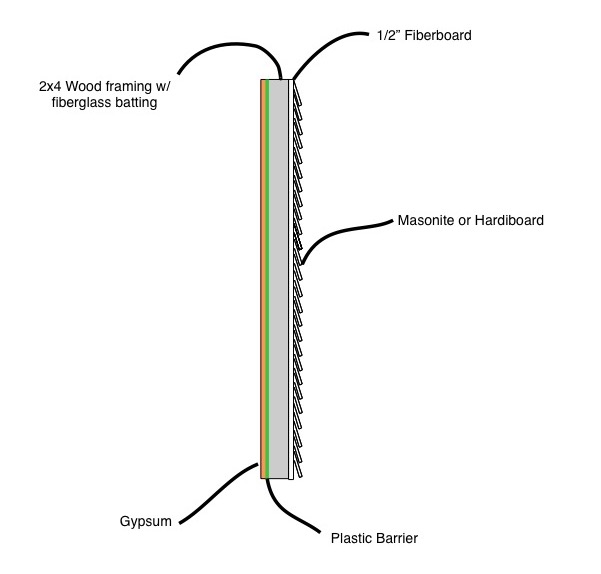
*Our home exterior walls were built as shown in the attached image. Namely,
Cladding->1/2″ fiber board->2×4 w/R-13 fiberglass batting->plastic sheating->drywall
*Cladding is mostly Masonite except a few areas that the previous owner made mods/repairs which he used Hardie Board.
*Mild mold was found on the plastic/fiberglass facing area in some areas (below kitchen window / behind sink on south facing wall was the worst) – none on wood.
*The outer sheathing of fiberboard (R-3/in and Perm 37) was attached after rafters were done. Sheathing was not notched around rafters and lots of holes for air (and critters) despite back blocking the sheathing on the inside (found dead lizard in the wall).
*Cladding is generally in good condition with the exception of a few locations, so we don’t want to remove all the cladding to redo sheathing. During the renovation process, we will have access to about 1/2 of the sheathing. We are considering replacing all fiber board we have access to with Zip R-3, notching around rafters and sealing with Zip Liquid Flash and Zip Tape at all joints and at the wall top plate.
*80% of all interior wall drywall is being removed and plastic barrier will be removed with the drywall.
*Per other articles on this site, it appears that any thickness of foam (EPS/XPS) placed on the outside will prevent inner cavity condensation in a 4A climate.
Questions
============
1) Will sealing the crawlspace shift the moisture problems – i.e. make the moisture laden exterior air come from other areas such as the poorly sheathed walls and/or attic?
2) Will using Zip R-3 on 1/2 the house and fiber board on the other 1/2 create a moisture/air flow imbalance resulting in higher concentrations of moisture in the “old”, non-Zip R-3 walls?
3) Based on our wall structure and access, what is the best value method to move the vapor/air barrier toward the outside of the structure (toward the fiber board, and away from the drywall) and eliminate (or significantly reduce) condensation?
Thanks in advance!!!
Bryce
GBA Detail Library
A collection of one thousand construction details organized by climate and house part


Replies
The high vapor permeabilty of the fiberboard sheathing is causing condensation on the plastic vapor barrier during the cooling season. The type of cladding matters too- masonry/brick/stucco and some stone can store a substantial amount of moisture, then release it in intense bursts when warmed by the sun.
Notching ZIP seems like an expensive (and potentially problematic) solution compared to leaving the fiberboard and adding a flash inch of closed cell foam on the cavity side of the fiberboard. That lowers the vapor permeance of the exterior layers from about 15-20 perms (the fiberboard) to less than 1.5 perms (the inch of foam), which is sufficient to limit the summer time moisture loading of the assembly while still leaving a drying path for the cavity. With ZIP-R the foil facer on the polyiso pretty much eliminates all drying toward the exterior.
If you won't have access to the interior side, adding a layer of half-inch or 3/4" XPS (not EPS, not foil faced polyiso) would add another ~R3, and bring the vapor permeance down to less than 3 perms (from 15-20). XPS can be detailed as an air barrier and WRB with tapes.
Dana,
Thanks for your quick response.
"With ZIP-R the foil facer on the polyiso pretty much eliminates all drying toward the exterior." - I know this is a noob question, it seems like that is what is recommended by Building Science Corp. That is, to have a barrier that directs moisture on the outside of the building to dry to the outside and moisture inside to dry to the inside. (see what I mean - too much reading). Is this what I need to avoid for our situation?
Are you recommending the "cut-and-cobble" on the interior and full exterior rigid foam on the exterior (where accessible)? If so, will the mix of the two be compatible?
The space between the foil facer and the polyethylene sheeting needs to be able to dry too, which is why I'm recommending against ZIP-R.
My recommendation would be to leave the R1.3-R2 fiberboard in place, fill the cavities with low density blown fiber insulation (to prevent blow outs & bowing of the fiberboard which would happen at dense-pack densities), and install a layer of half-inch to 3/4" unfaced XPS (R2-R3ish) detailed as an air barrier & weather resistant barrier over the fiberboard, between the fiberboard & cladding. The halfXPS lowers the vapor permeance to the exterior, but doesn't cut off drying to the exterior completely, and delivers approximately the code minimum R13 + R5 continuous insulation thermal performance.
If you're stripping the sheathing no matter what, do what Jon R says, cut out the interior polyethylene at each stud bay and air seal the interior side of the assembly. Filling the cavity with open cell foam would take care of most of the air sealing, but caulking the seams of any doubled-up framing and between the bottom plate & subfloor, subfloor & band joists etc with polyurethane caulk would make it more complete. Without the interior polyethyene installing ZIP-R would be fine, if that's what you would prefer.
Bryce,
Your wall suffers from solar-driven inward vapor drive. The effects will be worse on the east, south, and west sides than on the north sides. This article explains the phenomenon: "When Sunshine Drives Moisture Into Walls."
Martin - thanks for the article link. I figured that is what was happening (that and an air-leaky house). What would you recommend as a solution given the our specifics?
Also, I should clarify that the outer cladding is mostly Masonite except a few areas that the previous owner made modifications and updated with Hardiboard.
Air movement is typically the biggest problem and vapor drive is secondary. Spray foam (along with blower door testing and room-to-room and crawlspace pressure differential checks) can improve both. Try to get rid of 100% of the interior side plastic vapor barrier.
A Class I vapor retarder on the interior of your exterior walls in your climate is not appropriate. Class III is all that is needed, if that (building code aside...).
Patterns of wetting are important; if the moisture is equally distributed and pervasive, that suggests a vapor diffusion problem. If the moisture is patterned and more intense in some places than others, that suggests a leak, either bulk water or air.
It is hard to evaluate just what is going on in your walls until you completely solve what appears to be your biggest moisture problem: the crawlspace.
Get the crawlspace moisture-managed and then conduct blower-door directed air sealing.
Peter