Wet sheathing diagnosis
Hello GBA community,
Here’s a long post about a building science puzzle for anyone feeling bored and generous. I’m an insulation contractor who has been asked to diagnose wet sheathing and recommend solutions. I’ve got an idea of what’s going on but as this is a little outside my wheelhouse, I’d like to get the feedback and guidance of those more knowledgeable than I. Why is the insulator being asked to do this? Because contractor after contractor have failed to truly identify the root cause over the years (roofers, siding guys, masons, general contractors, drainage guys, etc.). I’ll try to put some pictures on here to help.
Here’s what we know so far:
– CZ4 mixed-humid
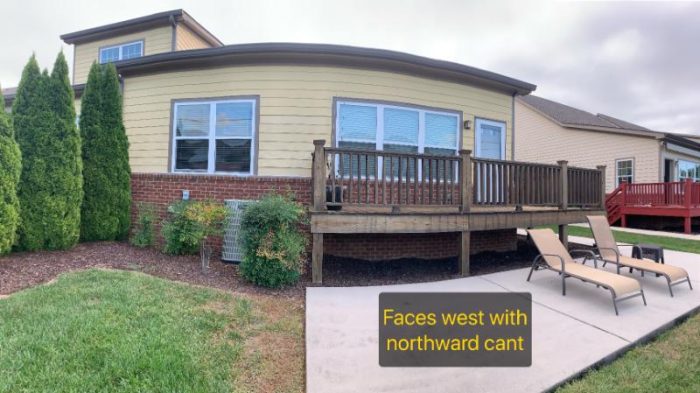
– South unit of a 2-unit townhome. Affected walls face south/southwest and west/northwest. North unit does not have a problem, according to HO. The affected unit has a deck lag-bolted to the west (rear) wall through the brick veneer. Unaffected unit has a porch that extends 12′ past the west (rear) wall.
– Built 2012, this owner purchased in Oct 2015, noticed mushy drywall with mold spots by spring of 2016.
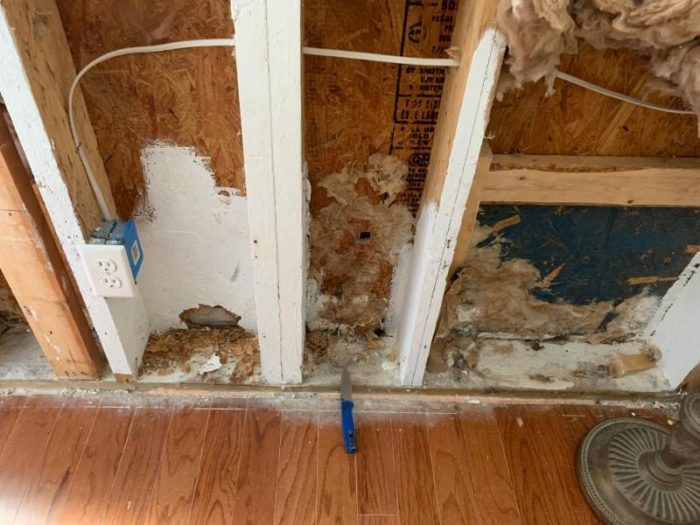
– HO had first 2′ of drywall removed along entire exterior perimeter, found wetness, mold, and a bit of sheathing rot at base of walls.
– HO had some rotten framing replaced, “mold treatment” (dish soap and bleach), and “mold paint” applied to affected areas
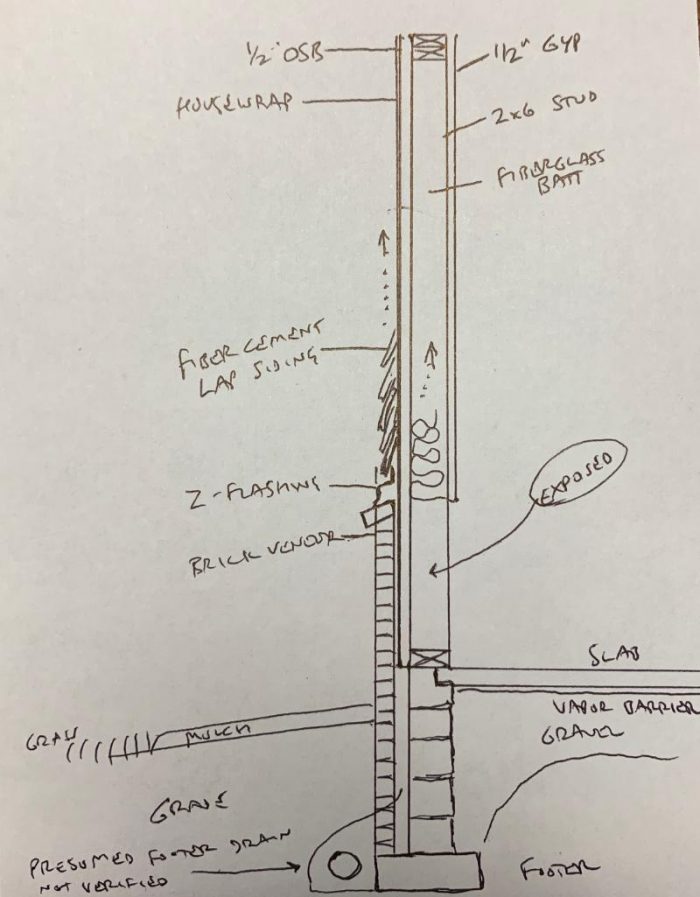
– HO had windows re-set, top 3 courses of brick veneer replaced to allow for top course to slope away from house (claimed it sloped inward beforehand), and new Z-flashing installed at brick-to-siding transition
– HO has also had exterior french drain installed, roof checked many times, weep holes drilled into brick at bottom/middle/top, then top weep holes filled, and garage slab core drilled to verify no excessive underground water.
– HO claims framing wood moisture content still 12-20% (higher at bottom plate) in framing, 15-20% in OSB, at all exterior walls. I verified these measurements. The sheathing gets to normal dryness about 1-2′ up from the bottom. This is the case in the conditioned house, AND the unconditioned garage.
– I noticed the characteristic wet spots at corners of window RO’s consistent with water infiltration around window openings
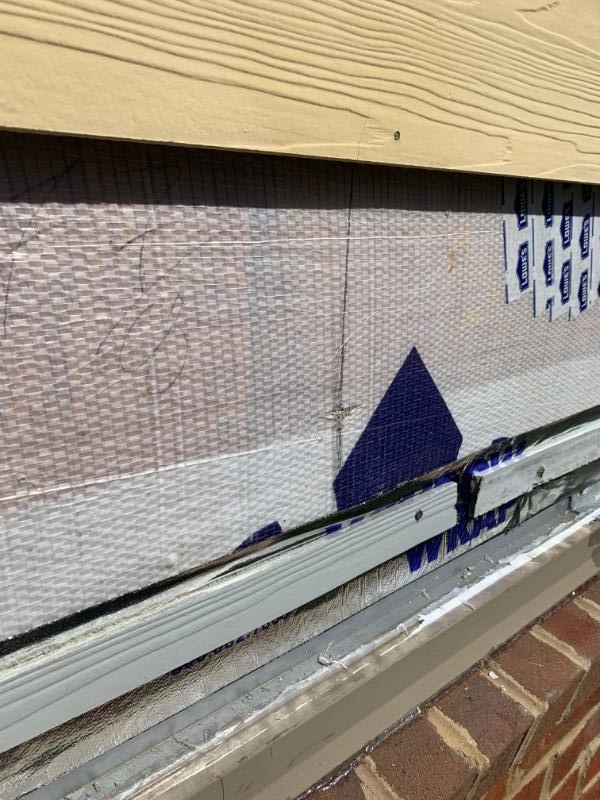
– The OSB seems to be the worst in places where the brick seems to be in contact with the house wrap. I could take the OSB apart with my fingertip, feel around the brick cavity, and notice mortar droppings bulging into contact with the housewrap in these spots.
– It has not rained here in several weeks and has been fairly hot for this time of year, so it’s hard to say how wet things really get based on my personal observations.
– The new Z flashing slopes into the house and creates a shelf where water can perch. It dies into window trim. It is caulked out the wazoo.
– The contractor who installed the Z flashing fastened it with drywall screws. There are a couple places inside where some insulation fibers stuck when the insulation was removed due to wetness in a fan-out pattern with one of those screws at the apex, which seems to indicate water entry through the fastener penetrations. Not surprising given the siding spacer creating a shelf for water behind the siding just above these screws.
– With the AHU on, the house is -2.8 Pa WRT outside, -1.7 Pa WRT the cavity between brick and sheathing. With the AHU off it is 0.0 WRT to brick cavity, and +1.3 WRT outside. HO keeps thermostat at 66 at night. We are an air conditioning climate with high summertime temps and humidity (this year we’ve had lots of >90 degree days and dewpoints are usually in the 60s-70s.
– The joint between sheathing and bottom plate is not air sealed.
I hope to return to the house for some hose testing and to place some data loggers at various points.
My best guess right now:
– Z flashing sloping toward house perches water and it finds its way into the wall cavity through window openings. Fasteners are also a weakness.
– Brick mortar droppings create perches for water against house wrap
– Solar radiation drives moisture held by the brick inward
Questions:
– Is solar drive through reservoir claddings enough to create that kind of wetness?
– Does the fact that the HO has had the lower 2′ of her walls gutted for the last few years help or hurt? I can see the low Tstat setpoint creating cold OSB at night while simultaneously drawing a lot of muggy air through the sheathing/bottom plate joint, but could that be enough to keep things that wet? Presumably it would bake out during the day due to high solar exposure.
– If anyone has a recommended process for hose testing and data logger placement, I’m all ears. I have my ideas but am relatively inexperienced.
Thanks to anyone who actually read all this!

GBA Detail Library
A collection of one thousand construction details organized by climate and house part


Replies
> Does the fact that the HO has had the lower 2′ of her walls gutted for the last few years help or hurt?
No insulation means that the sheathing will be close to the interior air temp (ie, cool with AC). This is a bad idea when combined with high exterior perms and moisture retentive brick.
Sounds like the major problem is wet brick creating and maintaining a humid environment (with and without solar heating). And probably some leaks/detailing issues.
Bushes restrict solar drying.
During Summer, low indoor humidity (like 50%) and positive pressure will help with wall drying. In Winter, you want even lower indoor humidity and negative pressure.
Thank you Jon R!
I should mention that there is one room on the rear of the house that still has all insulation and drywall intact. The drywall in that room shows signs of moisture in the lower 1-2' as well. This would be the room just over the outdoor condenser in the picture of the rear face of the building. So this sheathing would theoretically be much warmer than that which is currently exposed. Another clarification, the long windowless south facing wall is an unconditioned garage, and the same wetness pattern exists there as in the conditioned area of the house. Both the garage sheathing, and the sheathing of the room that has not been gutted from 2' down, should theoretically be quite warm compared to the exposed sheathing indoors, right?
The bushes at this particular house do not provide as much shade to the brick as the pictures may suggest. Yes, there is some, but the sun shines from a pretty steep angle and sweeps that southern wall so that not much of the brick is in the shade for much time.
I'm thinking the solutions are manifold. Correct the window rough opening waterproofing measures, correct the Z flashing, and rebuild the brick to provide a proper ventilation gap with weeps high and low, and maybe even a bug screened vent strip of some sort to connect the cavity to the outdoors just beneath the Z flashing, or just beneath the uppermost course concealed by the shadow line. I doubt they have the budget to reside with a rainscreen system, although I would like to see that happen as well.
You will find this Matt Risinger video interesting.
https://www.youtube.com/watch?v=Rd60AlJgwrw
After watching this video I tend to agree with Matt that house wrap in this video is not enough protection for a masonry wall. Be sure to see the video from 12 to 13 minute points in the video
I have seen other video where they put liquid water on horizontal house wrap the pin prick products leaked. This test is a little unfair because it is designed for the vertical but I say if it leaks it leaks.
“The OSB seems to be the worst in places where the brick seems to be in contact with the house wrap. “ It seems you are missing the required 1 inch gap between the masonry and the house wrap.
It seems from here there are 3 faults. One is this job seems to have only 1 layer of water restraint barrier the masonry. Two the single water restraint barrier is the inferior pin prick type product. Three the masonry is in contact with the house wrap.
My guess is these facts will not be a surprise to the owners they are looking for a low cost fix that does not exist. The real fix will require removing the brick and the siding, repairing the rot, installing new water restraint barrier, replace the brick and siding. A rain screen behind the siding would be a nice touch.
My wild guess the repair cost over $300 a foot.
Walta
Brick ledges are overall a bad idea, they do a very poor job of shedding rain. The best way to deal with it is to extend the Z flashing with a drip edge past the brick. Because of the orientation, my guess is the brick is always wet, when the sun hits it, it pumps all that moisture into the wall creating the issues. Bricks can absorb 7% to 15% of water per weight, so that is a lot of potential water.
The deck ledger is probably not helping either, that should have a Z flashing installed above it as well:
https://www.homeconstructionimprovement.com/wp-content/uploads/2011/03/Deck-Ledger-Detail-at-Brick.jpg
P.S. It is hard to tell from the picture, but the Z flashing should go bellow the house wrap. You want any water coming down behind the siding to be channeled outside.
My vote is the housewrap and improper flashings. The fact that the garage has the same issues as the conditioned spaces suggests that this is not a vapor drive issue, b/c the garage is generally going to remain above dewpoint temperatures.
I have done water testing on woven housewraps like this and they leak everywhere. I'm not sure how they pass the testing to get their ESR, but I would never use one on my project. Even good housewraps leak at fasteners, but these leak right through the field of the wrap. They get even worse with any sun exposure. The long strips of siding starter don't help. You are right that they could be damming water high in the wall. If you hold water against the houswrap, it is going to find a way behind.
The brick veneer was installed improperly. The IRC requires through-wall flashing and weep holed below the brick sills, below window sills, and at the base of the system above grade. Drilling in weep holes after the fact doesn't help, as there is no flashing to guide the water out through the weeps. The mortar bridges don't help either.
The Z flashing is also installed improperly. From the photos, it looks like it is installed in front of the WRB. Water running down the WRB will just go behind it. The WRB should have been sliced so that the Z flashing could go up the wall behind it. A good installer will use an aggressive tape to tape the top of the Z to the sheathing. Done properly, this tape can "wipe" the water off the surface of the sheathing and bring it back to the exterior, even if the WRB has been leaking above.
Add all of these leaks together, and you've got water entering the brick cavities, both behind and in front of the WRB. With no base flashing, that water pools at the base of the wall, soaking the sheathing. There's a good chance that the bottom of the sheathing is actually sitting in the mortar droppings at the bottom of the cavity, and the mortar is keeping it continually damp.
The solution is to take off the brick and do it right, or not at all.
I broke this up into two posts because of length.
You asked about water testing, and here's how to do it. You will need to find someone with a blower door.
Remove the damaged sheathing from the interior, as much as you can, for a couple of stud bays wide. Cut out the WRB so that you're looking at the back of the brick.
Use the blower door to depressurize the house to -50 Pa. This simulates about a 25 mph wind. You can do the test with and without the blower door, but the blower makes the test much faster. If you can't find someone with a door, operate as many vent fans as you can and try to seal as many exterior air leaks (flue dampers, windows, doors, etc.) as possible. Sometimes you can get -5 or -10 Pa this way. -50 is way better.
With the blower running, spray down the exterior of the brick with a garden hose on "spray" mode, not a tight stream. Start spraying just the bottom 1' or so of the veneer. Do this for 5-10 minutes unless you see water right away. If no water after 10 minutes, move up the wall and soak the whole wall, but not above the top of the brick sill. Again, after 10 minutes, move up and spray the area from about 1' up the siding to about 1' below the brick sill. You will likely have water pouring into the house by this time, and you can stop the test.
I would do this test at areas where the exterior has been relatively untouched since the Z flashing went in. I would also do one area around a window and one where there are no windows.
You generally see water coming right through the mortar joints within 30 seconds or so of starting the spray. If so, go ahead and move up the wall right away so that you don't load too much water into the walls. sometimes within a couple of minutes, you've got the whole wall leaking and water running onto the floors inside. This is a good visual indication for the homeowner of what's going on.
Record your setup and test conditions, photograph everything before and during the testing, time how long it takes to leak, and show the water pooling at the bottom of the wall and soaking the sheathing. Take close-up video of the water dripping right off of the mortar chunks and mortar joints. All of this will be useful during the inevitable lawsuits.....
Perhaps useful. And even as drawn, I'd expect high humidity behind the brick (because there is no drying airflow).