
Image Credit: Fine Homebuilding
More Q&A Spotlight


Finding effective ways of beefing up under-insulated roofs is a perennial problem, affecting countless houses built to minimum energy standards.
Even roofs that meet minimum code requirements are susceptible to thermal bridging when only the rafter bays are insulated.
So imagine starting with a New Hampshire beach house whose cathedral ceilings contain not a speck of insulation. “There is no insulation except for 1/2-in. Homosote sheets between the trusses,” Michael Buckley writes in this Q&A post at GreenBuildingAdvisor. “The roofing is relatively new (5 yrs). So I would balk at tearing it off.”
Although Buckley posted his question last September, it continues to attract comments, as well as questions from other homeowners facing similar problems.
Buckley’s budget is limited. He has no objections to putting in a new ceiling, but he wants a cost-effective way of insulating the 5 1/2-in.-deep bays between the framing. He intends to do the work himself.
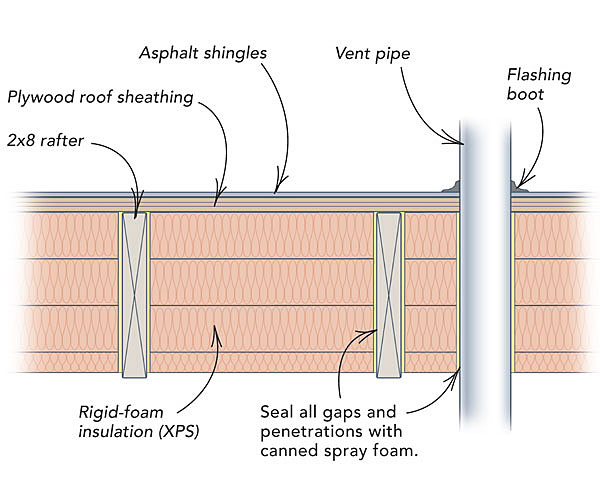
As GBA senior editor Martin Holladay points out, Buckley is in Climate Zone 5, where code requires a minimum of R-38 ceiling insulation. “That amounts to about 7 1/2 in. of XPS foam or about 6 in. of polyiso foam,” Holladay writes. “Or you could use about 12 inches of fiberglass batts.”
What’s the best answer? That’s the subject of this week’s Q&A Spotlight.
One plan that won’t work
One option Buckley has been considering is a combination of polyiso foam board and a product called Prodex Total 48, which consists of two layers of reflective aluminum on a 5 mm (3/16 inch) layer of closed-cell foam. Retailers handling Prodex claim the material has an R-value of 15.67, prevents 97% of potential radiant heat transfer, and even acts as a vapor barrier.
Don’t believe it, both Holladay and…
Weekly Newsletter
Get building science and energy efficiency advice, plus special offers, in your inbox.

This article is only available to GBA Prime Members
Sign up for a free trial and get instant access to this article as well as GBA’s complete library of premium articles and construction details.
Start Free TrialAlready a member? Log in


10 Comments
Climate zone is the key
When air-sealing and insulating a roof is it important to understand which direction the vapor flow will go, and choose your product(s) accordingly. In some climate zones the vapor could flow different directions at different times of the year, so it can get complicated. The short answer for all climates is that if you use all foam insulation, and not a combination of fiberglass, rock wool, cellulose, or other "fuzzy" insulation material, you are much less likely to have a moisture problem. The problems will occur where the impervious foam insulation is on the "wrong" side of the "fuzzy" insulation. If the first condensing surface in the direction of the vapor drive is within the foam, there will be no problem. If the first condensing surface is within the fiberglass, you could have a big problem.
That having been said, I favor a product called Insul-lam in my area, Nail-Base in others, now coming to be known as "retro-fit SIPS" The product has a layer of EPS foam insulation bonded to a single layer of OSB. The OSB provides a structural surface on which to attach the new roofing (or siding, on side-wall applications). The OSB also provides a convenient attachment mechanism; you simply run a long screw through the OSB, foam layer(s) below, and into the rafters or studs beyond. Air-sealing between the panels is done with special mastic, or with spray-foam or both, depending on the application. Virtually any thickness or R-value of insulation is available, thicker lay-ups simply use multiple layers of foam.
This product can be used by do-it-yourselfers, though the steepness of your roof pitch may determine your willingness to undertake this project yourself.
KISS indeed!
6" of rigid iso (with or without pre-applied nailbase) above the roof deck feels like the "right" solution to this humble pilgrim. The rustic bare-wood ceiling look is preserved, all of the structural wood stays inside the thermal & pressure boundary of the building all cozy & dry. Batts between rafters in would require adding ventilation between the insulation & roof deck. Hack'n'stack sealed foam board between the rafters would be better, since it's at least an air-impermeable insulation, but even that would require a vent gap below the roof deck to meet code, and you'd still be under R38 on that 2x6 rafters unless you fattened it out, per Holladay's recommendation.
If he places ANY dollar value factor in all of the cut'n'cobble + seal labor it may be getting close to cost-neutral to just bite the bullet and re-roof, putting the foam on top. (Why anybody would have re-roofed that house without adding at least SOME foam is a mystery.) But if the hack & stack approach is how it's going to be and cash is king, there's no point in using virgin-stock full-dimension unblemished goods- dig up a source for reclaimed foam from commercial re-roofing/demolition. (Search craigslist or try the Insulation Depot in Framingham MA if there isn't a source closer- it's only 60-90 minutes from the NH beaches.)
Roof Insulation
Been there, done that! With a lot of help from Martin, (thank you very much). I may be a bit more enterprising DIYer than most, but that's probably an age factor - be 67 next month, so I don't worry about 'mistakes', Either I'll fix'em, or be gone before they matter. I tore the roof off half of this house last fall. The place is really two post and beams joined together not too expertly by some past sinner. The back half is cathedral, the front half is not. The back half had serious sagging, so that required more re-construction. To make a very long story short, I ripped off all the asphalt shingles. For the front, I added a wooden frame around the periphery, (think of it as a giant flat cake pan), installed 2'X4'X3" foam blocks on top of the deck.(There were places I had to replace decking.) All the blocks were 'glued' together with expanding foam, plus I taped the seams. I also foamed the edges touching the wooded frame. I placed 1X4s horizontally across the roof using sip screws to secure them through the foam to the rafters. (These were locally rough cut, thus a full 1 inch thick.) The back half I removed the 4X4 rafters on 27-30" centers, and replaced them with 3X10s on 24" centers. All the interior walls had to be replaced in the back half since the new rafters did not have the 5" of sag, thus none of the walls reached the ceiling.:>) On the back half I then installed osb, then 3 inches of foam (same wooden frame concept) and the strapping. Inside (this is the cathedral portion) I cut down to fit and installed 2 blocks (6 inches) of foam between the rafters. I should mention I scored groves on the bottom of the strapping to allow moisture movement on the drainage plane. To the strapping I installed metal roofing. I lost two 'discussions' with the Queen - to install sheet rock between the rafters (with an air space) to have exposed rafters ... we have a flat ceiling instead, and I had to reinstall the two skylights. So my R-50-55 roof has a couple R-3 holes. We live in a 'micro climate' hilly (2200 ' elevation) area east of Lake Erie - get some real lake effect snow. This past winter was the easiest to heat in the 11 years here. And now its cooler than ever (though the skylights require foam blocks during the day).2X4 blocks required some extra work, but were easy to handle on the roof, and to cut down to size on a table saw or a radial arm in the rip position. The real reason was I was able to secure recycled blocks, so the cost for a 4X8X3" area was $12.
How to Retrofit a Roof with Insulation
In my humble opinion I believe the only way to effectively and cost wise to solve the problem is to insulate from the top. See, http://solaralberta.ca/pdfs/Harold%20Orr.pdf
We have done several roofs this way, 1. remove the shingles. 2. cover the roof with 6mil poly sealed at the wall line to the VB in the wall. 3. install strips of Orientated Strand Board
or plywood as walking strips on the poly. 4. Make a grid frame work of 2" dimensional to make space for the insulation. 5. Fill this space completely with insulation. (I like rock all because of its higher R value, fire, and moisture resistance and good cost per R value.) 6. install roofing over a wind barrier like spun olefin. ( this could be metal, or roof sheathing and shingles)
Adhesion
How do you get the rigid foam insulation to adhere to the underside of the roof and then to itself?
Adhesion by Frank Spencer-Molloy
You MUST cover the rigid foam with a fire resistant material at least 1/2" drywall and you can screw through the drywall and insulation. But the screws are heat bridges!
Harold Orr link problems
Harold,
I tried to link to your pdf through this site and by going directly to the solaralberta site. Neither method loaded your pdf. Did I miss something? Thanks Jim.
Response to Jim
Jim,
The link works for me.
Harold Orr link
Thanks Martin. It seems the problem was that the file was so large. I hadn't waited long enough for it to load.
It's me again...
the aforementioned Smith. Based on your advice and after a lot of looking at various options, we've decided to go with the 2" polyiso, two layers, on the inside of the unvented cathedral ceiling.
Layer 1 we could attach with screws to the roof decking, correct?. What about layer 2? Is there any glue-like stuff we could use to attach 2 to 1 or even 1 to the roof decking? We will cover it with gypsum board (quite how I don't know; we are doing the polyiso ourselves then having a contractor I trust do the g board) and there will still be rafter showing, about 3" of it. I know it's a thermal bridge and 4 in of polyiso may not be perfect but it beats nothing, which is what I have now. But just wondering how to stick it all up there. We are in Atlanta, GA.
And Dana? I asked the roof contractor about taking it all off and insulating when he was putting on the metal roof and he advised against it. "the old shingles will go in the landfill, it will cost a lot more, etc etc" It probably would have cost twice as much, so this solution is actually going to work out cheaper, though that's not why I did it. Whatever. Caveat emptor.
thanks for your advice on attaching the polyiso to roof deck and to itself.
Log in or become a member to post a comment.
Sign up Log in