

More Building Science


Which roof penetrations cause water damage? They all do, of course. But some are more likely to leak than others. The photo above shows the back of my house. We got a tiny bit of snow here in Atlanta one day last winter, and some of it even stuck around for a few hours. With the snow there, you can see the penetrations more easily. There are five of them: a chimney, furnace flue, and powered attic ventilator near the ridge (disconnected), the kitchen range hood midway down, and a plumbing soil stack down near the eave. One of those is far worse than the others.
Low roof penetrations are more likely to leak
The zoomed-in photo below should make it clear to you which one I’m talking about. The soil stack comes up through the exterior wall to the right of the kitchen window. And look at that brick wall! That discoloration just appeared a couple of weeks ago when we had about 6 inches of rain in 36 hours. Ugh!
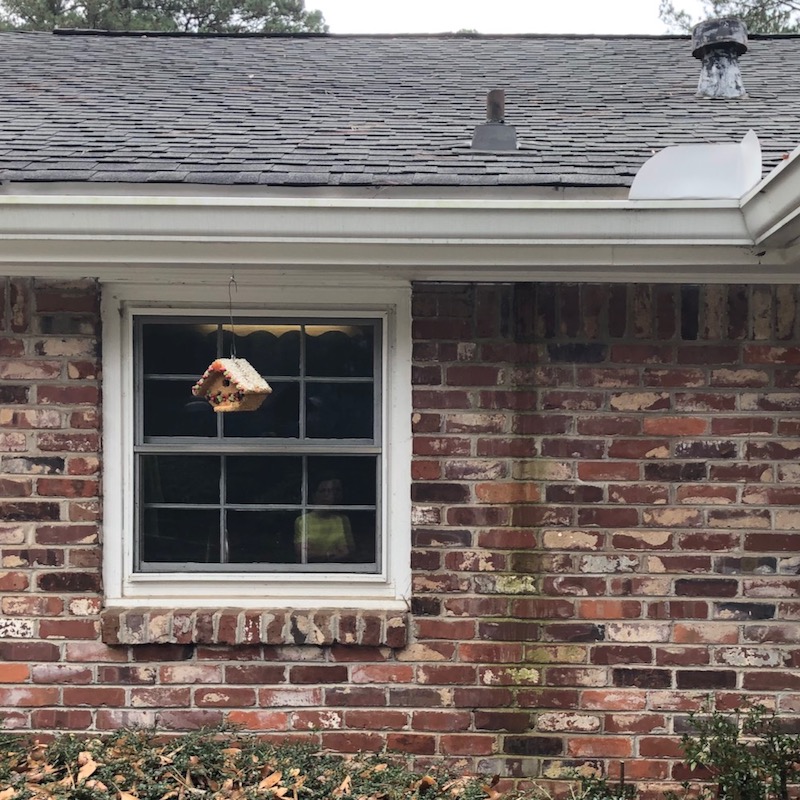
So, of the five penetrations showing on my roof, the soil stack is most likely to leak…and it is indeed the one that’s leaking. Why? Because it’s lower on the roof. Lower parts of the roof get a lot more water. At the ridge, the only water a penetration gets is the water that falls right there. The three vents on my ridge are therefore less likely to leak. The soil stack, at the bottom edge of the roof, gets all the water that lands on the whole slope above it.
Double the pain
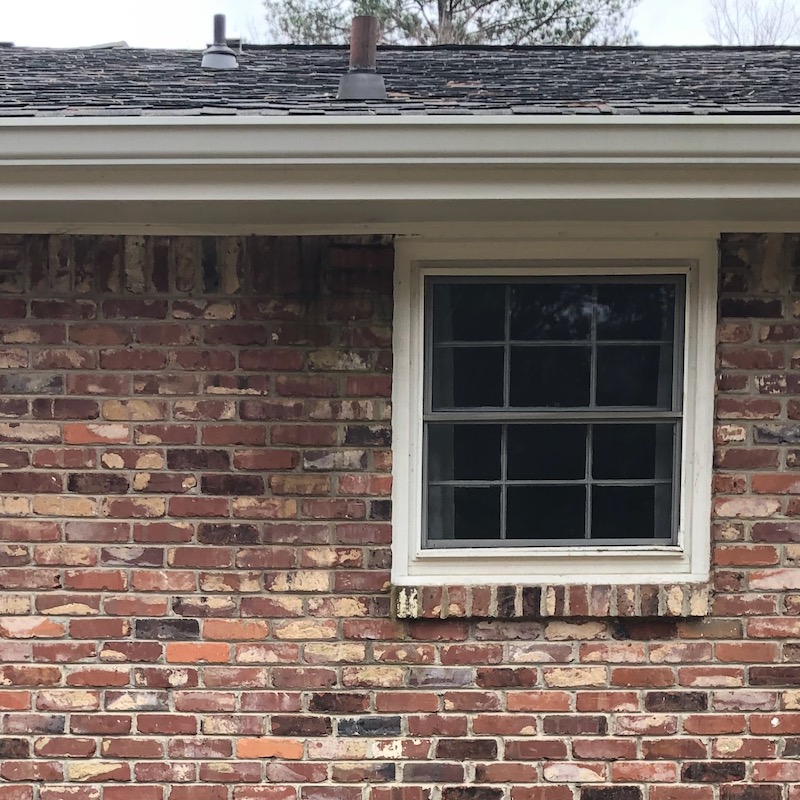
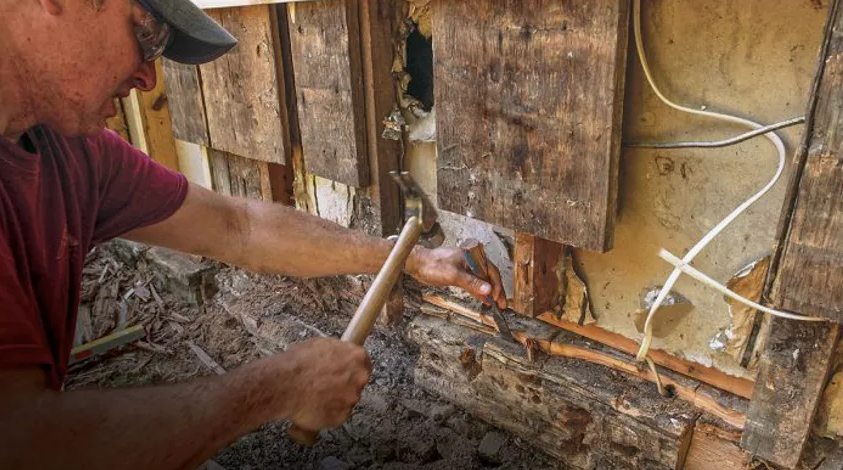
Unfortunately, that soil stack at the kitchen isn’t the only stupid roof penetration they put in my house. The photo below shows a second soil stack at eave above the bathroom. And guess what? That 6 inch rain caused the flashing to fail there, too.
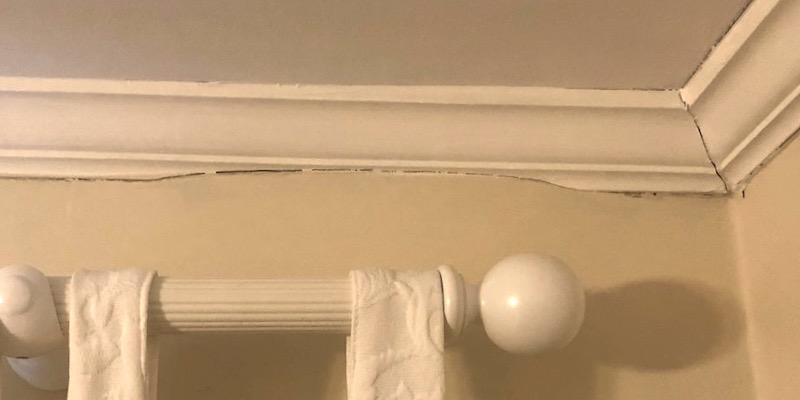
Here’s the drywall just below that soil stack roof penetration. It’s expanding out over the crown molding right where the pipe goes through the exterior wall because of the water that it has absorbed.
So, I’ve got two leaky roof penetrations to deal with now. But having these plumbing vents near the eave isn’t the only problem. The pipes that you see coming up through the roof go through exterior walls. That means they’re taking space away from insulation, too.
I’ll have to fix the leaks soon. I’ll call a roofing company to repair and reflash the penetrations for now, but I really want a longer-term solution. I’ll first need to relocate the soil stacks in the basement and crawlspace. This is the year I gut and remodel the basement, so that’ll be part of the process. The hard part will be finding places to take them up through the first floor and into the attic.
A note about other roof penetrations
For those of you who know this blog and what I preach, you may be wondering about the roof penetrations for the powered attic ventilator and the furnace flue. We have a spray foam insulated attic, so I’ve disconnected and sealed the powered attic ventilator with foam. And we have an all-electric house with heat pumps now, so I’ve also disconnected and sealed the furnace flue.
On the bedrooms side of the house, we also have roof penetrations for two bathroom exhaust fans and two more soil stacks. Three of those four are close to the ridge, and one of the soil stacks is midway up the slope. When I get my new Zehnder ERV installed this year, I’ll monitor indoor conditions and maybe remove the bath fans when we get a new roof. That would leave me with four fewer penetrations after I remove the furnace flue and powered attic ventilator.
Let my pain be a lesson to you. All roof penetrations cause water damage when the flashing fails, but low roof penetrations are more likely to fail because they have to deal with more water. Put all roof penetrations as high up on the roof as you can to minimize problems. And of course, minimize the number of roof penetrations, too.
________________________________________________________________________
Allison A. Bailes III, PhD is a speaker, writer, building science consultant, and the founder of Energy Vanguard in Decatur, Georgia. He has a doctorate in physics and writes the Energy Vanguard Blog. He also has written a book on building science. You can follow him on Twitter at @EnergyVanguard. Photos courtesy of author.
Weekly Newsletter
Get building science and energy efficiency advice, plus special offers, in your inbox.


10 Comments
No argument that putting the penetrations higher up is better if you can, but one thing that stands out is that the plumbing flashing in your pics look like they have a gasket that seals the pipe to the boot. This is something that typically seems to dry and crack. We typically use a lead boot that is shingled in and then wraps over the top and into the pipe. We have been able to reuse these on re-roof projects, some after 100 years on a slate roof. We have also been able to replace the pipe from the inside when re-plumbing without removing the boot. You can slide the old down and slide a new one up into the same spot when you don't want disturb the roof, say when it is a tile or slate material,
This seems like the ultimate in durability.
Lead has its downsides, but this seems like a good use.
jimkas,
I agree, lead boots are great. I've learned to live with the more common plastic ones, and worked out a system where I feel I can trust them over time.
- The first thing I do is integrate a square of peel and stick membrane into the shingling. It goes against the WRB, but the bottom edge comes out on the shingles just above where the bottom of the roof boot will sit. The hole in the membrane is cut tight and caulked to the pipe. If the roof boot fails, this provides secondary protection.
- Before installing the boot I run a bead of caulking around the pipe just above where the boot will sit. This gets pushed down by the boot and seals against water intrusion, even if the gasket on the boot hardens or cracks over time.
- Finish it up with a ring of caulking around the pipe once the boot is in.
Allison,
Sorry about your roof. Finding a leak feels like coming home to discover burglars have been in your house. Hope things improve, and you have a good Christmas.
I recently saw a Build Show video with a house in Texas venting their sewer stacks out of sidewalls. Does anyone have any experience doing this in cold climates? I presume the pipe would need to be insulated to reduce condensate freezing issues. Any idea on insulation levels? Obviously the vent would need to be strategically placed away from intakes or soffit vents, windows, etc. It would be nice to avoid punching holes in the roof. I'm in zone 6.
JustusM,
The viability depends entirely on your code. All require clearances to air-intakes and operable windows. Some have restrictions on where it must terminate in relation to the roof, lot lines, height above grade - and some preclude it all together.
JustusM,
I live in CZ6B at altitude and have a sidewall vent. It is 2" PVC ending with a 90 elbow and short drop leg. It runs ( with a low slope) through a conditioned space above the 2nd floor ceiling, but below the un-vented R52 roof. I have never checked, but I assume the space is nominally 68F most of the time in winter. We have gotten down to -5F recently and so far no signs of any icing at the vent mouth. The last bit of venting condensate does make a little ice puddle down below, so be aware if the vent is over a lower roof.
The plumber called it a wet vent, of which at least one is required by code. It runs primarily off the laundry lines to vent that directly. All other vents for sinks, toilets, and tubs are AAV's. Aside from the occasional "gasping" sound they can make, we have had no issues with our plumbing. The fact that we have AAV's may distort the humidity level seen by the one wet vent. I am not sure.
In any case, if you are running horizontally for more than a foot or two, pitch the horizontal run to drain toward the nearest (down) vertical to control condensate build up. I don't believe wind has much effect on chilling the air in the vent run thanks to the AAV's. I believe a more traditional set up with multiple wet vents could induce more exchange thanks to wind caused pressure drops. I do know from past experience in bitter Chicago winters that our vertical vent stacks would frost over enough to self plug, causing havoc with the toilet nearest that stack. A ineptly placed horizontal run would collect enough water to make weird noises at the low end bend before I reset the run to drain properly.
Your biggest problem might be local inspectors. Our plumbing code is derived from the national code so you should be on good ground to use a side vent. Of course, the risk of irritating the local inspector or building board is up to you. I did irritate the plumber, but I at least I don't have any holes in any of my roofs. Very important as they are all low pitch.
I am curious if anyone has any best practice recommendations around decommissioning penetrations. I have a fairly new asphalt shingle roof and am in the middle of a major reno, where I am combining all vent stacks in the attic so that only a single penetration is needed. I am debating what to do with the other penetrations that are no longer needed (these have lead flashings). For the moment I've left the lead flashings in place but the long term durability of these seems suspect without the pipe inside to provide stiffness.
What do you guys do about sealing up unused penetrations?
User ... 471,
I don't know how you could keep the plumbing boots watertight once the pipes are removed. I would take them out.
Remove the surrounding shingles, patch the hole in the sheathing and underlayment, and re-shingle. Use a shingle bar. If the roof is fairly recent, the area of new shingles should be indistinguishable both functionally and visually from the rest of the roof.
We take all penetrations to about 1-ft below the ridge. WE get serious snow at times, and the roof of choice is typically metal. Which means the snow will slide off, and take anything without a cricket to protect it, off the roof..
So, we install close to the ridge, and build up small crickets, which come up from the ridge, at the roof slope.
Dealing with roof penetrations can be a real puzzle, right? Smart move installing close to the ridge and adding those crickets for protection, especially with serious snow in the mix! It's like a rooftop defense strategy. Have you considered looking into tips from experts on preventing temecula water damage https://rapidcleanrestoration.com/ for additional insights? Always good to have a few tricks up your sleeve!
Log in or create an account to post a comment.
Sign up Log in