Image Credit: All photos: Mark Yanowitz
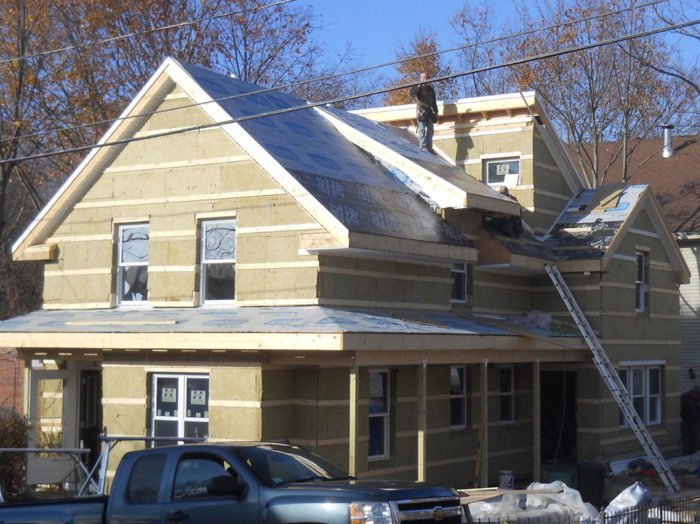
Image Credit: All photos: Mark Yanowitz This is what the house looked like before construction work began. Heco-Topix screws have two separate threaded sections. The screws are manufactured in Germany, and are available in the U.S. from Small Planet Workshop.
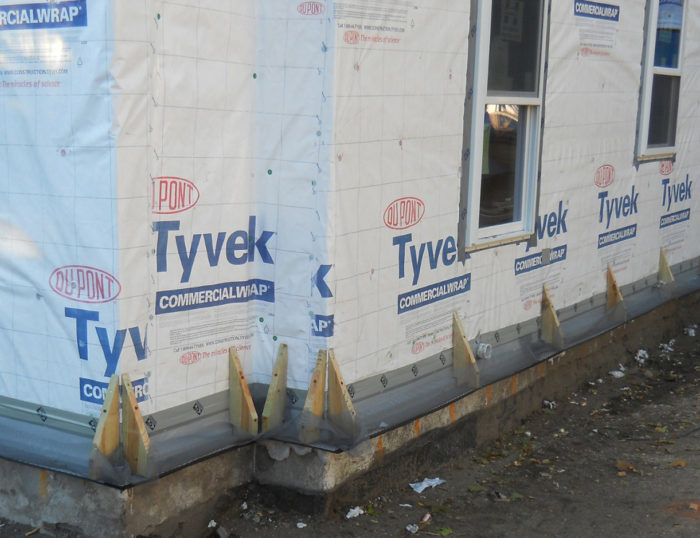
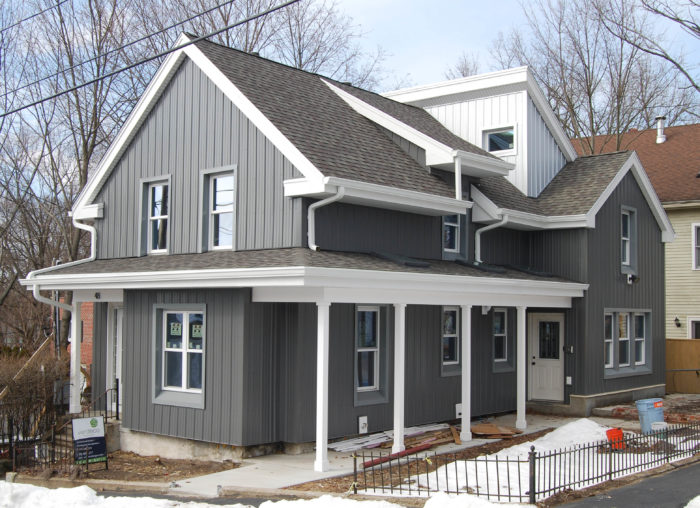
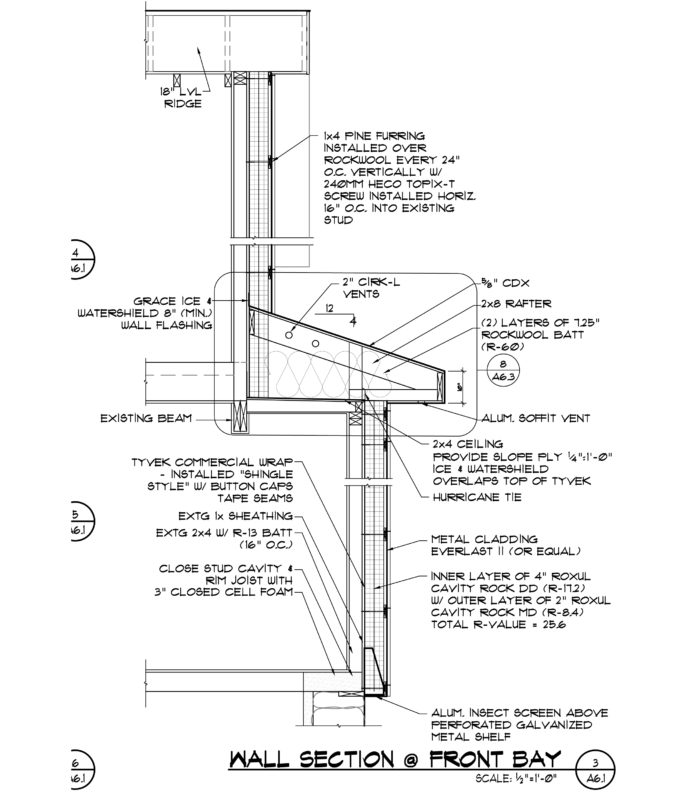
Image Credit: Heco-Topix These wood brackets were installed 48 inches on center. The brackets will support the metal siding. The Tyvek performs two functions: it is both a water-resistive barrier (WRB) and an air barrier. New 16-inch-deep TJI rafters were installed above the existing roof sheathing. The TJI bays were insulated with mineral wool batts. The walls were insulated on the exterior with two layers of mineral wool panels, installed with offset seams. The metal siding will be attached to the horizontal furring strips. The boldness of the metal siding is softened by the muted color choice. A wall section.
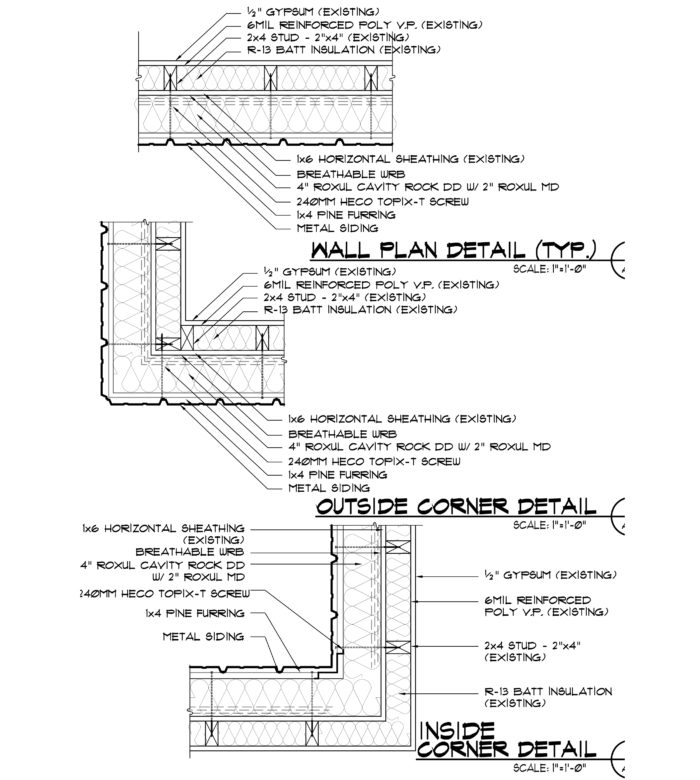
Image Credit: Architectural drawings: Verdeco Designs Wall plans.
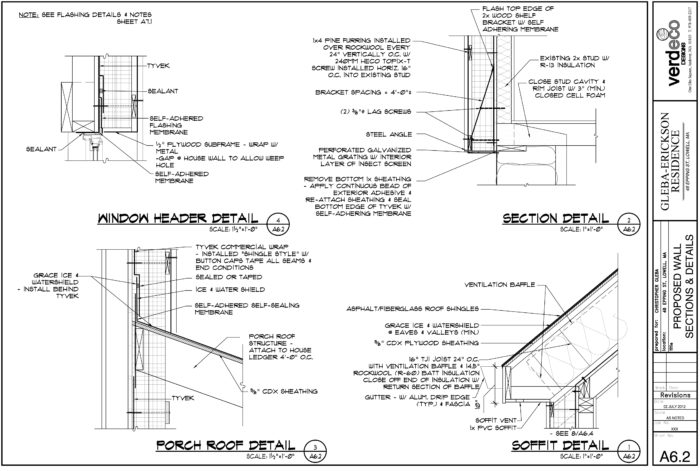
Image Credit: Architectural drawings: Verdeco Designs Various details.
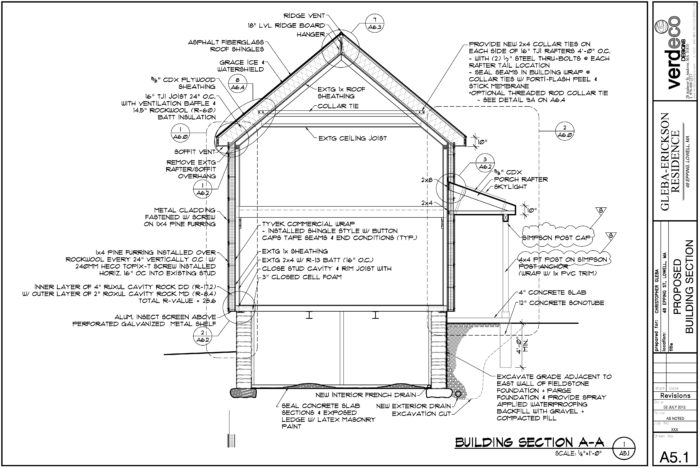
Image Credit: Architectural drawings: Verdeco Designs Building section.
Image Credit: Architectural drawings: Verdeco Designs
More Guest Blogs


When I first met Chris Gleba and Kris Erickson in December 2011 to discuss their plans for a deep energy retrofit, Chris told me that he had been remodeling his modest two-bedroom house in Lowell, Massachusetts, for over ten years. He had painstakingly rewired and re-plumbed the house and had made energy efficiency improvements (including the installation of a high-efficiency natural gas boiler and radiant in-floor heating). He had also devoted much sweat equity towards upgrading the interior finishes of the kitchen and baths.
Chris was aiming to achieve a high-performance, low-energy home, yet he understood that his early remodeling decisions limited his options moving forward. One of these limiting decisions was the installation of a polyethylene vapor barrier on the inside face of his exterior wall framing as he gutted and remodeled each room. This construction approach was not a mistake in and of itself, but it required that the wall assembly be designed to dry to the exterior to avoid trapping moisture in the walls.
Chris had held off replacing the exterior wall finishes of his house, as he hoped to build a second-floor addition on an existing one-story section of the house. Now that he was married with two young children, his expanded family made the addition more urgent. As he wondered when he would be able to afford the planned work, along came National Grid’s Deep Energy Retrofit (DER) Pilot Program.
Incentives for deep energy retrofits
National Grid, a Massachusetts electric utility, had established a DER pilot program that provides generous incentives for comprehensive projects that lower the energy demand of single- and multi-family residences. Although the primary objective was to improve energy performance (at least 50% better energy performance than a house that barely meets the building code), the program offered both financial incentives and integrated design technical support to improve indoor air quality, durability, and overall occupant comfort. Armed with an educated National Grid program staff, the program was strengthened with help from employees of the Building Science Corporation (BSC) who serve as program consultants to evaluate designs (and protect applicants from themselves).
The program was a perfect match for Chris’s project goals. There were up to $42,000 of incentives available to meet the aggressive program goals, including rigorous air sealing targets, R-40 above-grade walls, R-5 windows and doors, and R-60 roofs. Enticed by the available funds, Chris moved towards an “all in” position on his exterior improvements.
Chris Gleba contacted my company, Verdeco Designs, as our company had been pre-qualified by the DER program as designers and builders with proven experience on high-performance projects.
PROJECT TEAM
Homeowners: Chris Gleba and Kris Erickson National Grid staff: Oliver Klein and Marie McMahon Building Science Corp. consultants: Cathy Gates and Ken NeuhauserEnergy consultants: Jason DerAnanian and Mathew Monaghan (Simpson, Gumpertz, & Heger)Structural engineer: Mark Webster (Simpson, Gumpertz, & Heger)Framing and siding: Steve Jordan & Jeremy MelansonyInsulation supplier: Frank Novogratz, IDISpecialty hardware (Heco Topix screws): Albert Rooks, Small Planet WorkshopElectrician: Neal Boissonneault (Boissonneault Electric)Mechanical contractor: Allan Berry (Berry Mechanical)Waterproofing: John Lapan (Lapan’s Waterproofing)
Throughout my 28 plus years of designing and building structures in different regions of the United States, I have been blessed with many excellent clients. In many cases, the goals and needs of my clients set me on a path of discovery, a path where I was forced to challenge my preconceived notions and embrace the concept that I am never too old to learn new things about my trade. Sometimes the path leads me to new materials and new methods of construction and sometimes the path leads me to using old materials in new ways. It is through these clients and these projects that I find my greatest inspirations in work and reaffirm that I chose the right profession.
I designed the first Passive House certified in Massachusetts and multiple deep energy retrofit projects, but to be honest, I had never designed a deep energy retrofit project with exterior walls that could only dry to the exterior.
The exterior walls need to dry outward
Chris’s existing exterior walls were constructed with standard 2×4 framing and R-13 fiberglass batt insulation and he understandably did not want to rip out the interior finishes he had installed over the years.
Since the exterior walls had an interior polyethylene vapor barrier, we could not simply wrap the exterior of the house with 4 inches of polyiso rigid foam (an approach that seems to becoming the standard for DER projects in the U.S.). These walls needed to be able to dry to the exterior, so all of the exterior wall components need to be vapor-permeable.
Rock wool to the rescue
In recent years, I’ve heard about the use of exterior rock wool insulation, and in my initial conversation with Chris, I was happy to hear that he was interested in working with the product. Along with being vapor-permeable, rock wool has excellent fire retardant qualities. It’s also moisture- and mildew-resistant, so it is an excellent candidate for wrapping the exterior of a building shell, perhaps as an integral component of a rainscreen design.
I have read that the use of rock wool is common in Canada and Europe, where it is sometimes installed on the exterior side of the water-resistant barrier (WRB). It is also used as batt insulation and even as a blown-in product within masonry veneer air spaces. With all of these positive qualities, we felt committed to using it for this project. Most rock wool board and batt products average around R-4.2 per inch, so the challenge then became: How would we cost-effectively wrap approximately 6 inches of rock wool insulation on the exterior of a wood structure while anticipating some way to attach the siding?
After discussing siding options and preferences for an exterior aesthetic with Chris and his wife, Kris Erickson, we agreed to develop a “modern farmhouse” design solution with vertical metal paneled siding. These vertical panels are typically fastened through horizontal furring strips installed 24 inches on center.
We envisioned a simple installation with wood furring strips holding the rock wool insulation directly over the Tyvek Commercial Wrap, our chosen WRB. The Tyvek would adequately serve as our air barrier and WRB, and it had the high permeance that we desired for the “vapor-out” assembly.
Batts or panels?
We first considered using rock wool batts, as they typically have the same thermal value per inch as the denser board products, while being less expensive and more readily available. Although we found examples of similar installations in Europe, our building science consultants (Cathy Gates and Ken Neuhauser) were concerned that wind-washing through the less-dense batts would degrade the thermal performance of the insulation.
We considered incorporating rock wool batts within Larsen trusses, but the added material and labor cost of custom truss fabrication and a new layer of plywood sheathing seemed expensive.
We then focused on the rock wool board products, because their increased density would minimize the wind-washing concern and their increased stiffness might facilitate the installation of the furring strips and siding. Roxul manufactures several rock wool board products with greater density than their batts, and after analyzing cost and availability, we selected 4-inch Cavity Rock DD for our inner layer and 2-inch Cavity Rock MD for our outer layer.
We planned to install the Tyvek directly over the existing 1×6 sheathing boards. These boards had an irregular surface, and we thought that the medium density of the MD board, when slightly compressed, might help eliminate possible air gaps between the rock wool insulation and the irregular sheathing.
Searching for a fastening system
We still needed to figure out how to mechanically fasten 6 inches of rock wool to the exterior of the house. We needed a system that would support the vertical load of the insulation and the siding as well as horizontal lateral loads exerted by wind forces.
The Cascadia Window & Door Company offers an excellent fiberglass clip product prepped to receive metal hat channel for cladding attachment. We strongly considered this product, which would have met our structural requirements as well as our need for a proper fastener. However, we wanted solution that was simpler, cheaper, and would avoid the need to notch the insulation boards around the fiberglass clips.
As we continued to review various long fasteners, most all of which would need some sort of squash block to help maintain uniform depth and assist in lateral bracing, we discovered the Heco Topix-T fastener (see image below). This German fastener is a dual-threaded screw with a “broken” thread or smooth shaft between the top and bottom threads. The smooth shaft helps set the furring depth off the substrate as the screw is driven into the framing member. This fastener allowed us to continuously install our insulation with minimal notching and resolved concerns of furring attachment and lateral bracing.
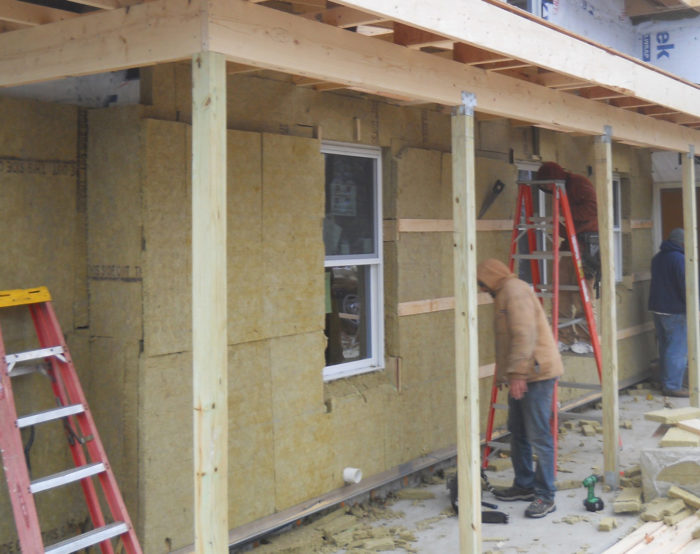
Although the weight or dead load of our exterior assembly (6 inches of rock wool, 1×4 wood furring, and galvalume metal siding) was not significant, we still had to structurally account for this vertical load. Upon consultation with our creative structural engineer, Mark Webster, we designed a 4-foot-on-center wood bracket system at the first-floor rim joist that could support the metal siding by fastening a small steel angle to the face of the wood bracket (see image below). In turn, we screwed a perforated metal shelf with a nylon insect screen to support and protect the bottom edge of the rock wool insulation while providing ventilation and weep openings for the rainscreen design. We used the same simple bracket system at the window and door headers.
A chainsaw retrofit
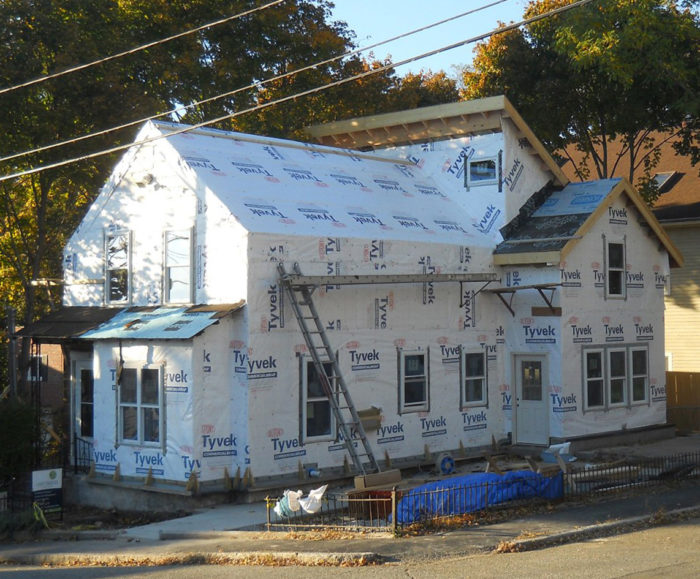
With proper planning, the installation of the assembly was systematic. Once all of the exterior finishes had been stripped down to the original sheathing, we transferred the wall stud locations to marks on the foundation, removed the roof eaves with a chainsaw, and then wrapped the building shell in Tyvek like a giant birthday present, carefully taping seams and button caps, with careful attention to penetrations and water management details at door and window openings.
We then installed the bracket and metal shelf at the first-floor rim joist. This allowed us to start installing the rock wool boards by stacking them on the shelf, overlapping seams, and fastening the batten strips as we went up. The 2 ft. by 5 ft. rock wool panels were fairly easy to handle, though my carpenters found the fibers irritating to the skin if there was much direct contact. At first, we cut the panels with a hand saw specifically made for cutting rock wool. After a while the carpenters switched to a PVC hand saw, which cut the panels more easily.
The batten strips slightly compressed the rock wool panels and held the insulation in place as we continued to stack it. As the insulation went up and fully wrapped the two-story home, I marveled at how snug the continuous rock wool wrap made the structure appear, like the thick wool comforter that might have kept us warm in simpler times.
Birds love rock wool
One slightly amusing problem that we did not anticipate: birds like to nest in rock wool! As soon as we installed insulation above head height, the word got out to the bird community that there was some prime real estate to squat in! The birds would quickly burrow clean circular holes to claim their own little condo.
In the few weeks that it took to install the insulation and await delivery of the metal siding, there were a dozen or so uninvited guests in our wall assembly. Systematic eviction took place as we installed the siding. We simply filled the bird holes (and other small gaps around openings and brackets) by pressure fitting some loose rock wool material.
TJIs for the roof
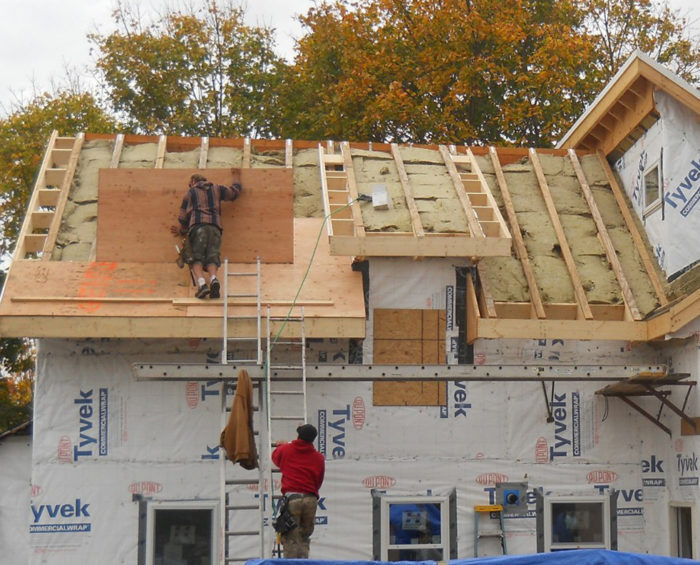
To achieve our R-60 goal on the roof, we over-framed the existing roof framing with 16-inch-deep TJIs and installed steel truss rods with horizontal hold-downs to prevent the new rafters from spreading. Along with a positive connection to the existing wall plates we were able to eliminate the structural loads on the existing 2×6 roof rafters, which were both structurally undersized and unable to handle much insulation within their limited depth.
Although we did not need to design the roof system to dry to the exterior, we elected to use rock wool batts. We installed three layers of 5-inch batts, overlapping the seams within the TJI cavities. We used the standard 24-inch wide commercial acoustic rock wool batts for this vented roof application, and the batts fit snugly in our TJI framing set at 24 inches on center.
A tight building that won’t trap moisture
The project was a smashing success. With the assistance of National Grid’s dedicated staff and BSC’s careful guidance, we comfortably achieved our airtightness goal and obtained close to the maximum incentive available. The blower door test result was 320 cfm @ 50 pascals (about 0.9 ach50).
As with most deep energy retrofits, this comprehensive renovation included integrated design solutions for water management, energy systems, and controlled ventilation. Low-energy buildings always require rigorous air sealing, but this project was noteworthy for the unusual building enclosure components and the recognition that exterior rock wool is an excellent solution for “vapor-out” assemblies.
As the debate on the environmental impact of spray and rigid foam insulation continues, many designers, builders, and homeowners may prefer to let buildings “breathe” rather than wrap them in foam.
Since rock wool resists fire, mold, and mildew, designers should recognize that this material has more uses than fire-stopping and acoustical control — the uses for which it is usually specified in the U.S.
I feel fortunate to have met Chris Gleba, the client who set the stage of this investigation and helped me identify attractive options for future deep energy retrofit projects. Empowered with new knowledge, I can only look forward to my next rock wool project.
Mark Yanowitz is the managing partner of Verdeco Designs, LLC, a design-build and consulting firm in Andover, Massachusetts. The company specializes in energy efficiency and low-impact green building solutions for residential, commercial, and mixed-use projects.
Weekly Newsletter
Get building science and energy efficiency advice, plus special offers, in your inbox.


31 Comments
Thank you for the details.
Thank you for including detailed drawings in your article. I especially like the inclusion of the cutaway view of the Heco Topix-T fastener.
I'm glad the Heco worked
Mark,
I'm glad the Heco Topix Therm worked on this project. I recall that the mineral wool thickness was right at the edge of the operating range where it would not compress the MW. It doesn't sound like you had too much trouble.
The link above goes to the 360mm length which is a 14" length. On this project you used the 240mm which is about 9 1/2". Here it is: http://www.smallplanetworkshopstore.com/heco-topix-therm-240mm-exterior-insulation-screw-box-of-50/
BTW... Mark, Chris and crew. The final project looks really great. It shows you can have super insulation AND classic lines. Good job!
Removing poly from the outside?
Thanks for this article! it's exciting to hear about new ways to pay for retrofit projects and to see different ways of carrying out the work.
I'm in a similar situation to the homeowner with poly vapor barrier in some exterior walls and I'm thinking about how to remove it without disturbing the interior surfaces. I've been thinking that after the siding is removed it might be possible to pry off the board sheathing and cut/pull out the poly at each stud bay. Then re-install the boards or apply all new sheathing and carry on with whatever wall assembly you want. Does this seem like a workable process to anyone?
Response to Mark Fredericks
Mark,
Anything is possible, including your suggested method of removing poly. It's just a tremendous amount of work. I wouldn't recommend doing it unless there were other reasons to remove the existing sheathing.
air tightness
"The blower door test result was 320 cfm @ 50 pascals. "
What is the air exchanges per hour (ACH) and/or what is the volume of the house for this air leakage result?
ACH/50, response to Mark
Looking at the pics I'm gonna take a WAG that it's about 1200-1300' for the first + second floor, maybe another 450' in the basement for a total of about 1800, maybe 2000' -it looks like they added on a bit of second story onto the conditioned porch space in the back as part of the upgrade if you look at the "before" and "after" pics.. Assuming 9' average ceilings, that 's ~16,20- 18,000 cubic feet.
320cfm is 19,200 cubic feet per hour, so it's something on the order of 1-1.2 ACH/50, which isn't bad at all for something that didn't get the full-gut rehab treatment for air sealing.
Great job but...
The lack of fall protection in image #6 is a bit alarming. OSHA has been making the rounds in Massachusetts even on small projects like this...be careful out there!!
That being said, I went to Roxul sponsored workshop with Joe L. last week. I am very impressed by their product and its many uses and variations. House looks great!
Responses to Mark F. (Removing poly) & Mark D.(ACH/50)
Mark D. - Looking back on blower door tests, our highest reading was 340cfm50 - considering building volume, the six-sided enclosure is 5294ft2, we got 340cfm50 which =.06 CFM50 / ft2 enclosure or pretty tight! (NGrid target goal was 0.10 CFM/ ft2 or 538cfm50)
Mark F. - Martin H. is correct to point out that removing the sheathing would require a lot of labor and costs, so I don't know why you might take this avenue unless there was some other compelling reason to consider (mold remediation?). The main lesson of this deep energy retrofit is that you can leave your interior finishes and interior poly in tack if you design the rest of the wall assembly to breath and dry to the exterior. This is a pragmatic strategy to create a high performance building when there is an existing interior poly vapor barrier that is difficult to access. Why fight it?!
Corrections
Just read through the text again and wanted to add a couple of corrections - the text listed our rock wool sandwich backwards - for what it is worth, we installed the 4" Cavity Rock DD as our inner layer & the 2" Cavity Rock MD as our outer layer, not the other way around.
Also, I incorrectly stated that the carpenters found that a standard "wood" hand saw worked best for cutting the rock wool - it was a PVC hand saw that they felt worked best, similar to the following link:
http://www.homedepot.com/p/Buck-Bros-12-in-PVC-Hand-Saw-120PMPVC/100148147
ACH/50 Clarification
For this program BSC bases the air leakage calculation on surface area of the structure, not volume (as Passive House focuses on) - with regard to cubic footage volume, Dana D. was not far off as our rough calculation had us a little over 21,000ft3 and around .9ach50.
Response to Mark Yanowitz
Mark,
Thanks for providing corrections to your article. I have edited your article to reflect these corrections.
rockwool insulation
Regarding the contractors rockwool skin irritation: I haven't tried it but rubbing baby powder over any exposed skin prior to rockwool installation is supposed to help.
Rockwool Deep Energy Retrofit
Bravo - Great article, GREAT project.
Thanks for highlighting there is an alternative to foam for a DER. Foam has many draw backs ecologically, impossing the highest carbon burden on a project of any insualtion. In NYC for decades EIFS systems were banned by law - because of the thick choking, blinding and toxic smoke produced when a building burns - and the risk it posed to fire fighters. The risks remain, as does much of the ban. Isn't a DER with 4 layers of overlapped foam just another EIFS system, with the same moisture trapping / wood rotting history. Yet energy programs and codes are embracing foam wraps. While Rockwool availability and price point hasn't been great until relatively recently, it is now, and there is no excuse to not update codes. Now don't get me wrong, there's nothing wrong with EIFS, rotting buildings is simply a life safety issue, like steel framing and architects should just have to prove they've done the math, and certify they've done the inspections needed for EIFS to be safely used.
Response to Russell Higgins
Russell,
You refer to the "moisture trapping / wood rotting history" of EIFS. Virtually all building scientists recognize, however, that the causes of rot in EIFS homes -- there were many clusters of these failures about 20 years -- were due to bad flashing and moisture-managment details, and in some cases the presence of interior polyethylene, not due to any inherent problems due to exterior insulation.
EIFS buildings and PERSIST buildings perform very well, as long as the designer and installer plan for rain, and don't install interior polyethylene.
Sealing around windows with added insulation
I would love to see close up images or a drawing for finishing the windows. I see they left original windows in and worked around them. I've had to do the same with 2" and worried about leaks in the future. That much extra... Wow. Any beta would be greatly appreciated.
PK
Response to Paul Kuenn
Paul,
If you look closely at Image #7, you can see that the two layers of mineral wool have been beveled under the window to facilitate the installation of metal flashing, creating a new exterior sill for these innie windows.
If you look closely at Image #8, you can see the installed metal flashing that was used to create the exterior jamb extensions and new exterior window sills.
Response to Paul Kuenn
Paul,
To clarify, we did not leave the existing windows in place. We replaced a majority of the existing house windows with new R5 triple glazed units and pulled and reset a few existing windows which were already triple glazed R5 units. We did this to both make certain that our air barrier was continuous at these openings, but also to make certain that our rainwater management details at these openings was properly executed. I will try to dig up and post photos and/or details of this, but the principle was that the perimeter of the openings were sealed and we installed sloped sill pan flashing & did not seal the bottom nail fins (@ sill) of the vinyl windows so that any water or condensation that got into the extruded window frame had a way to weep out. Understand that the Tyvek layer at the existing house sheathing was both our air and water barrier and was thus the inner layer of our rainscreen design. The metal cladding was our "veneer" to protect the insulation and shed the vast majority of rainwater, but we knew and accepted that water would get behind this veneer and could weep out through the perforated shelf at the bottom of the cladding., The exterior window sills were sloped mainly to shed snow, but we were not overly concerned of the cladding details around the window openings as we were confident that the window openings were properly sealed at the Tyvek/sheathing layer. The same principles apply with other cladding systems, such as wood siding or Hardi-siding - water will always get behind the cladding and a proper rainscreen design will allow the water to weep out. In those applications, It always helps to minimize the amount of water behind the cladding with proper flashing & installation techniques, but caulk at siding & exterior trim butt joints is mainly done for aesthetic reasons if at all. Hope this helps clarify the design intentions!
Window flashing
Thank you both!
That makes sense for security. I hate to pull the 1999 double panes out as they are silicone caulked in place and I'll have to somehow make room for a deep window buck (want innies) to add two more outer layers of insulation (old 2x4 walls in NE WI are COLD). I'm searching for past stories on such retrofits. and enjoy every story I find here.
Addicted to this Site...
amendment to window flashing
I'll move questions to "innie" window retrofits. I see by the innie details, they duplicate what I did 7 years ago when I added the first two inches of EPS. I took used 2x2s (sloped at bottom sill) to grow outwards. The housewrap looked to be properly used under the then new 99' windows, so I just grew the house outwards. Now I want to go out an additional 4". I hate to use space in this mineral wool section as it's too pricey for me and most folks I help.
Cheers,
PK
"Wood brackets" at the base (Detail 2/A6-2) Flash???
Sorry to be obtuse but I don't understand the purpose of "FLASH TOP EDGE OF 2x WOOD SHELF BRACKET WITH SELF ADHERING MEMBRANE."
Maybe this step hadn't been performed in image 4 of 12 as I don't see any self-adhered flashing at the top of the bracket (as pointed to in the Detail 2/A6-2).
If it DID get installed at the location shown in the detail (at the top of the bracket) what was it meant to do? Is the intent to protect the penetrations made by the fasteners through the WRB? It doesn't seem to make sense to "flash" the tops of those brackets as they are treated and shouldn't be a problem
It looks like there is some sort of adhered flashing terminating the WRB that is consistent with the detail. I just skimmed through looking for some indication why the last course of sheathing was removed, adhesive applied and then re-attached but couldn't find it. Not sure what the purpose of that was either.
Thanks for providing the information in the article and the detail drawings and photos. Nice outcome.
"Wood Brackets"
Justin, Note that the Tyvek building wrap serves as our water resistant barrier (WRB) and is the base layer of the rain screen design - a driving wind blown rain may reach this area & gravity flow to the base of the building. The self adhering membrane flashing at the top of the bracket was intended to both protect the top edge of this wood member from potential moisture over time and to direct any water to flow around it rather than behind it - a similar concept to flashing a deck ledger board at the house wall.
The removal of the last course of sheathing, application of adhesive, and reattachment was recommended by our BSC consultants, I believe because 1x6 sheathing is inherently less stable than plywood sheathing (i.e. can expand/contact/move over time) & might compromise air sealing at this critical location (building rim joist). It was considered a relatively minor priority within the overall air sealing strategy, but suggested as we had easy access to do this around the entire structure.
Hope these responses were helpful in understanding the thought behind the details.
On a related follow up note to the air sealing issue in general, New England has been hammered by a series of snow storms & a consistent arctic chill over the last month - 9 out of 10 houses on most residential blocks are struggling with huge icicles and growing ice dams...... there is not one icicle growing on this building!
Exterior Basement Insulation
Mark,
Thanks for sharing your experience. Did you address basement insulation? Would the mineral wool panels be suitable on the outside of the foundation wall, above and below grade, to keep the wall and basement interior warm? Roxul shows a detail of Comfort Board used on the interior of a basement wall, but interior insulation consumes valuable space and interferes with basement stair clearances.
Response to Fred Williams
Fred,
I hope that Mark sees your comment and provides his opinion. In the meantime, here's what I know: mineral wool panels have been used for decades to insulate the exterior of foundation walls. One advantage of this type of insulation is that it provides a path for water to drain downward (ideally, to a functioning footing drain). Like exterior rigid foam, the above-grade portion of the insulation must be protected from physical abuse by some type of rigid finish material.
Mineral Wool Exterior Basement Insulation
Thanks Martin. I hope to hear from Mark or anyone else having experience with or thoughts on using this approach. Am I correct that mineral wool also has the advantage of being less vulnerable to termites and ants than foam when exposed to soil? Are there any concerns about losing R -value from soil backfill compacting the mineral wool, or from ground water flowing through the wool during or following a rain storm ("water washing")?
Response to Fred Williams
Fred, while I haven't used mineral wool in this application myself, as I prefer interior foam when I have to do basements, I did research the topic for a Fine Homebuilding article (http://www.finehomebuilding.com/2015/09/16/mineral-wool-makes-a-comeback), and I know people who have used the approach. Anecdotally, insects are less drawn to mineral wool than to non-treated foam, but the most pest-resistant material would be foam treated with an insecticide. (In this class, I prefer borate-treated EPS; borate is not toxic to humans and the blowing agents in EPS are less terrible than those in XPS.) Long-term European studies of high-density mineral wool below grade show no significant compression or loss in R-value. If the soil is sandy or silty, cover the mineral wool with a filter fabric. Water drains freely through mineral wool, with very little remaining adhered to the fibers, so there is little loss in R-value if the soil is well-drained. If the soil is saturated, obviously the mineral wool would be useless.
Mineral Wool Basement Exterior Insulation
Thanks Michael. Great article!
Response to Fred Williams
Hi Fred, Sorry for delay in response.... As both Martin and Michael commented, there are mineral wool panels designed for below grade conditions and as long as the perimeter soil is well-draining, this below grade mineral wool can be a good alternative to foam products. However, the project highlighted within this article was a deep energy retrofit of an existing structure and full excavation exposing the exterior foundation would have been required to install insulation on the exterior side of the foundation - not a practical consideration on this tight urban site. On this project, we installed an interior french drain system with a drainage mat that extended up the lower third of the interior of foundation wall. We then sprayed the inside face of the fieldstone foundation with 3" of closed cell foam which covered the drainage mat and continued to seal the top of the foundation wall & rim joist cavity and completed the air barrier transition to the Tyvek layer on the exterior sheathing.
Hope these comments were helpful!
Exterior Insulation
Mark,
Thank you for your reply and comments. Did you consider using EPS foam instead of mineral wool for the above grade walls? Though less vapor permeable than mineral wool, wouldn't EPS nevertheless allow some drying to the exterior and be lighter and cheaper than mineral wool while providing roughly the same R-value per inch?
Is the Cavity Rock specified for the walls, now called Comfortboard? Great article.
CavityRock isn't identical to ComfortBoard- it is similar, but somewhat lower density:
https://www.rockwool.com/products/cavityrock/?selectedCat=cavityrock%C2%AE%20downloads#Specifications&Sizes
“[Deleted]”
Log in or create an account to post a comment.
Sign up Log in