

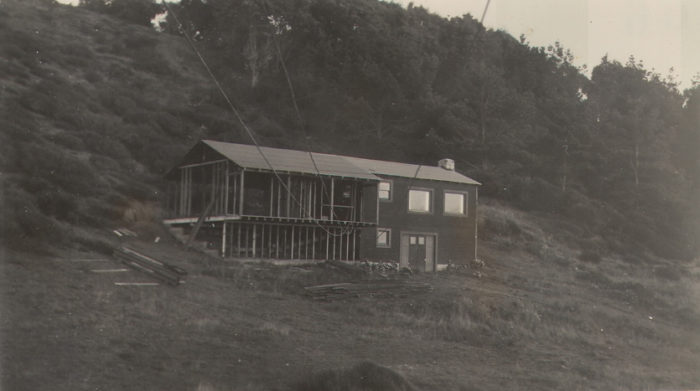
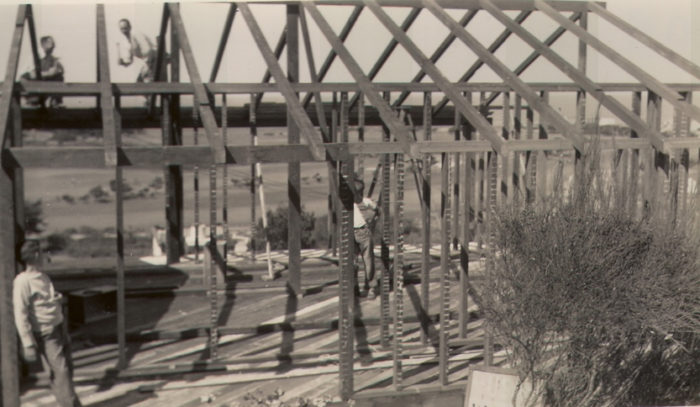
Image Credit: Jim Kremer The construction of the addition in 1940. Note the lath and plaster markings on the studs, which were recycled from demolition sites in San Francisco. Pat’s father built the house by hand without power tools. Sharp Park Golf Course is in the distant background.
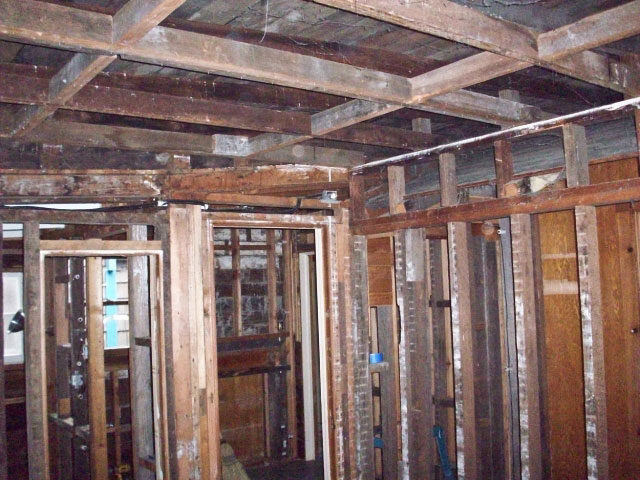
Image Credit: Jim Kremer The interior after removing wall finishes. Note the extensive use of recycled lumber (salvaged from office building sites in San Francisco by Pat’s father) in the original construction, evidenced by the lath and plaster markings. Many of these framing members were left in place; others were removed, moved and reused elsewhere.
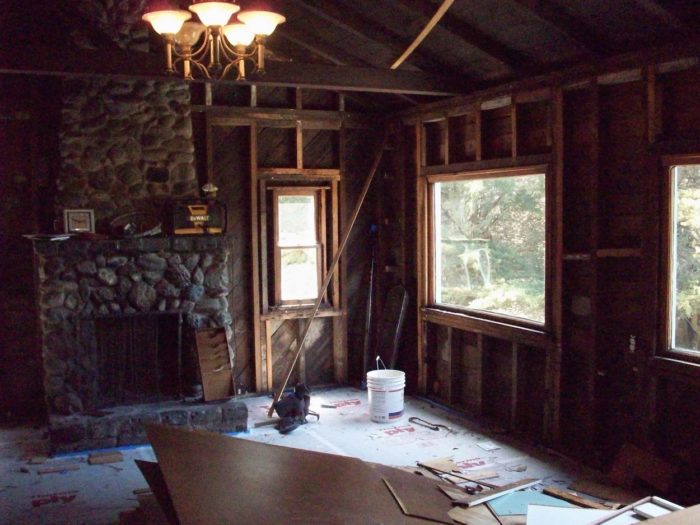
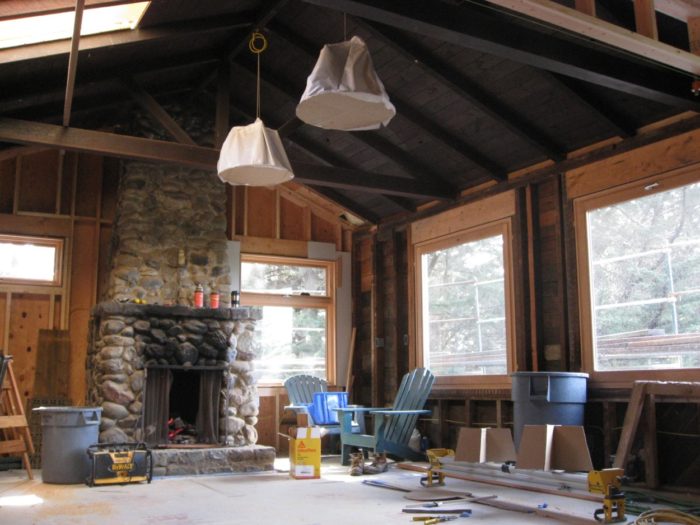
Image Credit: Jim Kremer The living room interior (facing southwest) during the remodel. Note the lack of any insulation, ceiling, or wall finishes.
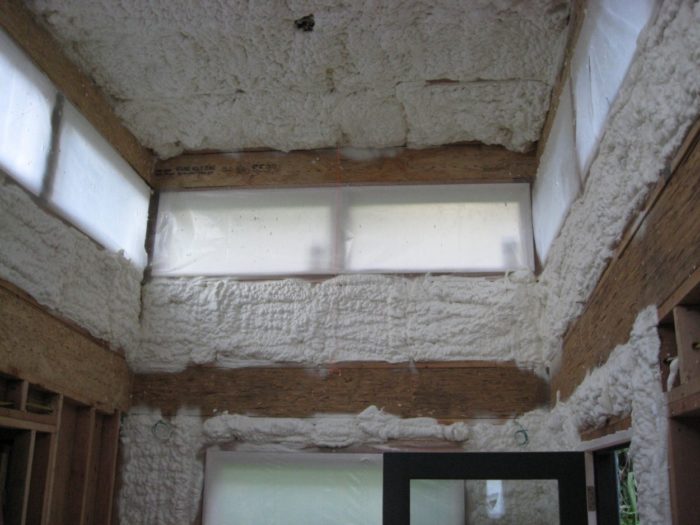
Image Credit: Jim Kremer Spray foam insulation in the “jungle” room. Open-cell spray foam was installed in all the walls, floors, and ceilings.
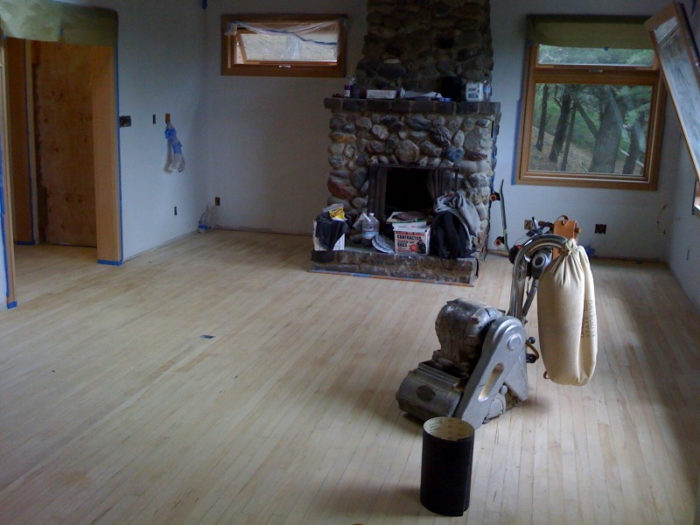
Image Credit: Jim Kremer The original maple floors were sanded and refinished. The flooring was salvaged in 1938 by Carl McCarthy from a dance-hall in San Francisco.
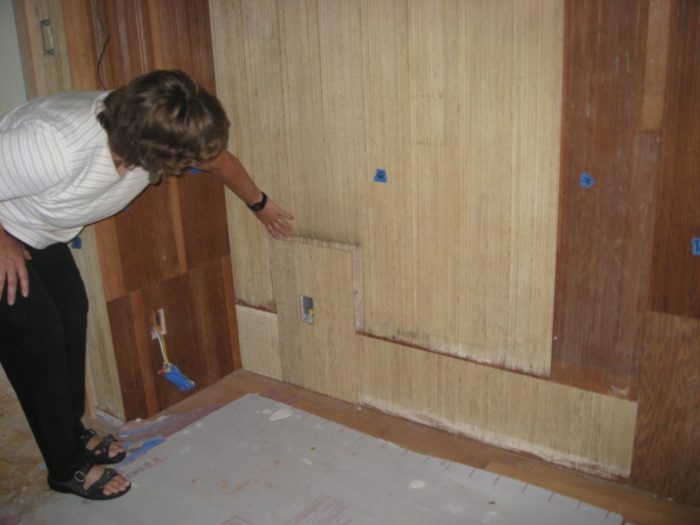
Image Credit: Jim Kremer The bead-board paneling from two rooms was saved, stripped, and refinished. Since the rooms and walls had changed, the panel pieces were assembled like a jigsaw puzzle to cover the new walls.
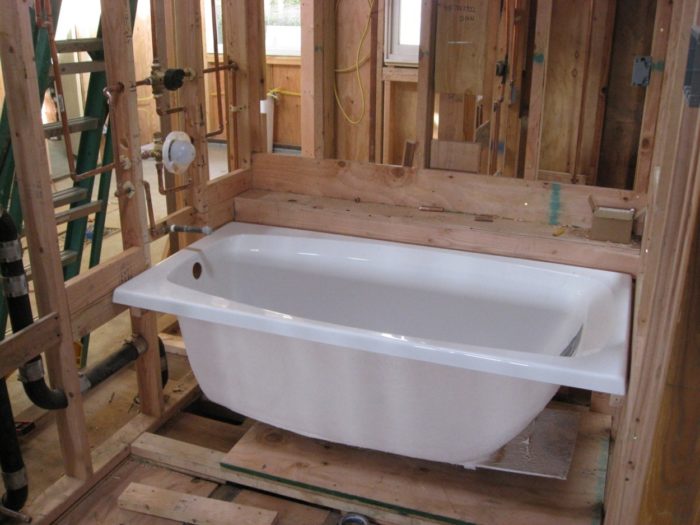
Image Credit: Jim Kremer The chosen bathtub has a trapezoidal cross-section, allowing water-saving low-volume baths for kids and occasional decadent full baths for adults.
Image Credit: Jim Kremer The living room, looking south. Note how the south gable has been newly framed, pulling the stone chimney inside what will be conditioned space.
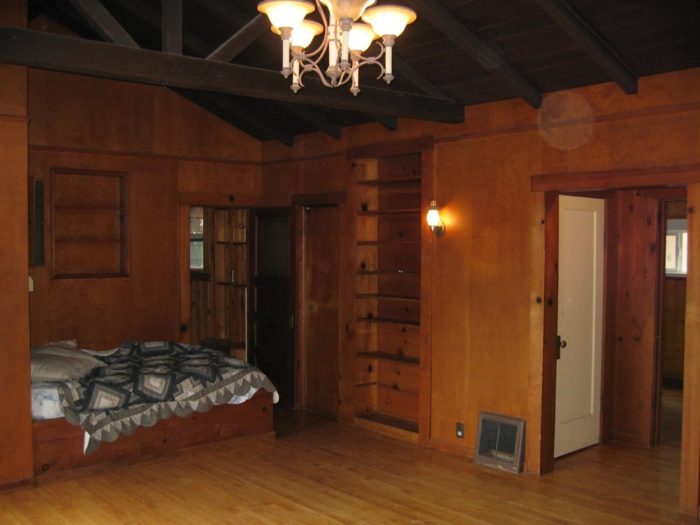
Image Credit: Jim Kremer A “before” photo, looking northeast from living room. With the wood paneling and limited windows, this space was really dark.
Image Credit: Jim Kremer This is an “after” shot of the living room looking to the northeast; it's the same view as the living room “before” shot. After removing the wood paneling and adding a couple of skylights, it's a whole new space.
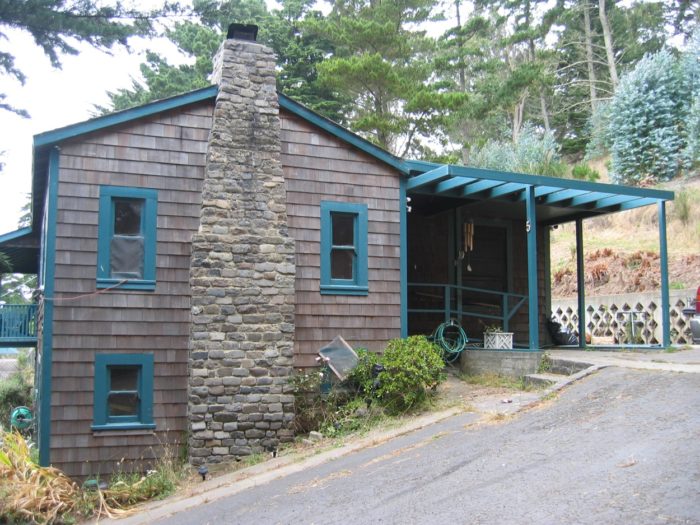
Image Credit: Jim Kremer The original south façade in June 2008, before the start of the renovation.
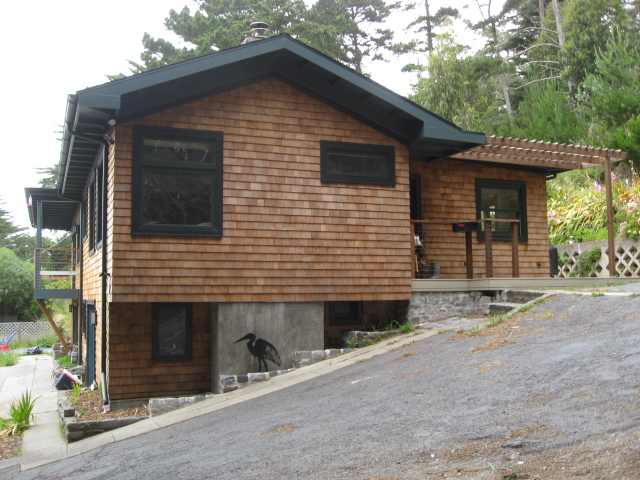
Image Credit: Jim Kremer The south façade in June 2010, after most of the renovation was complete. Note that the original stone chimney is now enclosed, eliminating a substantial thermal bridge to the outside. Warming the chimney this way also improves its draft.
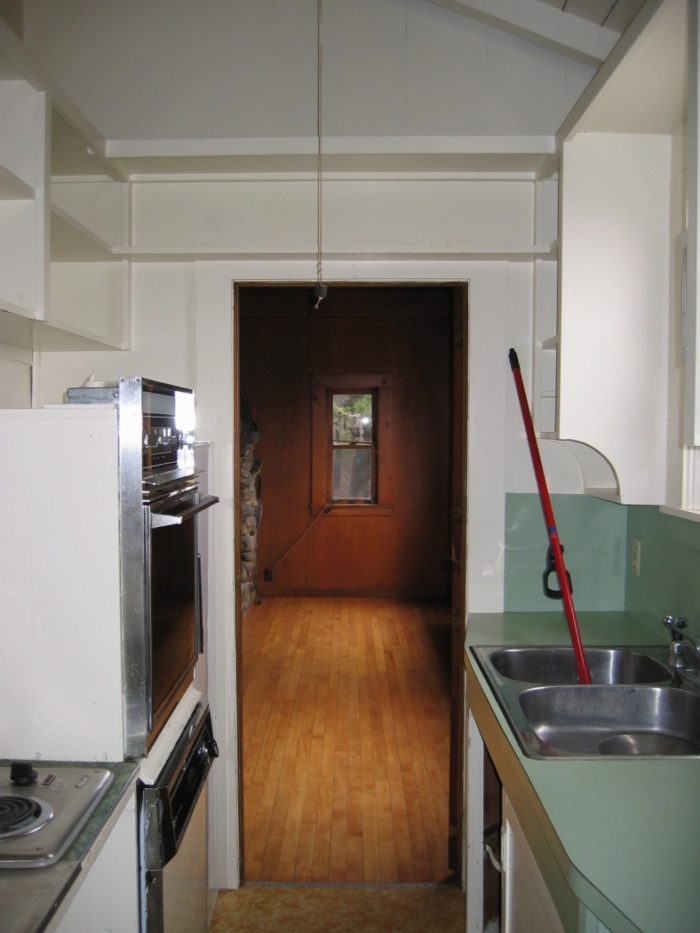
Image Credit: Jim Kremer A “before” shot of the original “one-butt” 6' by 8' kitchen — more of a galley than anything else. This view is looking to the south into the original living room.
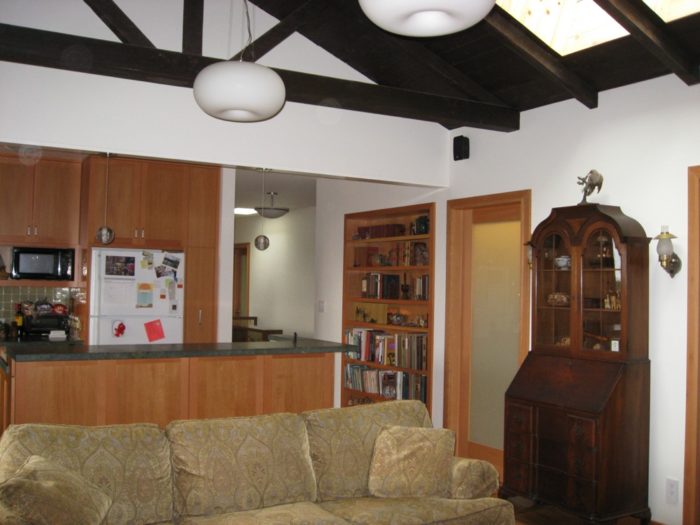
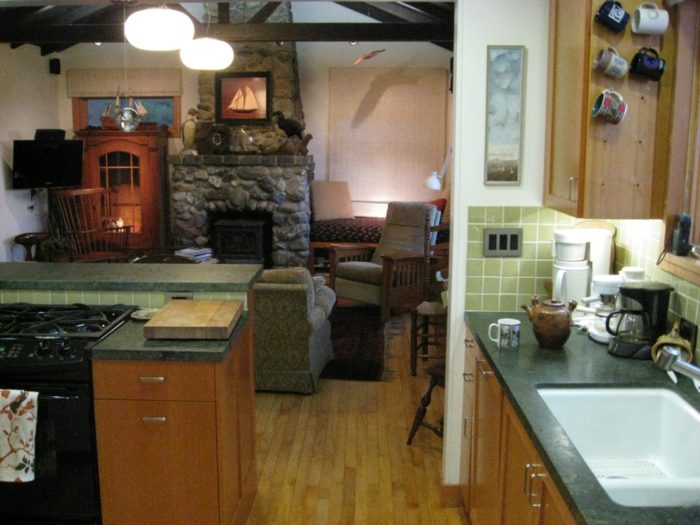
Image Credit: Jim Kremer An “after” shot of the new kitchen, looking into the living room. It is a completely different space.
Image Credit: Jim Kremer The original hallway looking to the north. It was a dark space, and quite tight.
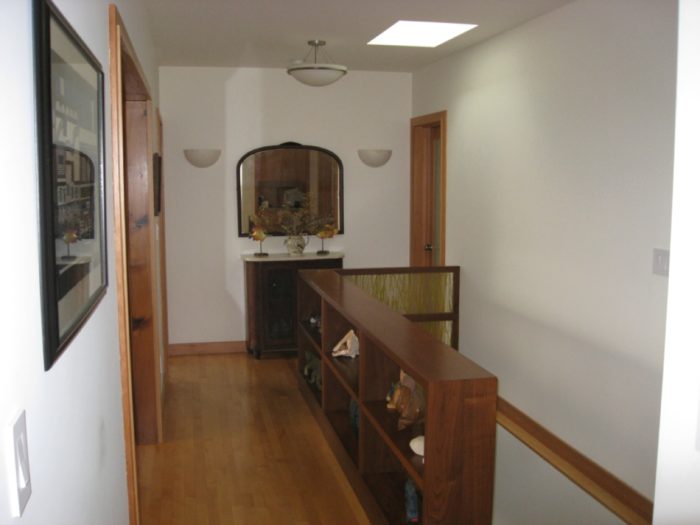
Image Credit: Jim Kremer The same view as the previous photo, looking down towards the north of the new center hallway. It is now a completely different space: open, airy, and inviting.
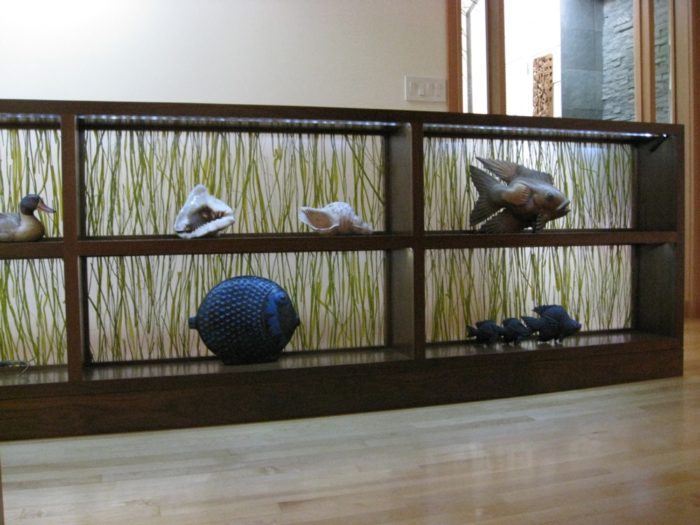
Image Credit: Jim Kremer This photo shows the open-shelf kneewall in the central hallway. Not just a half wall that closes off the space, it is a focus feature and translucent in nature, connecting many of the spaces that share this central space.
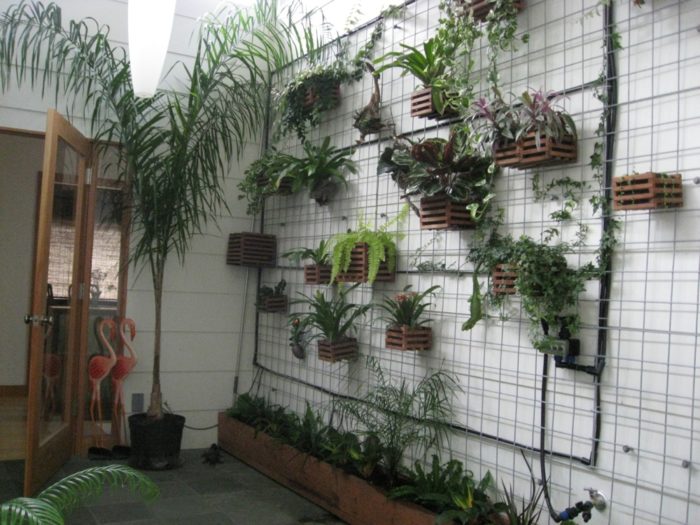
Image Credit: Jim Kremer The Kremers fondly call this the "jungle room." It's a very modest "retreat" room in the center of the home. It is not a jungle yet, but more than a healthy start towards one. And if you are wondering how to water those plants up high: note the piping grid connected to the hose bib!
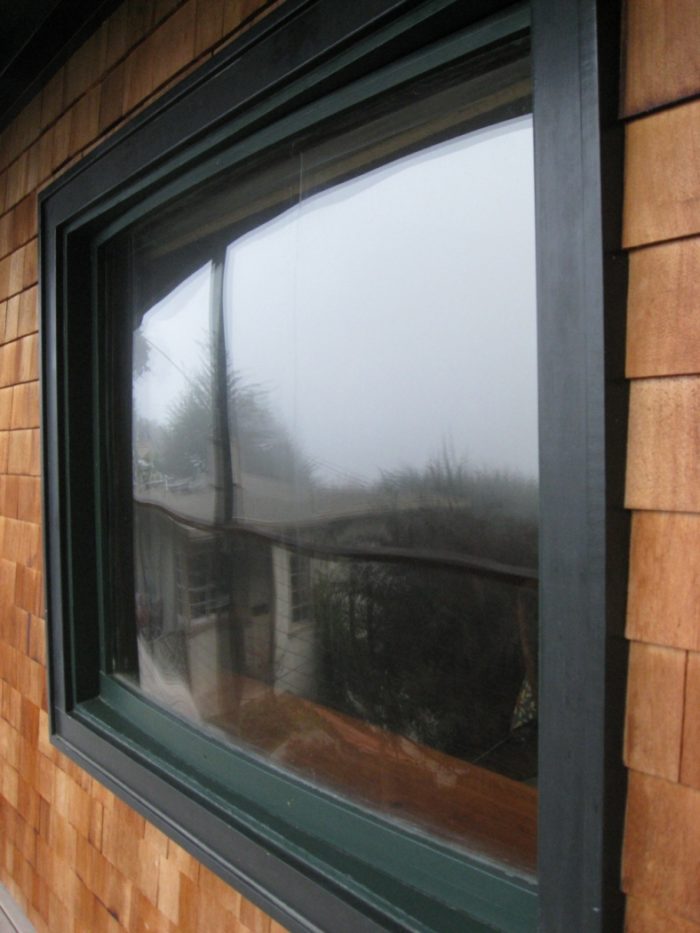
Image Credit: Jim Kremer Looking for a way to keep the original convex windows — note the gentle curve to the outside unit — in the home, Dan Miller incorporated them as storm windows. That means this is the third time that these windows have been used since Carl McCarthy salvaged them from a dance-hall in the early 1940s.
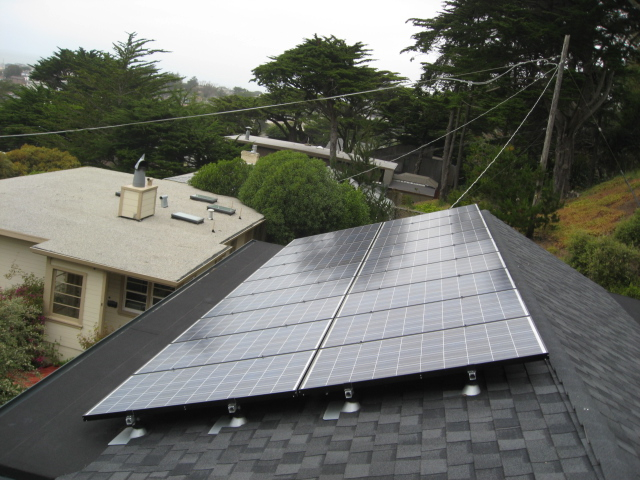
Image Credit: Jim Kremer PV panels: 18 Mitsubishi modules are mounted on a west-facing roof slope.
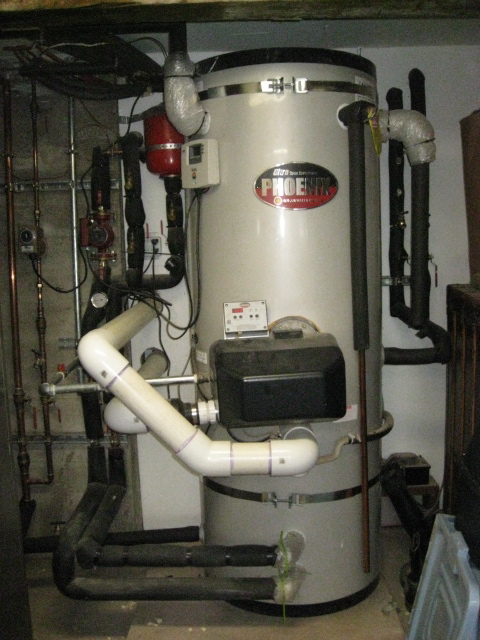
Image Credit: Jim Kremer The pipes near the Phoenix water heater are covered with pipe insulation which significantly reduces heat loss. The pipe insulation made a noticeable difference, reducing the storage lapse rate by 50%.
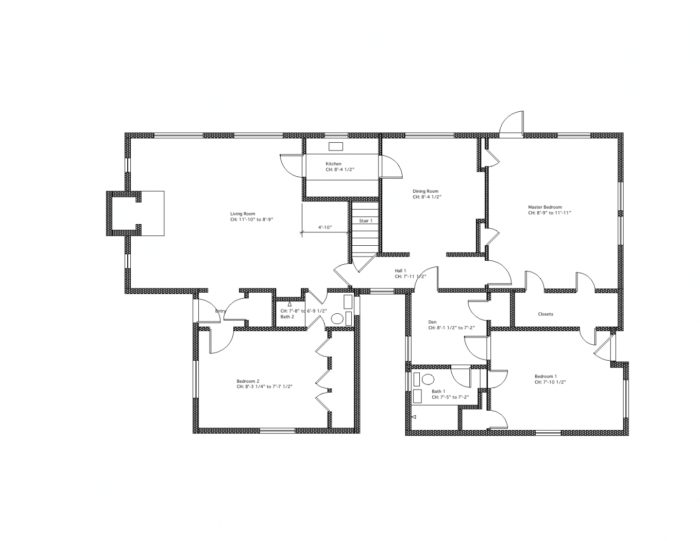
Image Credit: Jim Kremer The floor plan of the original home as it was before Pat and Jim Kremer began their total renovation. The original "Shamrock Shack" was just the living room and kitchen portion. The top of the page is essentially due west. The total area measured 1,434 square feet.
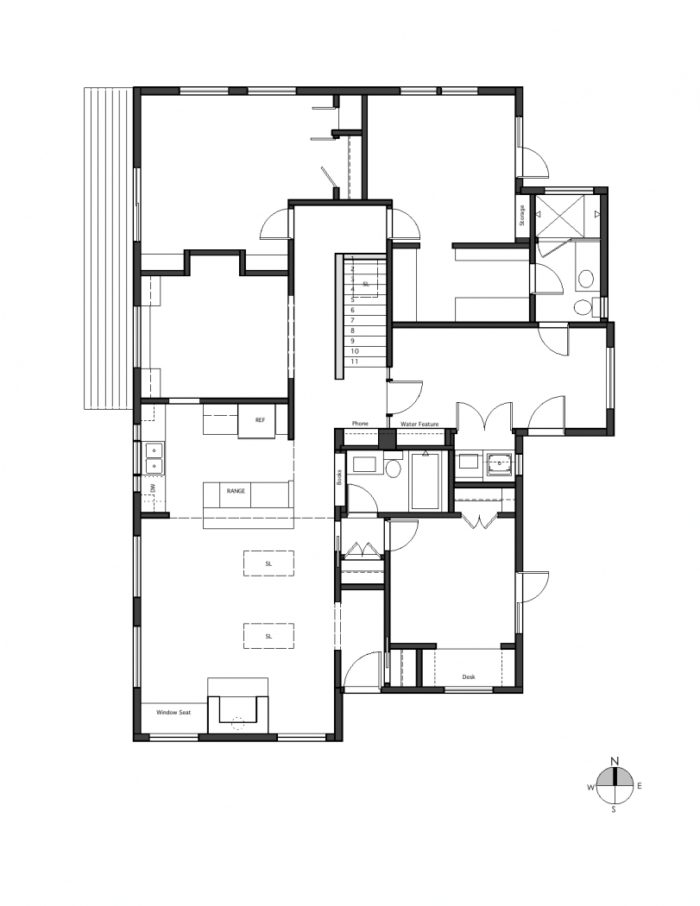
Image Credit: Alden Miller The floor plan after renovation (but with no furniture). This floor plan covers 1,750 square feet, about 300 more than the original plan. Note the relocation of the stairway, the expansion of the kitchen, and the jungle room in the center on the east side (this accounts for the single largest increase in living space).
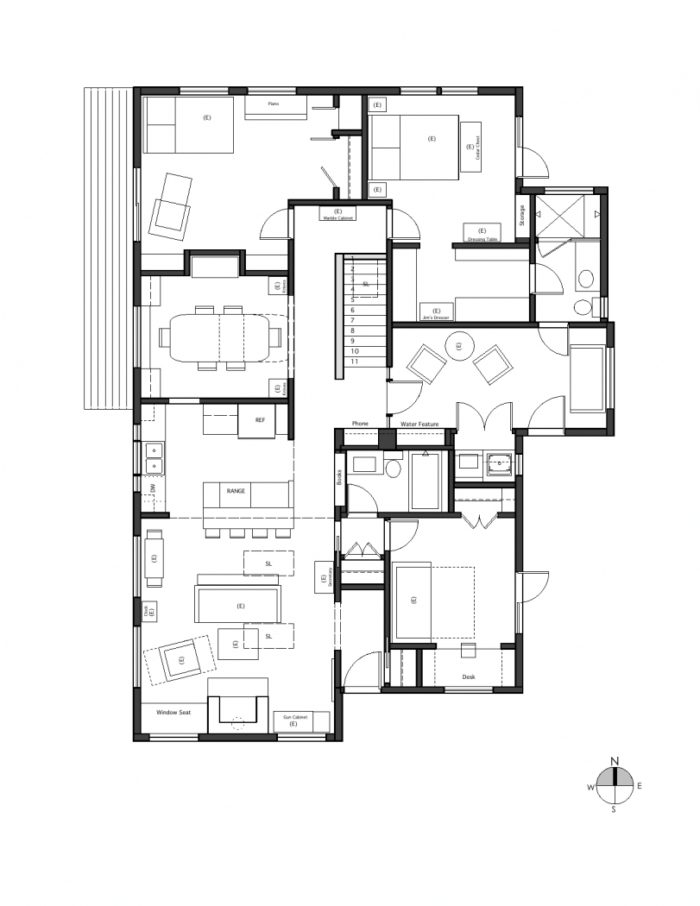
Image Credit: Alden Miller The new floor plan with furniture layout. Each piece of furniture depicted was part of the interior design decision-making process and final design. This integrates the two families, since most of the furniture comes from Jim's side and the home from Pat's.
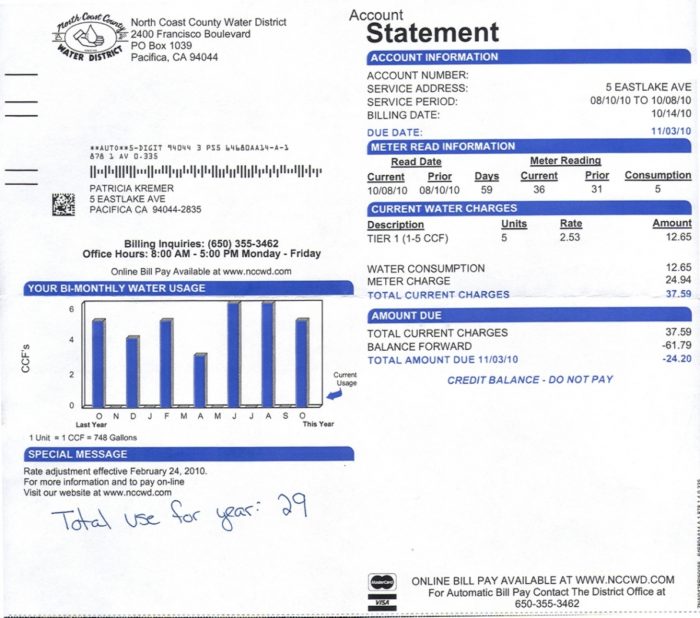
Image Credit: Alden Miller This water bill shows that the Kremers used about 2900 cubic feet of water over the annual time period this bill displays. That works out to be a very modest 29 gallons per person per day. The average in the US is about 50 gallons per person per day.
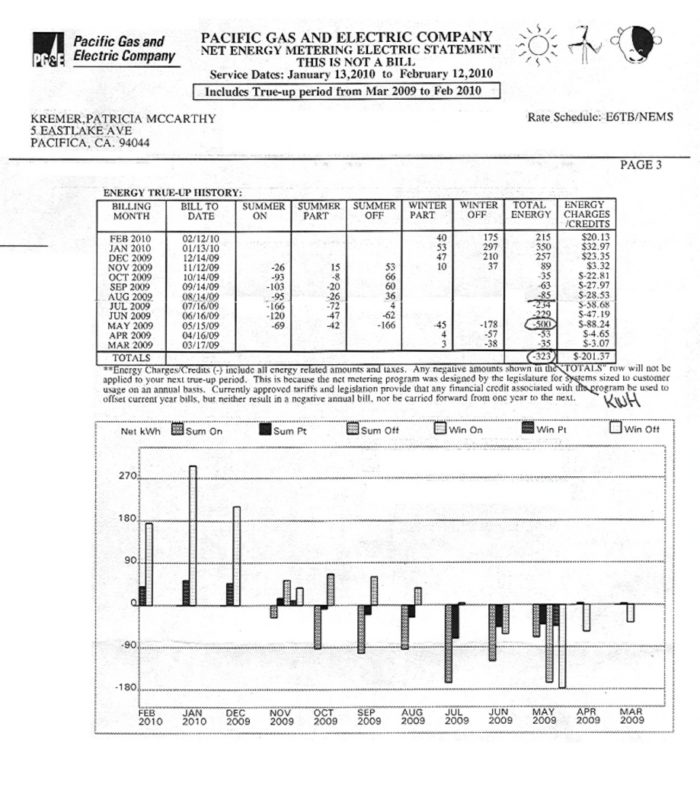
Image Credit: Jim Kremer This electric bill shows how over the annual period the bill covers, the Kremers have a net meter result of negative 323 kWh or a credit. The Kremers don't consider themselves a net zero energy household yet and they realize that it will be difficult to overcome their cloudy and foggy "winters" but they are on their way.
Image Credit: Jim Kremer
This Bay Area project features family ties to green design and construction spanning three generations
In 1938, Carl McCarthy started his “Shamrock Shack,” a small (700 square feet) weekend retreat overlooking the golf course in Sharp Park (now part of Pacifica), Calif., while he and his wife, Grace, lived 10 miles north in an apartment in San Francisco. He had virtually no building experience and no power tools.
Pat Kremer, Carl’s daughter (and with her husband, Jim, the current owners), remembers the original home this way: “It was totally uninsulated, a ‘one-butt’ kitchen (6 by 8 feet), a bed in the living room, and a bathroom — that’s it. The name Shamrock Shack was just a whim of a young Irish-American couple feeling lucky to have a weekend retreat in those days.”
Carl and Grace moved to Sharp Park full-time at the start of World War II, freeing up their San Francisco apartment to wartime housing demands. Between then and 1952, Carl cobbled on additions to the home as the family grew, until the structure had three bedrooms and two baths, with living space of 1,434 sq. ft.
The Kremer family approach to green
In 2008, Jim and Pat Kremer, approaching retirement, decided to gut and rehab the McCarthy family home as their own.
According to Jim and Pat, this was their challenge: “How do we incorporate environmentally sensitive green practices and materials, retain the tone and feel of Pat’s original homestead, yet upgrade to a modern, cozy, livable, resource-efficient home?”
More than 60 years after the McCarthys’ move-in, the home was still uninsulated and comprised a charming but not very functional warren of interior spaces, along with a decidedly dated aesthetic. Razing it would have been simpler and probably more economical, but the Kremers – and ultimately their entire team – shared a strong drive to honor both the spirit and the materials embodied in the original home.
Jim and Pat started the process by building a project team that wove together family and local building expertise. Daughter and interior designer, Alden Miller; son-in-law and contractor Dan Miller; neighbor and leading green building consultant Ann Edminster; local leading green structural engineer/building materials expert Bruce King; and energy-savvy mechanical engineer Bill Dakin of Davis Energy Group — all worked shoulder-to-shoulder throughout the project.
Their charge was this unifying theme: in design, construction, materials selection and use, weave together the history of the Shamrock Shack (green in its own right) with 21st-century high performance and resource-efficiency.
Focus: integrating the whole – team and building
Ann Edminster: “You could look at all the themes and goals addressed in this project and wonder how it could possibly all fit together. But the team effort was enormously constructive, and the design came together beautifully. There are not many projects that when finished, I think to myself, I could live here, but the Kremer home is absolutely one of them. It feels like home.”
Edminster, although trained as an architect, is a long-time consultant and had not done hands-on design for many years when the Kremers approached her. However, Pat assured her (in all innocence), “There’s really not much design involved; we just need help with energy and other green issues … and if you can help us get the drafting done, too, that would be great.” As it turned out, the design challenges were quite significant and optimizing the design involved a lot of integration among the team members. There was a host of unusual structural, thermal, building code, and local zoning issues — including some very tight clearances — added to the typical array of functional, aesthetic, and green performance objectives. However, Edminster’s practice focuses on integrated design, and so the project, she says, was “pure pleasure. I think we succeeded quite artfully in accomplishing what Pat and Jim wanted.”
Alden Miller was integral from the start, delivering the design brief on her parents’ behalf, contributing key input throughout the process, and taking the helm toward the end of design development to work closely with her parents on end-stage refinements. Edminster was seconded in the earlier stages of design by architect Karen Chan; both worked closely with King on structural improvements, with Dakin on energy strategies, and with Dan Miller on constructability and budget. Edminster says that Dan, new to green construction, “was completely on board with the program and executed the design with meticulous attention to detail.”
Focus: interior design
Alden Miller worked extensively with her parents on a detailed floor plan from the beginning of the team collaboration. Her efforts to envision multi-use spaces within the modest footprint while accommodating her parents’ prize possessions created the starting point that was critical to the project’s trajectory.
Alden Miller: “In approaching this project, my top-level focus was on three things: retaining the character of the original home, green design, and improving/unifying the functionality of the home.”
Retain the character of the original home: “We made sure to reuse many of the existing materials. A good 95% of the wood floors are existing material, that themselves were salvaged by my grandfather from a Barbary Coast dance-hall when he built the house. To reuse the beadboard paneling in the back bedrooms we removed the paneling to strip and refinish. It was then reinstalled almost as a jigsaw puzzle after the window/door layout changed and insulation was added. We kept key elements like the stone fireplace, exposed rafters and non-structural trusses in the living room and the knotty pine wood paneling in the dining room.”
Another way to retain the character so important to Pat and Jim was with the floor plan. “My parents did not want a larger home or to unnecessarily change the feel of the spaces. We only added about 300 square feet of living space, leaving the dining room largely untouched. Although only one or two of the interior walls are in the original location, many rooms are in basically the same space allowing for the home to feel a lot like what it was. Even the new ‘jungle’ room is located where the original house had a very small exterior space, so it felt natural to design that space with a more ‘exterior’ feel.”
Green Design: “Sustainably responsible decisions were important to the design of the floor plan and the material selection. The floor plan was finely tuned in order to avoid purchasing any new furniture. For example the niche in the dining room was made deeper to accommodate both an heirloom sideboard and use the existing dining room table.”
“When selecting materials throughout the project it was important to not only design to the aesthetic of my parents but to create a home that was a natural extension of the unique woods/ocean landscape. We used doug fir for the window and door casing, built-in bookcases and all cabinetry. It was important to select a wood that was not exotic and doug fir added the needed warmth in addition to being FSC-certified. The one exception was the wood for the stair guardrail/display shelf. Here a medium stained walnut was used to compliment the darker furniture in the dining room and the end of the hall, and to set it apart from the other cabinetry. Together with the translucent Varia Ecoresin (40% pre-consumer recycled resin by 3-form) with embedded seagrass fronds, the walnut shelf makes a very nice focal point to the hallway.”
Unify and improve functionality: “I worked very hard developing a floor plan to give most every space a double function. For example, the small hall that takes you to the guest room/study off the living room also takes you to the bathroom and the utility storage room. The hall in the middle of the house (great design input from Ann [Edminster, project architect] to have this space open) is not just a pathway to get to the back bedrooms but is the entrance to the dining room, the landing for the top of the stairs, entrance for the jungle, place to stand at the phone niche, and a visual showcase for the furniture-like bookshelf/guardrail housing personal treasures.” Edminster adds, “I’ve learned over the years that the stairway is always a primary driver of form in multistory projects, so working this out — along with the location of the jungle — was a critical piece of the overall design puzzle.”
Not only were the bathrooms and kitchen not terribly functional, but the existing windows and dark walls caused major day lighting issues and glare. Again, Alden Miller: “By adding skylights, using translucent glass panels for the interior doors and increasing the sizes for the non-view windows, we were able to bring a balance of natural light. Not only was the glare eliminated, but seldom is there a need to turn on lights during the day.”
Pat Kremer sums up Alden’s work on the home’s interior design this way: “Alden contributed immensely by creating a unified whole that incorporated so many disparate aspects that we cared about.”
Focus: salvage and reuse
Carl McCarthy set the standard for reuse in this home back in 1938: he framed with used lumber, used windows and doors salvaged from sites in and around San Francisco, built the hearth with cobblestones being pulled out as the city paved its streets, and gathered river rocks for the chimney during every family road trip in their Model A Ford.
Dan Miller: “All deconstructed materials and off-cuts from the new construction process were separated on site for reuse. Still usable fixtures, doors and hardware from the original home that were not used on site were donated to a building materials salvage yard, Building REsources of San Francisco. And if reuse was not possible, materials were used for firewood or eventually recycled off site.”
Focus: design for permanence of place and people
Pat Kremer: “Our home is a family project started in 1938 but designed to meet our needs in retirement and the next generation’s needs as a growing family. Jim and I can age together here but we can also accommodate plenty of family when they visit or someday when this could be their family home. It’s a small home, but packed with purposeful spaces and family history.”
Focus: energy efficiency
Jim Kremer: “It’s not easy to honor the original structure and ambiance while dramatically improving the home’s energy profile. One good example of a solution: adding a required structural ridge to the main part of the house and then building a ‘second’ roof structure on top of the first created a deep space for plenty of insulation while leaving the original rafters exposed.
“And the performance of the state-of-the-art mechanical systems matches the efficiency of the structure so that our renewable energy systems approach our reduced energy needs. We are not net zero energy, but we are getting pretty close.”
Edminster also insisted on encasing the exterior of McCarthy’s salvaged-rock chimney – a big thermal bridge in the original structure – with an insulated wall that also embraces a new window seat and media niche. Thus the vintage character was not compromised, even while dramatically improving energy efficiency.
Weekly Newsletter
Get building science and energy efficiency advice, plus special offers, in your inbox.
Lessons Learned
Jim and Pat Kremer are really happy with their "new" home. But the performance of their heating system is just not what they were expecting.
Jim Kremer: "Radiant hydronic heat is highly touted and considered to be so green. But we feel it has some drawbacks for our lifestyle and our benign climate. Consider that the system has to heat up the subfloor, the maple hardwood, and in some cases a nice carpet. Under the best of circumstances, this means the lag time to respond is quite long. Unless you keep a room/zone up to temperature full-time, you have to work this lag into the heating program.
"The main living space — living Room, dining room and hallway — are all open and connected. They are served by three PEX zones controlled by one thermostat. I have been using a modest setback at night (at 10 p.m., down to 63°F) and try to heat it up for the morning (by 7 a.m., up to 68°F). Now, when the outside night temperature is in the low 50s, this works OK and it warms OK. But when we got our coldest nights last winter (low 40s — and this is not THAT cold), the system had been unable to get up to temp. Even with progressive recovery set ON with the thermostats, it does NOT bring the space up to heat during the cold snap. And during more normal winter stretches, it is taking 4 hours or more to get up to temp after the setback. If we did NOT set back at night, we could probably keep it at 68°F, but this is certainly wasteful and I am not willing to do that so far.
"The master bath — It is far from the Phoenix water heater/boiler, and the PEX runs along the wall of the Jungle, under the slate floor. It is insulated below, but unless the Jungle is up to temp, the PEX runs quite a ways in the cold slate bed before getting to the bath. So, instead of a small bath area that would heat up quickly, it is slow and very demanding of heat (a large drawdown of the water tank temp — I've monitored it) to warm the floor enough to notice with your toes.
Jim Kremer is determined to optimize the performance of their radiant system. "It's a work in progress; we will learn more about how to tune the system, balancing it's performance with our patterns of use."
General Specs and Team
| Location: | Pacifica, CA |
|---|---|
| Bedrooms: | 3 |
| Bathrooms: | 2 |
| Living Space: | 1745 |
Interior Design: Alden Miller, Alden Miller Design Architectural Design & Green Building Consultant: Ann Edminster, Design AVEnues Contractor: Dan Miller, Daniel Miller Construction Structural Engineer: Bruce King, Bruce King Consulting Energy/Mechanical Design: Bill Dakin, Davis Energy Group
Energy
• Spray foam insulation added to roof, walls, and floors
• High efficiency Phoenix gas water heater backing up a solar thermal system
• 5 heating zones with programmable thermostats
• All new Marvin windows (double low-e, argon-filled) and doors
• Window treatments that modulate solar heat gain and loss
• Grid-tied PV array
• Enclosed stone fireplace to block thermal bridging
• Fireplace replaced with high efficiency Jotul wood stove insert, old chimney sealed
• Energy Star GE refrigerator (GTH22KBRWW)
• CFL, electronic ballast FL, and LED lamps
• Sola Tube skylights for natural daylight
Water Efficiency
• Bosch (SHV68M03UC) dishwasher
• Whirlpool Duet (WFW9400SW) front load clothes washer
• Toto Aquia (CST414M), dual flush toilets
• Hansgrohe Croma low volume shower heads
• Tub with water saving cross-section
• Remote switch recirculates hot water on-demand to remote bath
• Gray water diversion plumbed in at installation
• Gutters and downspouts designed for catchment and reuse
• Landscaping plan (underway) with native and climate-adapted plants
Indoor Air Quality
• Benjamin Moore Natura interior paint low/no VOC
• Minwax Polycrylic Clear Satin (water based)
• Cross ventilation and operable windows in all bedrooms
• Doors to outside in 5 rooms
Green Materials and Resource Efficiency
• Reuse of materials (including much of the original wood which was itself reused by Carl McCarthy, the original home’s builder, from demolition of old buildings in San Francisco in 1938 to the early 1940s)
• Salvage of burnable unusable wood for firewood
• Donation of still usable items (Building REsources)
• Minimal volume of demo materials to landfill
• High R-value spray insulation in walls, floors, and ceilings
• All new wood was FSC-certified
• High-volume fly-ash concrete with lower CO2 footprint was used for all new foundation work
• Decorative transparent paneling by 3-form
• RPI 100% HDPE decking
Alternate Energy Utilization
Solar hot water: Heliodyne Gobi 410 solar thermal collectors
PV: 18 Mitsubishi PV-UD185MF5 185-watt modules


8 Comments
Radiant floor woes
The slow response of this system should sound a cautionary note for those in mixed climates who are convinced that radiant floor heating is the only green way to go. High thermal mass systems are fine for regions with long predictable heating seasons but lack the flexibility to deal with milder climes where temperature swings above and below the heating threshold are common.
More details on the insulation package would be welcome: there are no numbers given for the "High R-value spray insulation in walls, floors, and ceilings". If the home's insulation has really been brought up to standard it's hard to understand why modest overnight lows in the 40's and 50's should be a problem. Night-time setback of the thermostat should be entirely unnecessary if the thermal enclosure is adequate.
Insulation specs and radiant floors
I agree with James Morgan -- it is surprising that modest cold nights would challenge a well-insulated home with a new, modern heating system. Here are some details. Retaining the original hardwood flooring required that hydronic tubing be installed under existing floors. To enhance the heating efficiency, we applied spray foam insulation up under the installed tubing. This floor insulation was applied to achieve between R-15 and R-19 under floors. The new ceiling insulation is designed to yield between R-25 and R-32. Walls and stud bays were caulked with poly-cell foam as per Title 24, with spray foam added to R-13 to R-19. A blower door test was conducted as a diagnostic tool late in the reconstruction, and we identified and corrected numerous gaps where air flow was detected.
I don't know if these R values are reasonable -- they are the specs of the installation. But the foam all exterior walls was sprayed into the stud bays, therefore thickness >3.5". And structural improvements to the roof created rafter bays 10" deep, filled with foam.
If it gets cold here this winter, I'll be doing some more testing. :-)
Thermal capacitance is the issue
Hey Jim, that sounds like a pretty decent insulation spec for your climate. I think you have already identified the problem quite correctly as the time lag resulting from the high thermal capacitance of the heating system. Your night setback habit is working against you: it'd be like having a storage tank hot water system and turning it on ten minutes before taking a bath. In situations like yours there would have been a good case for a fast-response system like an air-to-air heat pump (that'd be the equivalent of a tankless water heater), but the investment has been made and I really don't think you need to change the system, just your habits. Your excellent thermal enclosure and the low Delta-T will ensure that the savings in thermal energy loss at the lower thermostat setting will be negligible - just so long as you don't find yourself having to open the windows to cool the place down! Set it (at 68) and forget it.
Radiant floor woes
I am wondering if reflective aluminum was installed, and also at what temp. the glycol or water is set at? My experience building many houses with both slab on grade and Warmboard underlayment radiant floors is counter to your experience. I don't see why a system like yours, in a climate with light loads, would not be quickly responding. I suspect that without the a proper conducting material surrounding the tubes, or that the spray foam, isolating the warming effect to a small area, may be at fault. In my experience, regardless of thermostat settings, a system over wood floors might need to be set higher for quicker responses, where as in a slab the thermal mass properties can be utilized with lower temp settings, and therefore longer lag effect..
Radiant floor installation details
Thanks, Matthew, Your comments are helpful. I too am puzzled by the performance, and worried that something might be amiss. Here are some details.
The Phoenix boiler is set at 140°F. This hot water drives a Taco heat exchanger. This seems pretty hot to me (?), and I am not sure if the Phoenix specs might let me set it even higher than 140° -- does that seem desirable?
PEX tubing was installed in Aluminum panel strips about 5" wide with a groove down the middle into which the PEX clipped. This Al panel was mounted directly on the underside of subflooring that looks like 3/4" x 6" boards (it was pre-plywood, I think!). The maple hardwood flooring is mounted on this subflooring. The foam insulation was sprayed into the bays between the joists. That seems to me to be a great plan, with at least of 6" of foam insulating under the PEX so the only way the heat can go effectively is up into the floor. So the Al panels were wide enough that substantial area the floor was heated -- looking at photos I have before the foam went in, I estimate the Al area is about a third of the floor area. Still, there is ~ 1.5" thickness of wood floor above the PEX.
Another factor may be the flow rates through multiple tubing zones? For example, our main living space involves a large area and is served by 3 contiguous loops of tubing controlled by one TStat. But the length of the loops are not the same, and the flow rates are not either. (The valves in the manifold have little flow meters, and can be adjusted. The loop that serves most of the living room unfortunately is the flow-limiting one. That is, when I try to adjust and balance the 3 valves, the main loop is the lowest GPM, and I have to set the other two lower if I want to match them. Actually, my attempts at adjusting these flows had not made any noticeable difference in performance, and now I have them all wide open.)
I have some little Hobo U-10 temperature loggers from Onset, and I've been doing some tests, but haven't worked up the data yet. I had one on the line leaving the Taco exchanger, and another on the return line too, hoping to measure the heat drop when the hot water returned from heating the loop. But the return logger didn't work, so I have to set it all up again, and the cold weather here is almost over for the "winter." However, again this year, when night temps dropped to mid-40's, with only the living room calling for heat, the system was unable to recover from a 64° night setback starting at 0600 to reach 68° by 0800. Using the "progressive recovery" feature of the TStats did not help. But it was able to keep at 68° all night with no setback.
That may be more than you wanted to know! Thanks for your interest.
RE: Radiant floor installation
I think your on to something with the fluid temp once it has run it's course, which leads me to my next question...........How long are the tubing zones, especially that pesky one( three contiguous loops controlled by one thermostat). Are these three different zones controlled by the same thermostat, or actual contiguous loops in succession? I haven't ever heard of anything higher than 140 degrees, I was thinking 120......
Zones and valves
For the living room set, there are three full loops, each controlled by its own valve at the manifold, but they are all switched by one T-stat. In theory, each should work satisfactorily as long as the hot inflow volume is adequate, which almost HAS to be the case, since there are a total of maybe 8 zones total (i.e. driving 3 should be easy).
Tubing runs -- for the 3 in question: Two are 215 ft @ 0.5 GPM, and One is245 @ 0.3 GMP. BUT, big caveat, these are the engineering design specs. My fear and suspicion is that the installation was not specifically done to these specs and drawings, and thus my feat that it might not all be OK. I have no way to really know if they did the installation "right."
Zones and Valves
Those are standard specs, I thought they may have been too long, and so the fluid was cooling down too much before returning to heat exchanger.
Log in or create an account to post a comment.
Sign up Log in