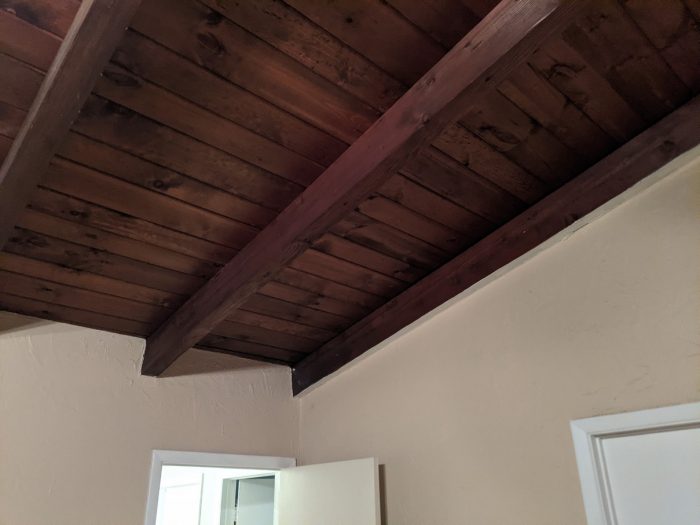
Air-Sealing a Tongue-and-Groove Ceiling from the Attic
Hello,
I’ve got a vented attic above a 950 sq ft area. Just over half the area is normal joisting with drywall. Above the Master Bedroom (16′ x 21′) is a Tongue and Groove Ceiling that is supported with large timbers from the inside. So in the attic I’ve got a this whole area flat, no joists to work around. It currently has R-11 batts on top of it. I want to blow in insulation in the whole attic. What’s the best way to air seal the tongue and groove section? I’m thinking Tyvek Home Wrap or Homegaurd brand. Would remove all those old batts, roll out the Tyvek. Tape any seams. Not sure the best way to secure it down. Capped nails all seem to long. Maybe just staples and tape over after. Or just roll the whole length and secure at ends and not worry since I’ll be covering it with cellulose.
Should I instead use a smart vapor barrier?
Hard to tell but it’s also sloped and a fall off at the end so I’ll have to build an insulation dam for the area.
It’s a low slope roof if that means anything. If I remove the batts, I should not reinstall them correct so I don’t trap moisture between the batting and the air barrier I put down correct? Build dams and blow in cellulose?
Other idea to shoot down, what if I just put the wrap overs the existing batts and secure it down with tape sealing it like one big pillow, get whatever R value that provides and then do the blow in on top of that? Only concern would be potentially trapping moisture in the batts or not worrying because it’s fiber glass and the breathing through the gaps in the batts and the tongue groove are adequate.
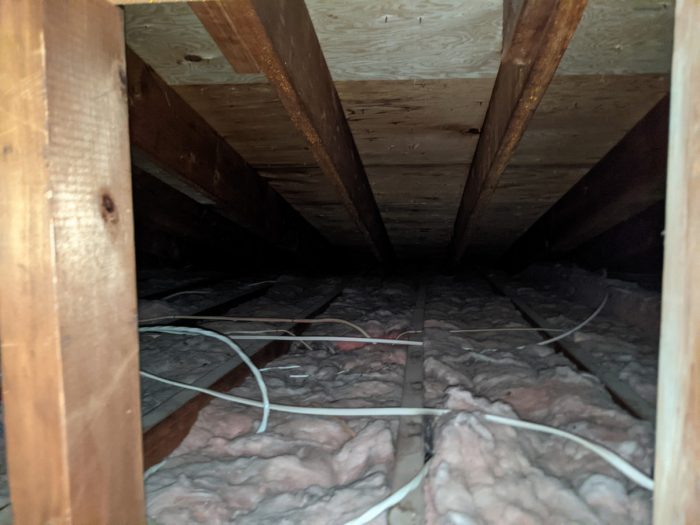
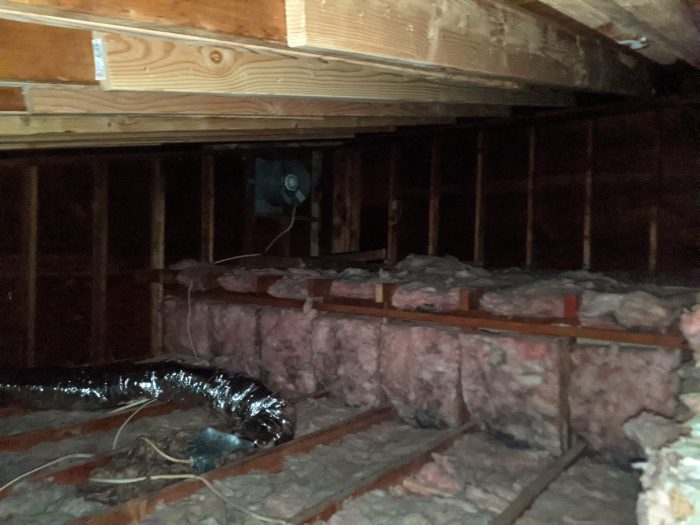
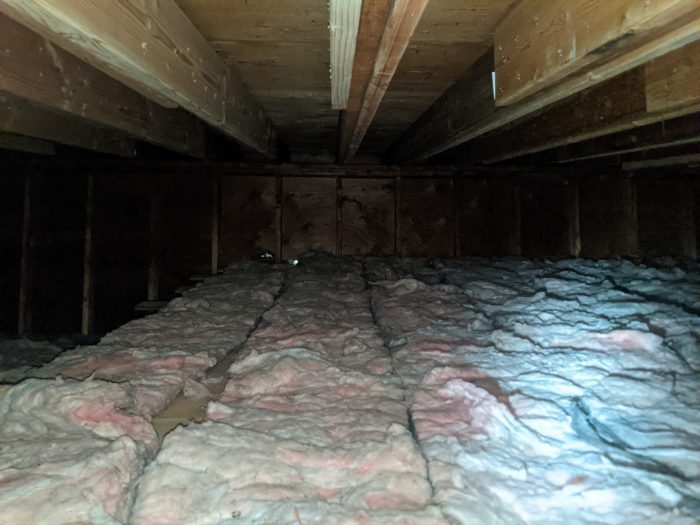
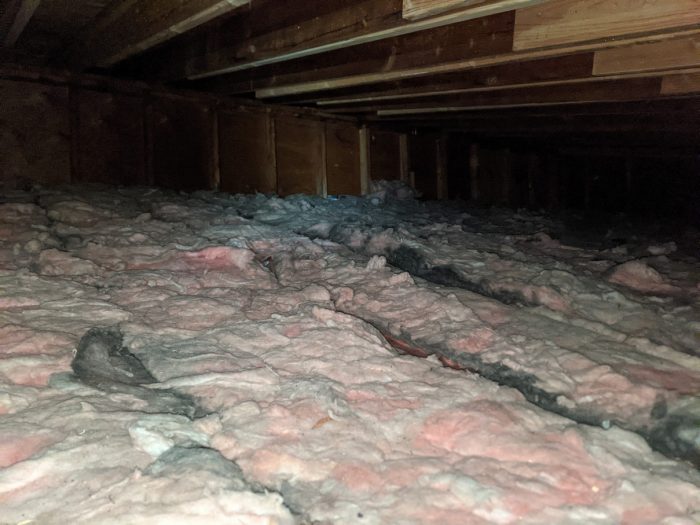
Included 2 pics of the rest of the attic in case anything stands out.
In Zone 5 – Northern NJ.
Thank you in advance.
GBA Detail Library
A collection of one thousand construction details organized by climate and house part


Replies
I'll give your post a bump.
Thanks, I think the Tyvek Housewrap is the way to go since it's vented. Would love an experienced opinion on doing it right over the top of that old stuff so I don't have to pull it up and toss it, those T&G boards have to provide enough venting right.... right?. That said I think the best practice would be to toss it, build up insulation dams and just fill the whole area with a thick cover of blow in.
I’m telling you now, skip the Tyvek! It handles vapor drive well, but not bulk water! Bulk water from leaks, and it will happen the way homes are built today! Use a smart vapor barrier if anything else you do…
If you're going to rip out the old batts first, your best options for air sealing are either a flash (thin layer) of spray foam, or some cut'n'cobble of thin rigid foam. Spray foam is expensive, cut'n'cobble is a fair bit of labor. I wouldn't try your tyvek idea -- it would probably work, but I think it would be even more work than cut'n'cobble since the tyvek would be constantly fighting you, tearing off of staples, wanting to fold up on itself, etc. At least 1/2" polyiso would stay flat while you work, and you could deal with it in manageable pieces instead of big, unwieldy rolls in the confines of your attic.
Cellulose would be better than fiberglass if you don't do any air sealing work prior to installation, because cellulose is a bit better as an air barrier compared to fiberglass. I would try to do some air sealing work first myself, even if it took some effort.
BTW, didn't your ask about that bump out area before? Your pics look familiar to me -- I'm thinking I answered a different question about your project some time in the recent past...
Bill
Bill,
Thanks for your response.
I haven't asked about the bump out area but since you mention it idea is to build an insulation dam and blow in there as well. Figure out some way to stop the blow in from getting sucked into the vent fan.
As for your suggestions, the foam board is an idea. I just checked my opening though I would have to rip pieces in half to get them up there and getting an 8' length might have to be cut down too. The material would cost me an extra $120ish where I'm at, on top of whatever I would use to seal all the gaps between the boards. I guess sheathing tape would be most economical. I'm going to think on this but I tihnk it would end up being even worse.
For the Tyvek they sell a 3' roll by me for $76, with 6" overlap It'd cover the area. I'd use a whole roll, maybe 2 of sheathing tape, so that's another $15-$30. I can get a helper up there to hold it down while I staple it in place. Then sheathing tape as well around the entire perimeter and if I'm nuts over all the staples. The way the work space is it wouldn't be too much trouble to weight it down with boards as it gets secured. I had the dumb idea of maybe buying some thing plastic to go through where I staple and almost act as a poor mans capped staple. Imagine stapling through a plastic credit card onto the house wrap.
Torn between time spent rolling and stapling vs ripping the foam board and all the trips up and down the ladder with the board.
I will definitely be doing air sealing, there's a couple big gaps and I figure as it cools off here in NJ I can just get a podcast going and commit to crawling through the hole thing foaming everywhere I can.
Current plan is install rafter baffles for the soffits, air seal everything (removing batts above T&G), build insulation dams, blow in insulation, attach foam board to the back of the door and use weather stripping.
That picture of the corner of the ceiling from the inside is actually where the access door is.
I'd be curious to hear what you think about house wrap and sheathing tape. if the only concern is it being unwieldy I may go for it and gladly post an update here to eat my words and tell my tales of using foam board.
Appreciate your feed back.
I guarantee you the labor to use the housewrap will be more than the labor to put in the rigid foam. Attic work is miserable work, and you'll be hating life while you're up there, so you really want to minimize the time spent working up there. With rigid foam, you can cut the pieces BEFORE going into the attic, then just slide them into place. With house wrap, you have to do EVERYTHING while IN the attic. That is not to be taken lightly. Consider yourself warned :-)
Sheathing tape will work fine on rigid foam. Pretty much any tape will adhere well to the foil facers on foil faced polyiso. I like to use foil tape since it matches the foil facers, but any sheathing tape will work fine too. Canned foam can seal the edges, and it's fairly easy to do if you use the gun for the canned foam. The gun is about $50 and is totally worth it for a job this size, even if you never used it again. The gun makes things much easier and much cleaner.
Regarding the bump out, I'd put some polyiso across the studs to seal the batts in (which gives you an air barrier which will greatly improve the performance of those batts), and leave the edge of the polyiso sticking up above the level of the insulation you plan to install. This way the polyiso does double duty of providing an air barrier for the batts and also an insulation damn on the upper part of the bumb out to hold back your loose fill insulation that you're planning on installing.
Bill
I will def report back. Hopefully be getting to it with in a month. I don't have a good way to transport sheets. I'm going to give the tyvek a go and apologize and borrow a truck haha. Telling myself the tyvek will feel like a dream after having the crawl around in the other half on my stomach spray all the top plates. I've also got to cut all these baffles because the joist end in between the rafters not in line w them at all. I'll definitely try and get all that cut before going up. Thatll all be on my stomach.
I take it I should use polyiso for the dam around the tongue and groove deck as well, it's to the right of that bump out. There's a big gap between the fire place and wall below. Cover that with polyiso or just OSB? I imagine polyiso is best practice.
Anything useful I can do with the Batts above the tongue and groove area or just toss em?
Thank you again. Looking forward to updating this later.
Bill,
Minor update. Finally had time to finish the soffit baffles, difficult crawling down in a single slope roof. I will be picking up Polyiso sheets Sunday. Will start cutting em down to get up there that following weekend and see when I can get started. Little bit to clean up first.
Bill,
I finally had a chance today to get up in the attic. I moved all the old batts over, sept and vacuumed the whole area. I was able to cut the 4x8 sheets in half and then cut and fold to minimize taping as you'd suggested. Cleaned all the surface to be taped with IPA as well. I laid out the sheets taping as I went. taped areas down that lifted. I also had cut pieces to fit in all the stud cavities and air sealed them and all along the edge with foam.
On the side with the bump out out wall I took a circular saw and cut a flush edge. I still need to seal and tape that side. I also need to come up with something for the the door to the space.
Those sheets sure are slippery too, difficult to move around on. Wonder if I wiped the whole area with IPA if it'd help. Don't really need to get out on it again. Next I've got air seal some more areas around it and then build up some insulations dams around the chimney and perimeter.
Let me know if there's anything I should to to improve this.
The old batts were pretty gross. I was debating replacing them or just going with the blown in and forgoing the batts. Would that be smart or should I reuse my batts or get new ones? Do I need a vapor barrier now that I've sealed the whole area with polyiso sheet?
Thanks so much for all your help. I'd have been tearing house wrap all day otherwise.
You don't need an additional vapor barrier -- the foil facer on the polyiso is already a very good vapor barrier. You do need to make sure you air seal all the perimeter edges of the polyiso "floor" you've built though. I would use polyurethane caulk for this myself. It looks like you've already go through with canned foam to get the larger gaps and holes. I'd double check and make sure you didn't miss anything.
A sheet of hardboard with the shiny side down towards the polyiso will make a sort of sliding creeper that you can use to move around, and will help to protect the polyiso from punctures. It looks like you don't have much headroom in there, so anything you can do to make your life easier while you're working is a plus. A 2x6 foot piece of 1/4" hardboard would make a nice creeper, or a piece of plywood -- but plywood won't slide as well.
I wouldn't bother reusing the batts. It's very difficult to reinstall used batts well in large areas, especially when you have limited space to work in. See if you can donate them to a reclaimer in your area. I would just install new loose fill insulation and call it done.
Bill
Thanks as always. Will grab some poly caulk this week. I'm thinking caulk the whole side as best I can and then encapsulate w foil tape over the top as well. Probably put foam in between there as well when I secure the insulation dams.
I got the far side perimeter sealed but I'll grab some hardboard and look it all over again.
If I made any holes in the foil on the sheet, like when I leaned on an elbow should I seal those up with tape as well? Guess it can't hurt just a little time consuming but I want this done correctly.
The way that bump out wall comes up to it I'll have to cut more polish and make sure i've got it sealed all around.
I'm with Bill on this, Tyvek is a bad idea.
Tyvec and most house wraps will be very annoying to work with. These things are SLIPPERY, hard to walk on as even the slightest sideways force will cause it to slide. I've fallen on my @$$ a couple of times when putting tyvek on walls before they are lifted up.
Foam board or thin plywood is the better way to go. If you must use a membrane, a better option is roofing underlayment. Most synthetic ones can be taped quite easily, much harder to tear and won't slip. They are also cheaper.
Also think about how you will air seal whatever you put down around the perimeter.
The grooves between T&G boards are a pretty big air gap which make for a great 3D air path. Even if you seal the top, the air will happily flow sideways along those gaps. The simplest is to drill a 3/8" hole between each board where it passes over the exterior wall top plates and inject canned foam or flex caulk to seal.
What about 6 mil poly? Tape it down or staple it down and put the bats and the loosefill on top
For the TG section that would work
The risk would be condensation on the poly depending on ambient conditions with AC running. A sheet of polyiso or EPS would be better in that regard
The form factor of 6 mil sheeting by me makes it seem appealing. Could get 2 of the 10' x 25' ones and cover the whole area.
Thanks for responding
Alright Tyvek is out. I will try roofing underlayment. I hear you guys on boards being better and if I could just have them show up in the attic I would do it but the layout of this house makes every journey from the driveway up to the attic a haul. There's 7ft ceilings on the 1st floor and a stairwell that makes a 90 turn. Then three more turns to the master. (1965 contemporary design). The idea of just going up the ladder once w a roll is so much more appealing then time spent borrowing a truck, ripping down 10-12 sheets, multiple 2 story trips and returning a truck on top of being more expensive. I will definitely come back and update whether I bailed and just did the sheet thing but it'll also double or triple the amount of tape work I have to do to seal between them all once in place.
The one end of the t&g is open to the bump out. Since it's slopes not sure how it meets on the other end. I'm going up there today to plan what I want to do around this massive masonry chimney stack so I'll look at the far side of the T&G boards. I'll throw some more pictures up here.
I'm thinking on the polyiso board though, I may be swayed here. I've got to install all the rafter vents and deal w the chimney first so it'll give me time to think. Will see about borrowing a truck. I guess if I have the sheets here I can rip em on my table saw and then just carry em up over the week to stage em till I'm ready. I also like that the boards will provide some insulation between when I get them up and when I blow in cellulose.
It appears I can only get polystyrene not polyiso by me. And I definitely want faced board correct? Foil side down when I put it in yeah?
Opinions on laying out the 1/4 eps that comes in folded 50ft length. I assume that may get destroyed when walking in it for the sealing and blow in after.
Thanks for your advice.
If you go foil faced then foil up- that is where condensation would happen. If you can give your climate zone then the R of the eps can be discussed in a more dependable fashion.
The 1/4" fanfold stuff is XPS. You could use that, but with it being only 1/4" thick, you'll probably not be able to get a reliable air seal between it at the edges of the joists. 1/2" material would be better. It's more durable than you might think -- stepping on it probably won't be an issue, but if you step AND SLIDE you'll probably tear it. Either way you're almost sure to have it seperate from the edges where you're trying to seal it in with canned foam -- there just isn't enough for the canned foam to adhere to with 1/4" material.
If you use EPS, you absolutely need facers on the thin stuff, otherwise it will be too brittle to work with. I see no problem using 1/2" faced EPS here if that's all you can get. My default mode of thinking is usually "use polyiso", because I like that product better (stiffer, easier to use in structural-ish things like baffles, etc.), and a bit better R per inch.
Regarding your earlier "cover it with OSB or polyiso", I'd say "it depends". If the "gap" is a hole in the floor, I'd use plywood for safety. Once you cover everything with loose fill insulation, you won't be able to see that it's not safe to step in the area of that hole anymore. Use 3/4" plywood securely fastened and that's not a problem. I'd use polyiso for all the vertical insulation dams though -- it's lightweight, it adds R value to the wall you attach it to, and it's stiff enough to stay put when you are blowing in insulation. I'd use it for the baffles too, otherwise some 1/4" plywood, luan, or even hardboard work. For baffles, you just need "strong enough" (and "enough" here isn't very much), and cheap.
Bill
Tha is Bill and Sommer,
Just tried getting a 2' x 8' piece up there. Didn't work. I'll have to cut pieces to 2' x 4'. I'll keep looking for polyiso between now and when I pull the trigger but may only be able to get EPS.
For the baffles I've got the squeeze through a 14" hole to get to that side. It's a single slope roof so I'd end up ripping sheets and wasting a good bit to fit em in there. I was going to use plastic baffles figuring they'd be more foregiving to wrestle with. You can see in the photo w the wires that's where it goes down to the low wend soffit. Truss is in between the joists so I'm going to have to cut them all to go around the joist and make a good enough seal so the blow in doesn't go past it.
Thanks for the input I'll use 3/4 ply for holes in the floor.
And while I'm doing my die diligence I should use flashing and fire rated caulk for sealing around my masonry chimney yeah? Use the foam board to build a dam around it 2" off or can you wrap it in Rockwood and be ok? I ask but the house being built in 65 has wood right up by the brick.
Appreciate everyone help.
If you're careful with foil faced polyiso, you can cut through one side only, then fold it, and unfold it later with the second facer intact. This means no issues with air sealing an extra seam -- but you have to be careful not to "peel" the second facer off when doing the folding. The facer on EPS is usually a think poly sheet, so it's weaker than the facer on polyiso.
There are some articles on here about air sealing around chimneys.
Bill
Just wondering:
What about some elastic foam like in a Yoga mat? Will be more expensive but easier to move up.. Neopren like in a diving suit etc
You run into fire spread problems when using materials like that (yoga mats). As an example, people have died in night clubs that had rapid fire spread due to the club's using packaging foam instead of much more expensive fire-rated soundproofing foam.
I wouldn't use random materials here. Use something intended as a building/insulating material and play it safe.
Bill
Yes - fire is no joke and whatever you do has to pass later scrutiny. That said, Neopren is rather safe in that regard.. the typical Yoga mat maybe not..
> best way to air seal the tongue and groove section
Non flat surfaces are harder to air seal well. I'd probably remove the current insulation, apply DIY spray foam (about $700), put the insulation back and add more cellulose or fiberglass. I don't know, maybe foam leaking down through the T&G would be a problem.
Whatever you do, success is going to be largely determined by having a good system for detecting where air leaks are. For example, a fan to pressurize/depressurize and smoke or a thermal camera. Do not rely on "it seems air-tight".
Thanks for replying. I thought about this as well but a bit apprehensive since folks say you should have experience with that type of foam. Have read it can bleed through T&G but have never seen proof. The cost being $700 though would put it well over the cost of the polyiso and feels more prone to mistakes.
Open to hearing other comments.
I've been very busy and traveling lately. Still have soffit vents to put in before sealing but appreciate the suggestions.
Skip the Tyvek, skip the foam, 1. remove insulation, 2. use a smart vapor barrier, like Siga or proclima product…3. run it over and in joist bays, 4. tape any seams or any staples holes, 5. Use blown in cellulose, wool to R 49 or beyond code dense-pack (several inches above/over high point)
This will keep moisture and heat out of the attic in the winter, which will dry to the inside-dense pack will be a highly tight, after settling, insulation… note: because you mentioned low slope roof, make sure entrance air holes are many and can exit via ridge vents not much Of a stack effect?
From pictures; there’s not enough insulation, those joists need to be covered up, that vent pipe needs replacing and if using flex, stretch it all the way before installation, and no bends!
Would something like Hubers liquid flash- applied from the top - do the trick to close the gaps?
I have often wondered about this, but I’ve never tried it and I don’t know anyone who has. Before trying it, I would check with the manufacturer to see if there are any fire concerns using this material indoors. Fire spread becomes an issue indoors.
Bill
Thanks for the suggestion. I've got to travel again this week but I will look into that. My initial thought would be concern about bleeding through the grooves as well as making sure I could vent the space well and get the whole area clean enough to spread it.
I’d be inclined to apply a peel and stick non permeable WRB like Blueskin to the top of the T&G. What would be the argument against that?
I think cost is a bit prohibitove but would be interesting to see if if could just use it like tape on all the seems. I'm still feeling like polyiso is better.
Skip the Tyvek, skip the foam, 1. remove insulation, 2. use a smart vapor barrier, like Siga or proclima product…3. run it over and in joist bays, 4. tape any seams or any staples holes, 5. Use blown in cellulose, wool to R 49 or beyond code dense-pack (several inches above/over high point)
This will keep moisture and heat out of the attic in the winter, which will dry to the inside-dense pack will be a highly tight, after settling, insulation… note: because you mentioned low slope roof, make sure entrance air holes are many and can exit via ridge vents not much Of a stack effect?
There is no point in using a smart vapor retarder here since it's a vented attic. Drying to the interior doesn't matter here, either, again, because it's a vented attic -- there is basically unlimited drying potential to the exterior. If you were going to seal things with a membrane like this, you could just use a sheet of poly since it's probably the cheapest option -- smart vapor retarders, especially the expensive fancy ones, add nothing and are a waste of money here.
I don't see any advantage to dense pack cellulose here, either. The poly sheet would already be taking care of air sealing, so regular ol' loose fill cellulose would work just fine, and would be cheaper to install.
Bill
You don't want a interior side poly vapor barrier when there is substantial AC use.
Jon,
Thanks for adding to the convo. Could you elaborate? Below the T&G will be in AC for about half the year. Above the T&G I will be laying down polyiso sheets, foil side facing up into the attic. Going to use foil tape to seal all the seams between pieces.
The edges of the T&G Area overhang at different lengths so was going to cut those to a straight line and make sure the edges are fully encapsulated so there's no 3D path into the attic. Will like cover all those edges with more foil tape where it makes sense, overhanging into the attic. At the sides that but up against the exterior walls I will likely fill with foam, or see if cutting up more polyiso to fill those voids is more logical and seal all the edges with foam.
Definitely need to spend time up there cleaning up a bit of mess left behind when the roof was redone a few years ago. Also got to air seal the chimney. Seeing as it's getting cold I figure air sealing the big T&G area will provide the most benefit and then I can tackle the chimney and the rest of the air sealing.
Will be getting some lighting setup there to make working easier and take some more pictures to post here.
Thanks everyone for helping out with this.
Ideally, you don't want to have a condensing surface on the "cold" side, which would be polyiso on the interior in the summer if you're running A/C. In practice though, this isn't usually an issue in heating domianted climates, as evidenced by the code requirements in much of Canada. You don't really need a vapor barrier in a vented attic at all, but it's unlikely to hurt you if use one.
I have recently put 1/2" polyiso behind a T+G ceiling just like you're planning. I sealed the edges by laying down a heavy bead of canned foam, then sticking the edge of the polyiso sheet into the canned foam before it cured. The result is the canned foam expands and seals to the drywall, the framing, and the edge of the polyiso. I found the canned foam even expanded up and sealed some gaps between the nailer against the top plate, which was a plus that I wasn't expecting.
Note that if you try this, you have to anchor the polyiso in place while the foam cures, otherwise the expanding canned foam will push the polyiso out of place. You want the canned foam to be trapped, so that the expansion pushes it into all the little gaps and cracks instead.
BTW, I found that Johns Manville appears to use some type of release agent on the face of their polyiso. The release agent is an oil film, and it keeps the tape from sticking. I had to wipe all the sames between sheets with isopropyl alchohol to remove the oil film before taping so that the tape would stick. It added an extra step to the project, but not a big deal -- just something to be aware of.
Bill