Below grade wall to above grade wall transition – gap?
Climate zone 6a, new construction. I’m struggling to imagine what to do with the transition between below grade wall and above grade wall. I had posted here about this in the conceptual stage but we started framing this week and the conceptual plan has gone out the window.
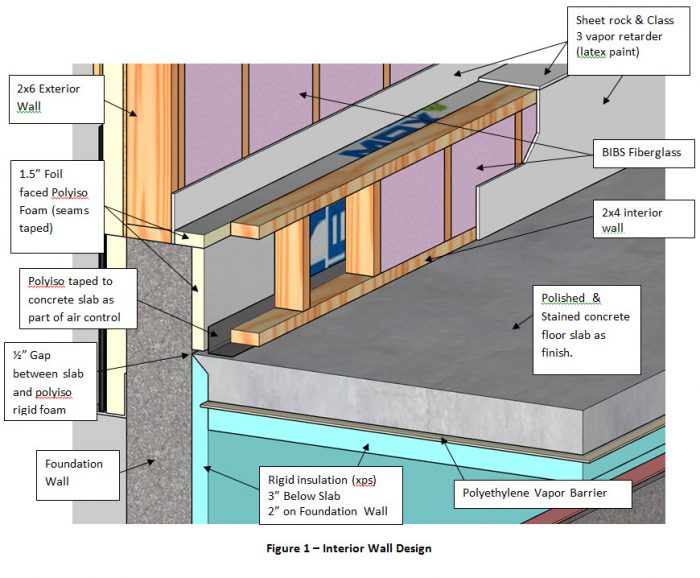
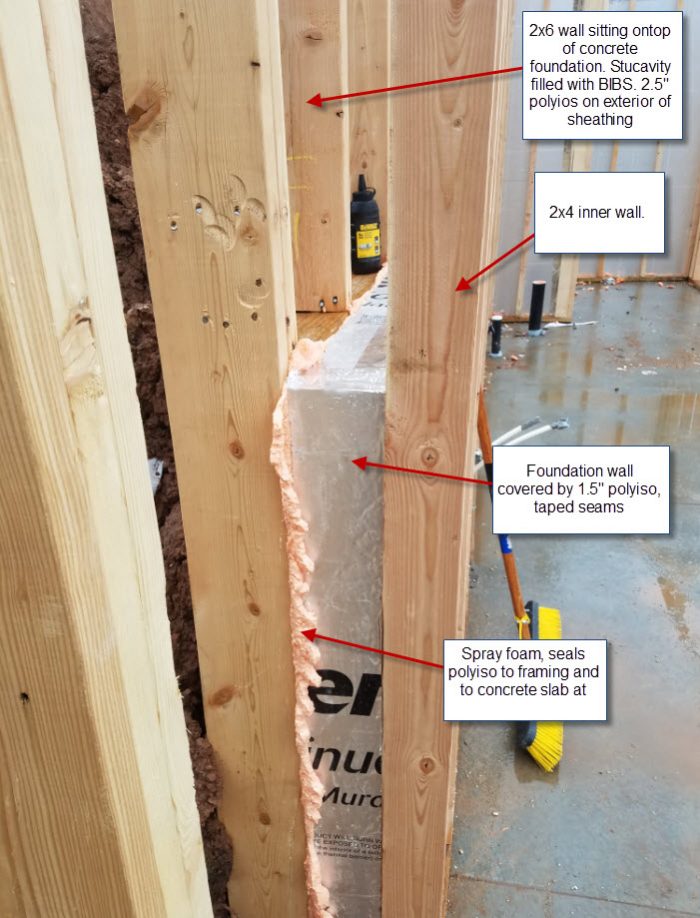
I have a 2×6 exterior framed cavity with BIBS blown into the cavity. To the exterior of the sheathing I’ll have 2.5″ of foil faced polyiso wrapping the house.
On the below grade walls of the finished walk out basement I have 1.5″ of polyiso wrapped around the interior side of the concrete. However the concrete foundation wall doesn’t go all the way up to the basement ceiling.
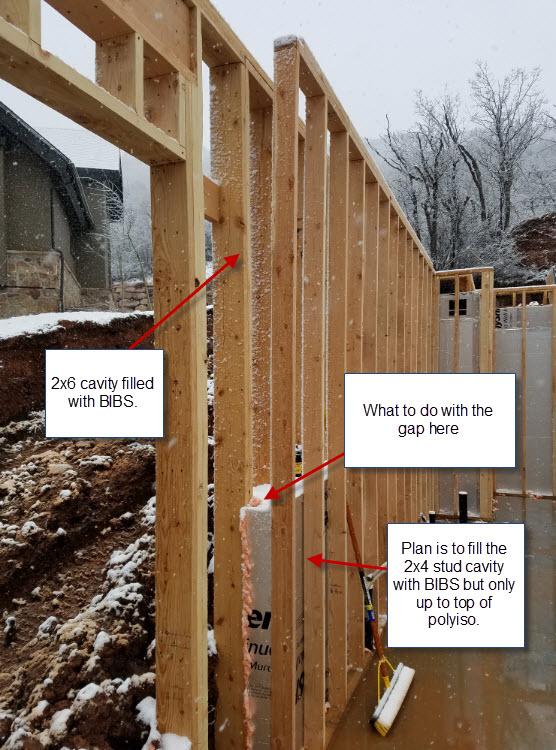
The conceptual plan was to have a shelf around the transition on the interior, like I show in the first attachment. This shelf was originally only going to be along the wall shown in the photographs. However due to a screw up in the height of the concrete foundation wall and to achieve the desired 10ft ceiling height we have to frame up by about 18″ around most of the basement perimeter.
Instead of creating the shelf like in the concept the framers want to build the interior 2×4 wall all the way up to the ceiling. Now I have an awkward gap between the 2×4 and 2×6 wall that I don’t know what to do with.
The quick answer would be to fill it with insulation. However I went to some lengths to design the above grade wall to ensure I had a nice 36% ratio R value of outside foam to inside vapor permeable insulation. Filling the cavity will insulation will screw up that ratio.
I’m worried about leaving the gap between the two walls because of air circulation and little thermal eddies being set up in the gap.
Does anybody have any suggestions?
Steve
GBA Detail Library
A collection of one thousand construction details organized by climate and house part


Replies
Steve,
If you are worried about your foam-to-fluffy ratio, you have to be careful not to install fluffy insulation with an R-value that exceeds the value needed to meet that ratio.
Options include:
1. Fiberglass batts installed in such a way that the batts stay in contact with the exterior sheathing or (in the case of the lower section of the wall) the polyiso. That might require criss-crossed steel wire or something similar.
2. You could skip the fluffy insulation between the studs and just use open-cell spray foam.
Martin,
I am not sure what you are suggesting for the gap between the walls above grade. The above grade wall profile outside to inside will be siding- rain screen gap - WRB - 2.5" of polyiso - OSB sheathing - 2x6 frame filled with BIBS - 5" air gap - 2x4 frame filled with air - sheet rock - class 3 vapor retarder paint.
It's the 4.0" air gap and empty 2x4 frame that has me worried. Is it okay to leave the assembly like this with nothing in the gap and 2x4 frame or should I fill it with something? Will thermal eddies not get set up essentially negating some of the effect of the 2x6 BIBS?
If I fill that gap with anything like open cell spray foam or bats I'd have to increase my external foam thickness by several inches to maintain the rigid to fluffy ratio.
(Edited reply to show 4" air gap [instead of 1.5"] in wall assembly - foundation wall is 8" thick with 2x6 ontop of it therefore air gap is 2.5 plus the 1.5 thickness of polyiso = 4")
Steve
Steve,
If you're using BIBS, you'll need something on the interior side of the BIBS to hold the BIBS in place so the insulation doesn't slump -- and more importantly, you'll need an interior-side air barrier (perhaps drywall).
If you are willing to install drywall on the interior side of the 2x6 wall, the air gap will do no harm.
Martin,
I was thinking that to install the BIBS they staple netting to the inside of the stud and blow it in before the sheet rock goes on so the netting supports the BIBS. That sounds like a wrong assumption?
I was thinking of drywalling the inside of the 2x6 but I don't think that's possible with the 2x4 wall already constructed.
Steve,
Is the netting air-permeable? Or is it an air barrier? Ideally, you want an air barrier in this location.
Martin,
I think I've got the solution. How about instead of the BIBS on the inside of the 4x6 cavity which was supposed to be about R21 I could get rid of the BIBS and put in R21 of open cell spray foam directly installed on the inside on the sheathing.
If I'm not mistaken the open cell spray foam will give me my air barrier I need while having vapor permeability allowing my sheathing to dry to the inside. In this case I'll just leave the air gap between the 2x4 and 2x6 assembly.
At ~ R3.7 per inch of open cell spray foam I'll need about 5.5 inches of open cell spray foam. The OSB sheathing will now be sandwiched between 2.5 of polyiso and the spray foam. How much permeability can I expect from 5.5 inches of spray foam and will this be enough to allow my sheathing to dry to the inside?
Steve
See below, Side bar 2 for Lstiburek recommendations. You are limited by your choice of low perm external foam. You could use external mineral wool instead, allowing point 5 and more inside insulation. Or higher perm foam (point 5 or the less desirable 6). If you must have problematic foil, stick to point 7 and the dew point/ratio restriction.
In either case, I'd use a smart membrane to get the advantages of the Lstiburek recommended class II plus the advantages of the class III that others recommend. And don't forget that air sealing/testing is much more important.
https://www.buildingscience.com/documents/digests/bsd-106-understanding-vapor-barriers
Jon,
I don't have to stick to problematic foil but at this point I've done no research in how to construct a wall with exterior mineral wool. That's a big change when we've started framing. The whole concept was to allow the walls to dry to the inside with a class 3 vapor retarder paint on the inside.
When it says Class II or lower does it mean Class 2 or higher permeability (class 3) or does it mean class 2 or lower permeability (class 1)? I assumed that for walls to dry to the inside you want the highest permeability. It seems to me to use a class 2 smart membrane is more risky with a vapor impermeable exterior foam than using a class 3 vapor retarder (latex paint) or am I missing something?
By "Class II (or lower)" Lstiburek means Class II or Class I. Use the higher option. IMO, a smart II/III retarder is less risk than a fixed class II or III - less wetting or more drying.
Sounds like EPS or limited inside insulation are viable options for you.
Jon,
I'm sorry I'm really confused now. The article side bar 2 - with the foil faced polyiso on the outside I'd have a wall per point 7 meaning my wall has to dry to the inside.
Class 1 vapor retarder is 0.1 perm or less
Class 2 vapor retarder is between 0.1 and 1.0 perms
Class 3 vapor retarder is between 1.0 and 10.0 perms
How does using a class 1 vapor barrier help me dry to the inside? Because of the 2.5" of exterior insulation my sheathing won't dry to the outside. I've set up the insulation so that the sheathing is always above the due point of the inside air. Surely I should be looking for a class 3 vapor barrier to allow my wall to dry to the inside should it ever get wet?
I'm assuming my wall will get wet from the outside and not so much from the inside (our climate is very dry to the point I'm possibly going to add a humidifier).
Steve
Steve,
My advice differs from Jon's. If you have an adequate thickness of exterior rigid foam, you don't need an interior vapor retarder. But an interior air barrier is always a good idea.
> How does using a class 1 vapor barrier help me dry to the inside?
Not sure where this came from - but there is no need to use a class 1 (so don't).
> I've set up the insulation so that the sheathing is always above the due point of the inside air.
Probably not - you should review your calculations on this. Use the lowest Winter temperature you expect to see and a tolerably comfortable indoor humidity.
Jon,
The reason I mentioned class 1 vapor barrier was because the link you gave referred to Class 2 or lower, implying that lower was better when in actual fact it might be worse in the case of scenario 7.
I'll be interested in your input on my calculations. I have an inside design temperature of 70F outside design temperature of 22F (average of 3 coldest months average temperature). With R21.4 fluffy insulation and 2.5" of polyiso de-rated to R-5 for R-12.5 of exterior continuous insulation I have the inside of my sheathing coming in at about 39F. I had 5 different cheap hygrometers about my house and 30% RH was about as humid as it got. If I assume 30% RH inside then that has a dew point of 37F.
Typically we keep our house at 65F in the winter and using that number we'd be at 38% RH before we hit the 39F dew point.
Even if on some days I do get some condensation on the sheathing the thought process is there is plenty of time to dry out to the inside.
Do you disagree with this logic? I'm interested in your input as I want to ensure I have a robust wall design.
> implying that lower was better
I've seen nothing that implies that Lstiburek believes that the lower end of his recommendation is better. IMO, yes, it would be worse (which is why I wrote "Use the higher option").
Re dew point: earlier you wrote "always above", so let's use 0F outside. So the sheathing is sometimes 24F. That's well below your dew point. A smart membrane will allow the accumulated moisture to dry when the weather warms up. More than .1 (1 is better) external perms will also allow provide a useful drying path.
Re inward drying: for some data on Class III performance with exterior foam, see Table 8 here (Class III usually has *more* peak moisture than even Class I): https://www.buildingscience.com/sites/default/files/migrate/pdf/BA-1316_Moisture_Management_for%20High_R-Value_Walls_rev.pdf
You've paid for a double wall. I'd install the additional insulation that it could (with small changes) allow. But the modifications that result in ~R34 are also fine.
> our climate is very dry
Pay as much attention to air sealing as the above issues and you will be fine with Lstiburek's recommendations, Martin's or mine (a subset of Lstiburek's that IMO selects the better of his options).
Martin,
Do you have any additional feedback on my proposal to use open cell spray foam up to about R21 maintaining my exterior foam to interior foam R ratio while leaving the gap open between the inner wall and the outer wall i.e. no sheet rock on the 2x6 outer wall.
Jon,
Any comments on my design parameters and logic?
Steve
Steve,
You can substitute open-cell spray foam for the BIBS insulation that you originally intended to install. That will work.