Best plane for air barrier in a double wall, and easiest way to frame said wall
Please see the attachment. I’m working on a double wall assembly design and I’d like people’s thoughts on two issues, air sealing and framing the double wall. My experience is largely desk-bound. So I look to builders to help me sort out the most buildable solutions. First, air sealing:
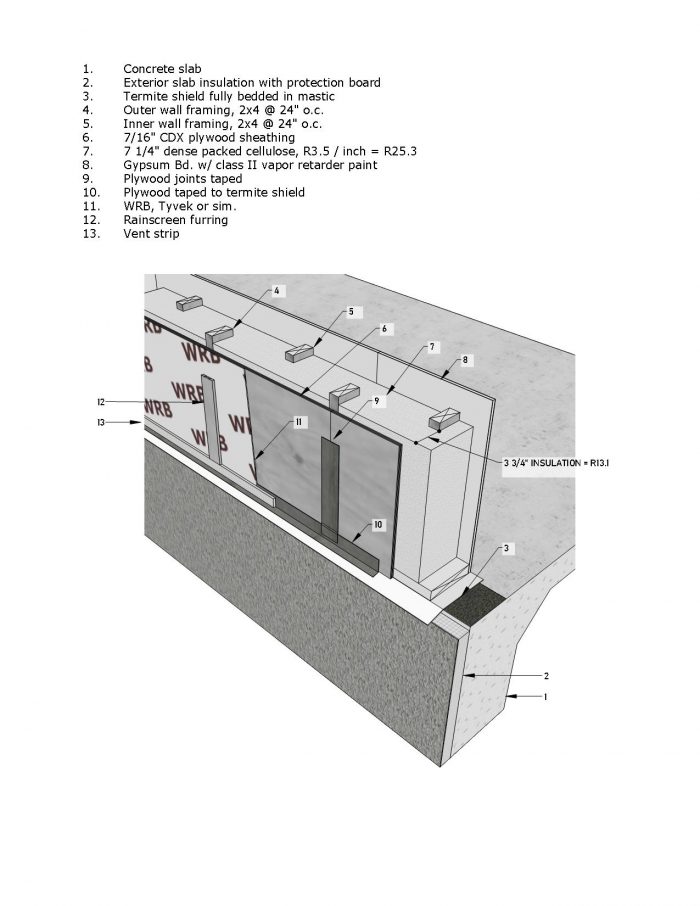
I’m opting for taping the exterior face of the sheathing. It seems to me a lot easier to air seal at the exterior than at the interior because I can avoid all the interior penetrations, plugs, switches, partition intersections, etc. Integration with flanged windows and doors is also in line with what most builders find familiar.
I’m thinking to tape the sheathing at the bottom to the termite shield as well, though I’ll also set the sill plate on 2 beads of acoustic sealant (not shown in the attached drawing). The sheathing will be plywood, not OSB. At this time I’m not concerned about the wall-eave interface. I’ve got a solution for that.
My concern about this approach: Placing the air sealing plane at the exterior means that, with the house under positive pressure, air could move through the wall to the inside face of the exterior sheathing, the cold side of the wall. Is this a danger for condensation? Is there significantly less risk if I put the air barrier at the inside wall face?
That gets to vapor movement. This detail is intended for stock plans which could potentially be built in any IECC climate zone. I’ve calculated the U-value of the assembly and it meets the requirement for all zones. In zones 1-5 a simple latex paint over gypsum board will satisfy the class III vapor retardant option since I have vented cladding on the exterior. In zones 6-8 a class II vapor retardant paint can be used on the interior, though I think the continuity of the insulation may mean we can still go with regular latex paint as class III covering. (IRC 2021 Table R702.7(3)) I can cover that situation with a note on the detail.
On to framing. I’ve drawn the detail as if the wall has 2×8 sill and top plates, with 2 independent rows of 2×4 studs @ 24” o.c. This would be built flat on the ground, as a single assembly and tilted up into position, like standard wall framing, in one operation. I’d probably also use 2×8 studs at door and window openings, for simplicity of detailing. Alternatively, instead of using 2×8 plates, I could just use 2×4 plates and have the inner and outer walls be independent of each other, and be raised independently, as 2 separate walls.
Which would be more buildable, easier, more economical from a framing contractor’s perspective? There are structural advantages to the first option, which is my preferred at this point. But if there is a big difference in constructibility / labor costs, I’ll go with the cheaper.
GBA Detail Library
A collection of one thousand construction details organized by climate and house part


Replies
Making your primary air barrier a high quality WRB with all joints, staples and penetrations taped, mechanically fastened to your exterior sheathing is the simplest and most cost effective option in most cases.
Your Vapour Barrier can also act as a secondary air barrier on the warm side of the wall.
As for how to frame the double stud wall, it all depends on your climate, local labour availability and skill and your performance goals.
I cold climate Alberta for net zero on site energy and Passive House homes a double stud wall of two 2x4 walls with a total depth of 12-18" is common. Use a smart vapour barrier on the inside of the studs. It would be better to have it protected by a service cavity, but that adds a third row of studs. You can try an put the vapour barrier on the outside of the inner stud, to create an installation cavity, but that gets tricky.
Make the inner stud structural and then the rim joists can stop at the outside of the inner stud leaving lots of space for exterior insulation at the rim joists. You will need some gussets or other structural connection between the inner load bearing stud and the outer stud with the sheathing.
The offset 2x4 studs on a 2x8 plate would work for warmer climates, you will end up with more studs then needed as at every opening you will have to add a stud on each side.
If you are only going for a 2x8 thick wall why not just use T-studs and dense pack them with cellulose?
https://www.tstud.com/barenaked-tstud
"Placing the air sealing plane at the exterior means that, with the house under positive pressure"
Doesn't matter where you put the air barrier, if your wall leaks, positive pressure will push air into it which can cause moisture to condense on the cold sheathing. Detailing the sheathing as the main air barrier is very effective, easy to do and robust as trades are less likely to punch holes through it. Detailing the drywall as a backup air barrier doesn't hurt and it is also easy to do (spec caulk around the perimeter and air tight device boxes).
I have only done a staggered stud wall, so can't help you much for constructability. With a staggered stud, once you add in door and window openings, the staggering doesn't help that much. You end up with these orphan studs on one side or other side beside the opening framing which looks strange and a bit annoying to measure and lay out. I can see why most double studs are constructed as two separate walls.
I think at 2x8 thickness, the extra labor of double stud is not really worth it. Plus you can't support a lot onto a 2x4 wall. I would go for 2x8 24" OC with high density batts/dense pack and call it a day. Slightly lower R value but not enough to really effect your energy budget.
I think for thicker walls the better option is to use I-joists. The thin OSB web is a small thermal bridge and it can be built pretty much the same a standard wall. Does add a bit of cost but it can save a fair bit of labor. Since each stud bay is partitioned off, it is also much easier to dense pack. The one concern is you always need an engineer to stamp the design.
Thanks. I'll stick with the air sealing at the outer plane, and as you suggested, I'll spec the drywall/caulk/air tight boxes as a back up.
I've come to the same conclusion that staggered studs doesn't help all that much unless you have a very long run of wall with no openings. I find that in my designs there are mostly only 2-3 stud bays between openings.
I like the idea of i-joists as studs. There are also these great thermally broken studs that have recently become available. https://www.tstud.com/ Matt Risinger did a video about them.
Unfortunately I need to stick with materials that are readily available around the country. And I need to avoid specific manufacturers if possible. So until something like the t-studs are carried in the big box stores it's not really an option for me.
jollygreenshort guy,
Stepping back a bit. Does it make sense to design one wall assembly for every climate, when that means it will not be optimized for most? Or to include details like the air-sealing integrated with termite shields, when many climate zones don't have termites?
That question informs the choice of wall construction too. To me the chief benefit of using double studs is that they can be moved apart to create various width walls based on the desired R-value. If you place them on a 2"x8" plate you lose that ability.
I think you need to design a wall system that allows some modification for the differing conditions of each climate.
Thanks for the thoughts on the wall plates. I'll probably go with separate walls.
Unfortunately, the legality of doing your own design varies greatly with jurisdiction,
in some you must have a registered architect and/or engineer, in others DIY is totally
legal. Personally, I am very fond of DIY, I believe it promotes understanding and rational
thinking. Check with your local bureaucrats before proceeding!
If you have the misfortune to be in a location requiring a professional stamp you have
a few choices. You can find a professional with whom you feel comfortable and work
together or simply hire one who is willing and capable of producing an acceptable design
without really working together - or last (Bleah!), accept a cookie cutter house from a local builder.
If you happen to reside in one of these bureaucratic jurisdictions you might want to take
a look at the relatively inexpensive stock plans produced by Passive Design Solutions,
a Canadian firm which has been involved with the design and build of hundreds (mostly
in Canada - some in the U.S.). Here are a couple links.
https://www.passivedesign.ca/
https://www.youtube.com/watch?v=_OtF0osQ0Cc
Note: I have never met or had any contact with any member of this firm - but, am generally impressed with what I see on the web.
Good Luck !!
"Unfortunately, the legality of doing your own design varies greatly with jurisdiction, in some you must have a registered architect and/or engineer, in others DIY is totally legal. "
I'm partnering with a company which has sold stock plans online for over 20 years. The legal issues were resolved long ago.
Thanks for the link to Passive Design. I'm looking at it now and enjoying it very much.
If I happen to have made an incorrect assumption above -
(if you happen to be a registrant in architecture or engineering).
please forgive me for telling you what you already know.
Lots of helpful replies here. My thanks to everybody, even if I didn't directly respond to your post.
I recently built a stagger stud as follows, and thought it worked quite well:
-Exterior 2x4 wall with structural sheathing, studs spaced 24" O/C. If you start your layout from the same location your floor joists, studs and roof trusses can all line up vertically, which is nice.
- If I were to do it again, I would tape the sheathing as primary air barrier. I chose to detail the WRB as the air barrier, which also works. Either way, as you mentioned, sealing the framing to foundation is a good idea.
- I then built a second 2x4 wall interior to the first structural wall, plates spaced 1/2" apart. Studs are staggered from the first wall. The framing around doors and windows then has no thermal bridging, and the insulation puffs up enough that there is no actual gap in insulation between the walls.
- I ran a strip of WRB between both top plates to be tied into ceiling poly. This means you have to size the strip to make sure there is enough hanging into the interior to account for the second wall.
- The 1/2" gap at window and door openings is then taped.
I designed the wall this way to try it out, and because I got a good deal on a lift of 8' 2x4, and I wanted to use them everywhere possible.
Of note, I am not a big time production builder, I like to consider it more like "gentleman's construction". I think a much faster way to go would be to frame a 2x4 stagger stud wall on a 2x8 plate, and use the 2x8s at door and window openings like you say. You would be losing a little to thermal bridging, but not a ton.
-
what is your wall-eave interface solution?